
Manual

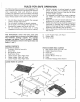


ASSEMBLY OF HOPPER BAG
Refer to carton contents figure on page 2 and figure
2 on page 3 for hardware needed to assemble
hopper bag. See page 2 to identify both upper and
lower hopper tubes.
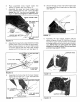
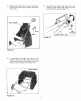
Insert the left hand upper hopper tube through
the hopper bag stitched flaps, starting at the
center cut out in the top of the hopper bag, See
figures 9, 10 and I) Repeat for the right hand
upper hopper tube.
CENTER CUT OUT
START HERE
UPPER HOPPER TUBE
(LEFT HAND SHOWN)
/ /
BAG FLAP
FIGURE 9
Locate the hole on side of both upper hopper
tubes. See figure '10 The bag wilt require
piercing at these holes in a later step, Refer to
step 12 on page 8,
HOLE ON SIDE OF BOTH
UPPER HOPPER TUBES
COVERED BY BAG FLAP
FIGURE 10
__//
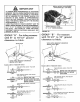
FIGURE 11
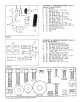
Slide the two upper hopper tubes together,
as shown in figure 11. Line up the center holes,
UPPER HOPPER TUBES
4o Secure the upper hopper tubes with 1/4" x 1"
curved head bolt and 1/4" hex loci< nut. See
figure 12o
1/4" HEX LOCI( NUT /
(INSIDE)
/
"_" x 1" CURVED HEAD BOLT
(OUTSIDE)
FIGURE 12
,,
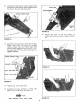
Assemble the two lower hopper tubes as shown
in figure t3,, Secure with 1/4" x 1" curved head
bolt and 1/4" hex lock nut° See figure 13
1f4" x 1"
CURVED HEAD BOLT
FIGURE 13