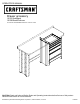
OPERATOR’S MANUAL Drawer accessory 10133 Red/Black 10139 Black/Platinum For use with CRAFTSMAN workbench 10132 or 10138 CAUTION: Read and follow all Safety Rules and Operating Instructions before first use of this product. Retain this document for future reference. Distributed by Sears Brands Management Corporation.
SAFETY SAFETY WARNINGS AND CAUTIONS: • Use appropriate safety equipm ent when using power and hand tools. Failure to do so m ay cause personal injury or product dam age. • Use adequate m anpower when assem bling and m oving this unit. Failure to do so m ay cause personal injury or product dam age. • DO NOT stand on this product. You m ay fall which m ay cause personal injury. • DO NOT m ount this product on a truck bed or any other m oving object. This m ay cause personal injury or product dam age.
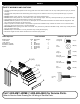
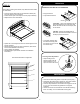
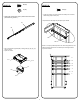
ASSEMBLY STEP (2): AA(10) STEP (1): BB(10) GG(2) CC(10) Note: Drawer kit may be installed on left or right side of workbench. Installation is shown on right side. • Ensure that the leveling screws on the work bench are extended to at least (1.5) inch, (38 mm). See operation section; Leveling foot adjustment. • Lean side panel (A) at an angle to fit under the rails on the workbench. • Line up the side panel with notches on the top rails of the workbench.
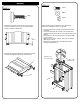
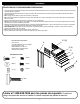
EE(20) STEP (3): STEP (4): DD(20) FF(20) • Install (10) frame slides (Gu) on workbench frame, as shown, using (2) (DD) in each (Gu). • Separate slide parts. (See drawer removal instructions.) Workbench top removed for clarity. Gu Gd Gu DD • Attach (2) drawer slides (Gd) to each drawer (C, D, E, and F) as shown. • Wrench tighten. Release NOTE: Drawers may be organized in several configurations, below is the slide positioning for the recommended drawer configuration.
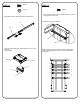
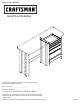
OPERATION STEP (5): REM OVING AND INSTALLING DRAW ERS: Note: Before inserting each drawer, fully extend the frame slides for that drawer. • Insert the drawer slides (Gd) into the workbench slides (Gu) and push all of the way to the back. • Pull the drawer open until it stops to ensure proper assembly. • Repeat for the rest of the drawers. • Empty the drawer. • Fully extend the drawer.
MANUAL DE USUARIO GAVETA ACCESORIA Sírvase indicar la siguiente información que encontrará en el dibujo suministrado de la pieza de servicio. Número de modelo: ________________________ Descripción del modelo: _____________________ *La unidad que adquirió puede variar con respecto a la ilustración. Precaución: Lea y siga todas las reglas de seguridad e instrucciones para el manejo antes de usar la unidad por primera vez. Conserve este manual para referencia futura.
SEGURIDAD ADVERTENCIAS Y PRECAUCIONES DE SEGURIDAD: • Utilice el equipo de seguridad adecuado cuando emplee herramientas eléctricas. De lo contrario, podría causarle lesiones personales u ocasionar daños al producto. • Utilice el personal adecuado para el montaje y el traslado de esta unidad. De lo contrario podría ocasionarse lesiones personales o dañar el producto. • NO se ponga de pie sobre la unidad. Podría caerse y lesionarse.
ENSAMBLAJE PASO (2): AA(10) PASO (1): BB(10) GG(2) CC(10) Nota: El kit de gaveta puede montarse al lado izquierdo o derecho. La instalación se ilustra al lado derecho. • Compruebe que los tornillos de nivelación en el banco de trabajo existente sobresalgan al menos 1,5 in. (38 mm). (Refiérase al ajuste de la pata niveladora). • Instale (A) utilizando (6) AA, (6) BB, y (6) CC. Nota: (A) encaja en las muescas en los largueros superiores del banco de trabajo.
EE(20) PASO (3): PASO (4): DD(20) FF(20) • Instale (10) (GU) en el marco del banco de trabajo como se ilustra, utilizando (2) (DD) en cada (GU). • Separe las piezas de las guías. (Véanse las instrucciones para retirar las gavetas.) La tapa del banco de trabajo se quita para mayor claridad. Gu Gd Gu DD NOTA: Los cajones pueden disponerse en varias configuraciones, más abajo se indica la situación de la corredera para la configuración de cajón recomendada.
FUNCIONAMIENTO PASO (5): REM OCIÓN E INSTALACIÓN DE GAVETAS: • Inserte las correderas de las gavetas (GD) en las correderas del banco de trabajo (GU) y empuje completamente hacia la parte posterior. • Saque totalmente el cajón hasta que haga tope para asegurarse de que está adecuadamente instalado. • Repita en el resto de las gavetas. • Vacíe la gaveta. • Abra completamente la gaveta.
6