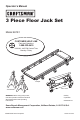
Operator’s Manual 3 Piece Floor Jack Set Model 48181 CUSTOMER HELP LINE Parts and Questions 1-888-332-6419 此处贴标 15.24CM X 10.16CM 8:00 AM - 4:45 PM Central Time Monday- Friday Creeper Jack Stands WARNING: Before using this product, read this Operator’s Manual and follow all its Safety Rules and Operating Instructions. Floor Jack • Safety • Operation • Maintenance Sears Brands Management Corporation, Hoffman Estates, IL 60179 U.S.A. www.craftsman.
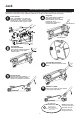
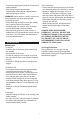
Jack AIR PURGE PROCEDURE IMPORTANT: BEFORE FIRST USE, perform the following Air Purge Procedure to remove any air that may have been introduced into the hydraulic system as a result of product shipment and handling. Purge Air Insert Handle With a flat blade screwdriver, See “ ASSEMBLY” on page 4 to loosen the oil fill screw assemble handle. Loosen handle about halfway up to release socket screw. Insert end of handle trapped air from into handle socket. Tighten screw. the system.
CRAFTSMAN LIMITED WARRANTY SAFETY INSTRUCTIONS CRAFTSMAN LIMITED WARRANTY FOR ONE YEAR from the date of sale this product is warranty against defects in material or workmanship. WITH PROOF OF SALE a defective product will be replaced free of charge. For warranty coverage details to obtain free replacement, visit the web page: www. craftsman.
Pin ASSEMBLY Assembly Handle Assembly • Refer to Picture 1 when performing this step. Align Quick Disconnect pushpin in upper handle piece with attachment hole in lower handle piece. Push upper piece into lower piece until pushpin pops through hole. • Sufficiently loosen the Handle Socket Screw to insert the assembled handle (Picture 2). • Line up the square shaped hole located at the bottom of the handle over the square bolt inside the Handle Socket. • Lower the handle onto the bolt.
• Continue to pump jack handle to lift vehicle to desired height. • After lifting, support the load with appropriately rated vehicle support stands before working on vehicle. Rust Prevention: • Check ram and pump plunger on the Power Unit Assembly every two months (or sooner, based on usage) for any signs of rust or corrosion. Lift the jack as high as it goes and look under and behind the lifting arm.
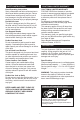
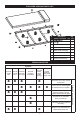
EXPLODED VIEW AND PARTS LIST Oil Fill Screw # Description Qty. 1 Saddle 1 2 Lift Arm 1 3 Side Plate Assembly 1 4 Front Wheel 2 5 Rear Caster Assembly 2 6 Handle 1 7 Handle Socket 1 8 Power Unit Assembly 1 TROUBLESHOOTING Symptom Jack will Jack will Jack will not lift not hold not lift to load load full height X X X X X X X X Poor jack Handle lifting, raises by pump itself while feels spongy under load X X X Oil level is low in jack. Add oil as required.
Jack Stands CRAFTSMAN LIMITED WARRANTY CRAFTSMAN LIMITED WARRANTY FOR ONE YEAR from the date of sale this product is warranty against defects in material or workmanship. WITH PROOF OF SALE a defective product will be replaced free of charge. For warranty coverage details to obtain free replacement, visit the web page: www. craftsman.com/warranty This warranty applies for only 90 days from the date of sale if this product is ever used while providing commercial services or if rented to another person.
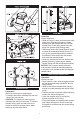
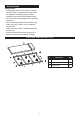
Inspect jack stand before each use. DO NOT use if bent, broken or cracked components are noted. To prevent corrosion, clean as needed and wipe with an oily cloth. Keep in a dry area when not in use. ASSEMBLY Assembly INSPECT STANDS BEFORE EACH USE. DO NOT USE IF BENT, BROKEN OR CRACKED COMPONENTS ARE NOTED. ENSURE THAT ALL PARTS MOVE FREELY. • Align the ratchet side of the ratchet column with front of jack stand. See Picture 1.
Creeper ASSEMBLY Assembly • For each caster, unscrew the cap and washer from the caster pin (see first picture below). • Insert the pin through the hole on the creeper frame. Place the washer and cap onto pin. • Use the provided hex wrench to screw cap securely onto pin (see second picture below). SAFETY INSTRUCTIONS Read Operating Instructions Study, understand and follow all instructions in this manual before operating the creeper.
MAINTENANCE Maintenance • Periodically inspect for corrosion, damage, cracking, bent or missing parts. Stop using the creeper immediately If any of these conditions are found. Rectify before using. • Do not expose to prolonged wet or corrosive conditions. • Clean all surfaces after each use with a dry clean cloth only. Store in a dry, protected environment. • Keep work area clean. Cluttered work area invite injury. • Failure to heed this warning may result in personal injury and/or property damage.
NOTE 11
For Help Line, Parts and Service: Call 8:00 am - 4:45 pm, CT, Monday - Friday 1-888-332-6419 Para la linea de ayuda, partes y servicio: Llame de 8:00 am - 4:45 pm, CT, Lunes-Viernes 1-888-332-6419