
Power Hammer User Manual

GroutRemoval Kit53052
Thegrout removalattachment comes completely
assembled and ready to use. Use the 1/16" bit that
comes with the grout removal kit for tiles spaced
more than 1/16"apart. If yourtiles arespaced more
than 1/8"apart, it isrecommended that you use the
53166 (1/8") bit (sold separately).
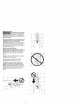
Note:If the bit is toowide for the spacing between
your tiles, you may damageyour tile or the grout
removal bit,
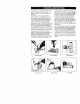
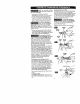
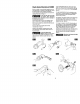
Step1: Removethe housing cap fromthe tool.
Step2: Insert the grout removal bit into your rotary
tool.
When insertingthe #53166 grout
removalbit intoyourrotary
powertool, be sure thai the bit is securewithinthe
"jaws" of the collet. Usethewrench to tighten the
collet nut to preventthe bit from loosening within the
collet. Do not useyour Craftsman Chuck,#53050,
with the grout removal bits.
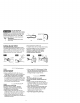
Step3: Screw thegrout removal attachment onto the
rotary tool.
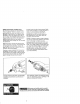
Step 4: Adjust theattachment and bit to the desired
cutting depth.
GroutRemovalAttachmentCuttingDepth
Adjustment
TheMulti Slide Depth Adjustment has increment
markings of 1/8" (3,2 mm). These markings are for
referenceonly in identifying the depth of your desired
cut. The multiple channels of the depth adjustment let
you choose the orientation of the attachment to the
tool. Be sure to securelytighten the screw within one
of the multiple channel positions.
To set cuttingdepth:
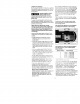
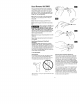
Cleaning Grout:
Donot removegrout more than 1/8" below the face
surfaceof the tile. Adjust the Multi Slide Depth
Adjustrnent and bit so that no more than 1/8" of the
bit extends beyondthe base of the attachment.
1/8"[_
3,2ram
Alter removing 1'8" of grout, regrout to tile level.Seal
the new grout.
_=====-
_,_-_,_ i( _\
Removing Groutto Replace A Broken Tile:
Remove all of tile grout surrounding the broken tile.
Adjust the Multi Slide DepthAdjustment so that no
more than t/8" of the bit extends beyond the base of
the attachment. Remove grout at a depth no more
than 1/8"at a time. You may needto adjust the Multi
Slide Depth Adjustment by 1/8" increments (reference
the 1/8"incremental white markings on the Multi Slide
Depth Adjustment) and makeseveral passes until all
the grout is removed.
When removing grout deeper into the grout line, you
may strike hidden objects like screw heads, mortar,
tile cement or nails that maycause tile bit to bind.
overheat or break. Reducethe tool speedand work
tllrough it slowly, making severalpasses. Incase of
screws or nails, remove the grout around the areaas
the bit will not cut through them.
18