Operator's Manual ® AC Generator 3600 Watt Model No. 580.323610 HOURS: Mort. - Fri. 8 a.m. to 5 p.m. (CT) ! ii_[i WARNING [i1 .,,ADVERTENCIA Before using this product, read this Antes de utilizar el producto, lea este manual and follow all Safety Rules manual y siga todas las Reglas de and Operating Instructions. Seguridad e Instrucciones de Uso. Sears, Roebuck Visit our Craftsman Part No. 198138GS and Co., Hoffman website: [)]'aft ((05'08,2006) Estates, www.craftsman.com IL 60179 U.S.
WARRANTY .............................. SAFETY RULES 2 ......................... FEATURES AND CONTROLS 3-4 ................ 5 ASSEMBLY ............................. 6-8 OPERATION ........................... 9-13 SPECIFICATIONS MAINTENANCE ......................... 14 ........................ 15-18 STO RAG E ............................... ONE-YEAR TROUBLESHOOTING NOTES ...................... 20 ............................. SCHEMATIC/WIRING REPLACEMENT DIAGRAM 21 & 33 ..........
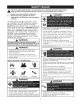
_iL This safetymessages alert symbol, it is used alert you to potential injury hazards. Obey isallthe safety that follow this to symbol to avoid possiblepersonal injury or death. DANGER [ ................... =_-!] familiar Read thiswith manual become your carefully generator. and Know its applications, its limitations, and any hazards involved. The safety alert symbol (,A) is used with a signal word (DANGER, CAUTION, WARNING), a pictorial and/or a safety message to alert you to hazards.
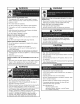
WARNING WHEN ADDING OR DRAINING Turn generator before FUEL OFF and let it cool removing pressure WARNING fuel cap. Loosen at least WHEN ADJUSTING GENERATOR 2 minutes cap slowly to relieve • Disconnect in tank. place Fill or drain fuel tank outdoors. DO NOT overfill If fuel spills, tank. Allow WHEN space for fuel expansion.
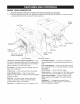
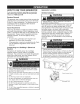
KNOW YOUR GENERATOR Read thethe Operator's Manual and sgenerator afety rules before operating generator, Compare illustrations with your to familiarize yourself your with the locations of various controls and adjustments, Save this manual for future reference, Rocker Switch Fuel Tank \, I StatStation Recoil Starter TM Choke Lever Cleaner Oil Fill Cap/Dipstick 120 Volt AC, 20 Amp Duplex Receptacles Spark Arrester Muffler ',, \ Circuit Breakers Grounding Fastener 120 Volt AC, 20 Amp, Duplex Recept
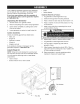
YourCraftsman generatorrequiressomeassembly andis readyforuseonlyafterit hasbeenproperly servicedwiththerecommended oilandfuel. • Safety glasses 1. Tip generator so that engine end is up. 2. Slide axle through both mounting brackets. the Generator 3. Place a wheel on each side as shown below in A. 4. Place a washer on axle and then place an e-ring in axle groove. 5. Install e-ring with pliers, squeezing from top of e-ring to bottom of axle. 1. Set the carton on a rigid flat surface. 2.
BEFORE STARTING GENERATOR Add Engine THE Oil CAUTION! Any attempt to crank or start the engine before it has been properly serviced with the recommended oil may result in an engine failure. 1. Place generator on a level surface. 2. Clean area around oil fill and remove yellow oil fill cap. NOTE: See the section "Oil" on page 16 to review oil recommendations. Verify provided oil bottle is correct viscosity for current ambient temperature. 3.
FreshStart TM Fuel Cap 3. Remove tab to expose membrane. Adding fuel preserver helps keep fuel fresh and carburetors clean for easier starting, all season long. This new fuel cap automatically drips concentrated fuel preserver into your fuel tank. DANGER IMPORTANT: DO NOT remove the silver foil seal on the opposite side. 4. Reinstall fuel cap on fuel tank. If SWALLOWED, call physician In case of emergency, and call 1-800-424-9300 immediately.
HOW TO USE YOUR GENERATOR Generator If you have any problems operating your generator after reading the manual, please call the generator helpline at 1-800-222-3136. Generator Clearance System Special Requirements There may be Federal or State Occupational Safety and Health Administration (OSHA) regulations, local codes, or ordinances that apply to the intended use of the generator. Please consult a qualified electrician, electrical inspector, or the local agency having jurisdiction.
To Start The Engine WARNING Disconnect all electrical loads from the generator. NEVER start or stop engine with electrical devices plugged in and turned ON. Follow start instruction steps in numerical order: 1. Make sure unit is on a level surface. iMPORTANT: Failure to start and operate unit on a level surface will cause the unit not to start or shut down during operation. 2. DO NOT touch Turn fuel valve to "On" position. Fuel valve handle should be vertical (pointing toward ground) for fuel to flow.
CORD SETS AND RECEPTACLES Use each receptacle to operate 120 Volt AC, single-phase, 60 Hz electrical loads requiring up to 2,400 watts (2.4 kW) at 20 Amps of current. Use cord sets that are rated for 125 Volt AC loads at 20 Amps (or greater). CAUTION • NEVER attempt to power amperage than generator • DO NOT overload Generator". GENERATOR a device requiring more or receptacle can supply. the generator.
COLD WEATHER OPERATION WARNING Under certain weather conditions (temperatures below 40°F [4°C] combined with high humidity), your Craftsman generator may experience icing of the carburetor and/or the crankcase breather system. To reduce this problem, you need to perform the following: Make sure generator has clean, fresh fuel. Operate 2. Open fuel valve (turn valve to open position). 3. Use SAE 5W-30 oil (synthetic preferred, see page 16).
DON'T OVERLOAD GENERATOR Capacity You must make sure your generator can supply enough rated (running) and surge (starting) watts for the items you will power at the same time. Follow these simple steps: 1. Select the items you will power at the same time. 2. 3. 4. Plug in and turn on the next load. 5. Again, permit the generator to stabilize. 6. Repeat steps 4 and 5 for each additional load. NEVER add more loads than the generator capacity.
ENGINE TECHNICAL INFORMATION PRODUCT This is a single cylinder, overhead valve(OHV), air cooled engine. It is a low emissions engine. Generator In the State of California, Model Series 120000 engines are certified by the California Air Resources Board to meet emissions standards for 125 hours. Such certification does not grant the purchaser, owner or operator of this engine any additional warranties with respect to the performance or operational life of this engine.
MAINTENANCE SCHEDULE Follow the hourly or calendar intervals, whichever occurs first. More frequent service is rec uired when operating in adverse conditions noted below.
StatStation ENGINE MAINTENANCE TM The StatStation TM displays the nominal load on generator based on output frequency. It also has a built in maintenance reminder. WARNING Wattage Monitor The LED display will indicate 0-95% nominal load.The display will flash at 90% nominal load and above. If above 95% nominal load the display will flash "OL" (meaning 'overload'). When load returns to within normal range, the display will automatically resume nominal load indication.
CheckingOil Level Oillevelshouldbe checkedpriortoeachuseor at leastevery5 hoursof operation,Keepoillevel maintained, 1. Makesuregeneratoris ona levelsurface, 2. Removeoildipstickandwipedipstickwithclean cloth,Replaceandtightendipstick,Removeand andcheckoillevel, 3. Verifyoil is at"Full"markondipstick.Replaceand tightendipstick. AddingEngineOil 1. Makesuregeneratoris ona levelsurface. 2. Checkoillevelas described in "Checking Oil Level". 3.
Clean/Replace Clean and inspect the spark an'ester as follows: 1. To remove muffler heat shield from muffler, remove four screws that connect guard to muffler bracket. Spark Plug Change the spark plug every 100 hours of operation or once each year, whichever comes first. This will help your engine to start easier and run better. 1. Clean area around spark plug. 2. Remove and inspect spark plug. 3. Check electrode gap with wire feeler gauge and set spark plug gap to 0.030 inch (0.76ram) if necessary.
GENERAL Change Oil The generator should be started at least once every seven days and allowed to run at least 30 minutes. If this cannot be done and you must store the unit for more than 30 days, use the following information as a guide to prepare it for storage. While engine is still warm, drain oil from crankcase. Refill with recommended grade. See "Changing Engine Oil" on page 17.
Problem Cause Correction 1. 1. Reset circuit breaker, One of the circuit breakers is open. Engine is running, but no AC output is available. Engine runs good at no-load but "bogs down" when loads are connected. Engine will not start; or starts and runs rough. Engine shuts down when running. 2. Fault in generator. 2. Contact Sears service facility, 3. Poor connection or defective cord set. 3. Check and repair, 4. Connected device is bad. 4.
CRAFTSMAN 3600 Watt AC Generator 580.
CRAFTSMAN 3600 Watt AC Generator 580.323610 ,-j :_[,N 44 :10_ : [ 0 i ...................................................................
CRAFTSMAN 3600 Watt AC Generator Main Unit m E×ploded 580.
CRAFTSMAN Main Unit 3600 m Parts Item 1 2 3 4 5 6 7 8 9 10 11 12 13 14 15 16 17 18 19 20 21 22 23 24 25 26 31 34 35 37 40 Part # 198816GS 194150GS 67989GS 186058AGS NSP * * 96796GS * * 47480GS * 194330GS 191785GS 697815 * 188301GS * 83083GS B4986GS 194153GS 86494GS 86292GS 198037GS 191190GS 74908GS 196830GS 195422GS 791745 56893GS 199433GS 199284GS 41 192980GS 44 198226GS 45 198912GS 48 195373GS 50 188333GS 51 194799GS 52 189235GS 54 196908GS 55 197798GS 58 197470GS 59 * 900 NSP Parts Not Illustrated
CRAFTSMAN Control 3600 Watt AC Generator Panel m Exploded View 580.323610 and Parts List 14 5 4 4 \ 5 \ 12 2 \ 10 9 7 item 1 2 3 4 5 6 7 8 9 10 11 12 13 14 Part # 196898GS 197004GS 188890GS 197731GS 189165GS 197729GS 197958GS 84198GS 75207DGS 197805GS * 192241GS 22694GS 82308GS Description PANEL, Control COVER, Outlet Flip COVER, Back Panel OUTLET, 120V, 15/20A Dplx NUT, 5/32 Pal MODULE, Led SCREW, 3 x 6, Tapping CAP, Breaker BREAKER, Circuit, 15A BAR, Retaining PPHMS, M3- 0.5 x 18 SCREW, 3.
CRAFTSMAN Alternator 3600 Watt AC Generator m Exploded View & Parts 580.323610 List \ \ 1 4 \\ \\ \ 5 \ \ \ \ \ \ \ J \ \ \ \ \ \, 2 6 2 7 \ \ \\ \ \ \ \ \ \ 11 \ 7 \ \, I0 item 1 2 3 4 5 6 7 8 9 10 11 12 Part # 186059GS 192164GS 199047AGS 186060GS 86308JGS 91825GS 66849GS 22694GS 81917GS 193428AGS 198779GS 65791GS Description ADAPTER, Mounting, Alternator ROTOR (Includes Item 12) STATOR RBC, with O-Ring (p/n 189197GS) HHCS, M6- 1.
CRAFTSMAN 3600 Watt AC Generator Wheel Kit m Exploded item 1 2 3 4 5 6 7 View and Parts Part # 196517GS 191267NGS 191265GS * B1764GS 67989GS * 580.323610 List Description WHEEL AXLE E-RING WASHER, 5/8" SUPPORT, Wheel Kit NUT, M8, Flange Serrated HHCS, MS- 1.
ENGINE, 7.
ENGINE, 7.
ENGINE, 7.
ENGINE, 7.
Sears, Roebuck and Co., U.S.A. (Sears), the United States the California Environmental Air Resources Protection Agency Board (CARB) and (U.S.EPA) Emissions Control System Warranty Statement (Owner's Defect Warranty Rights and Obligations) The California Air Resources Board (CARB), U.S. EPA and Sears are pleased to explain the Emissions Control System Warranty on your small offroad engine (SORE).
Emissions Durability Information Engines Period and Air Index On Your that are certified Resources display Board Engine to meet (CARB) information Emissions the California Tier 2 Emission regarding Label Air the Emissions The Emissions hours of actual accordance compliant, assuming with the Operating The following must Durability Period categories Moderate: Engine 125 hours of actual proper labels.
GARANTIA.............................. REGLASDESEGURIDAD............... CONOZCA SUGENERADOR................ MONTAJE............................ FUNClONAMIENTO .................... ESPECIFICACIONES ...................... MANTENIMIENTO ...................... GARANTiA Si el generador devuelvalo Estados Durante falla debido a cualquier Unidos Garantia alquiler.
,_ lesion Este espara el simbolo el personal. de alerta Siga de las seguridad. instrucciones Es usado de todosparalosindicarle mensajes situaciones de seguridadcon que peligros aparecen potenciales despues de de este simbolo para evitar posibles lesiones o muerte. PELIGRO Lea este manual familiaricese con de su manera generador.cuidadosa Conozca y sus .......
ADVERTENCIA CUANDO DEP6SITO ANADA COMBUSTIBLE ADVERTENCIA O VACiE EL CUANDO AJUSTE O HAGA REPARACIONES A SU GENERADOR Apague el generador (posici6n OFF) y dejelo enfriar al menos per 2 minutes antes de remover ta tapa de la combustible. Afloje ta tapa lentamente para dejar que la presi6n salga del tanque. Llene o vacie el dep6sito de combustible o Siempre desconecte el alambre de ta bujia y col6quelo donde no pueda entrar en contacto con la bujia. CUANBO a la intemperie.
CONOZCA SU GENERADOR _1 este manual del operario y las reglas de antescon delaoperar su generador. ......... Lea Compare las ilustraciones con su generador paraseguridad familiarizarse ubicaci6n de los diferentes controles y ajustes. Conserve este manual para referencias futuras.
Su generador requiere de ciertos procedimientos solo estar& listo para ser utilizado despues suministrado Si usted servicio con el combustible tiene generador, problemas por favor generadores con Ilame Coloque 2. Saque todo el contenido excepci6n del generador. 3. Abra la caja de cart6n completamente Mantenga el generador para rigida y plan& de la caja de cart6n, sobre 1. Dele la vuelta quede arriba. 2. Introduzca 3. Coloque en la A. 4. Introduzca a cortando 5.
ANTES DE DARLE ARRANQUE GENERADOR Agregar Aceite iPRECAUClON! Si intenta arrancar 1. 1. Coloque Limpie la zona de alrededor la generador aceite y quite el tapon NOTA: de Ilenado "Aceite", 3. para la temperatura 4. ambiente Con la ayuda de un embudo lentamente todo el contenido (0,53 I - 18 onzas) Vuelva Agregue a colocar el tapon los combustibles de arranque de Ilenado y aprietelo son iguales. de aceite.
Tap6n de Combustible El uso de conservante para Mejorar el Arranque de combustible mantiene 3. el Retire la lengOeta descubierto. para dejar la membrana al combustible en buen estado y limpia los carburadores, Io que facilita el arranque en todas las estaciones del aSo. El nuevo tapon de combustible gotea automaticamente conservante concentrado en el dep6sito de combustible. PELIGRO IMPORTANTE: NO retire a colocar el cierre 4. Vuelva el tapon 5.
COMO USAR SU GENERADOR Ubicaci6n Sl TIENE PROBLEMAS operando su generader despues leer el manual, por favor flame a la linea de ayuda para generadores al 1-800-222-3136. Tierra de Espacio del Generador Libre Alrededor ADVERTENCIA del Sistema El generador dispone de una conexi6n a tierra del sistema que conecta los componentes del bastidor a los terminales de tierra de los enchufes hembra de salida de CA.
Encienda el Motor Desconecte NUNCA todas de que la unidad 2. en una superficie Siga las en orden Si la unidad plana, del cigOefial numerico. esta en una superficie no se arranca se pueden durante producir y utiliza problemas arranca pero no sigue para en funcionamiento, haya aparatos despues de tirar tres veces funcionando, o si la unidad asegOrese plana de que y compruebe es correcto.
Detener 1. el Motor Desconecte todas las cargas electricas de la unidad. NUNCA arranque o detenga el motor con dispositivos electricos conectados 2. Permita minutos unidad. 3. Mueva el interruptor (Apagado). 4. Gire la valvula I a 61 y encendidos. que el motor funcione sin carga para estabilizar las temperaturas _ del motor a la posicion durante dos intemas de la a la posici6n "Off" "Off" (Apagado). 1 ADVERTENCIA • NO coloque la palanca estranguladora para parar el motor.
OPERACION FRiO En ciertas DURANTE condiciones climaticas 4 ° C [40 ° F] combinadas generador carburador reducir 1. AsegQrese a su es necesario realizar de que el generador tenga Opere el generador SOLAMENTE al aire libre. AsegL_rese de que los gases de escape no puedan entrar por ventanas, puertas, tomas de aire de ventilaci6n u otras aberturas en un espacio cerrado en el que puedan acumularse. Io siguiente: combustible y limpio. la valvula posicion 3.
NO SOBRECARGUE GENERADOR Capacidad Usted debe suficiente carga vataje Seleccione 2. (cuando al mismo proveer a los cuales tiempo. los aparatos puede este funcionando) para los aparatos la energia, mismo que su generador calificado (al encender) proveer 1.
INFORMACION MOTOR El motor es de uno cilindros, refrigerado de California, la certificaci6n (Consejo cumplimiento 125 horas. garantias (OHV), Especificaciones ata_en Nominal * Los valores de potencia se establecen en primer pequefios Dada nuestros ambientales nominal que pueden que ha adquirido cuando real "in situ").
PROGRAMA DE MANTENIMIENTO Siga los intervalos opere la unidad CALENDARIO ANOTE horarios o de calendario, en las condiciones Io que ocurra adversas descritas primero.
StatStation MANTENIMIENTO TM El StatStation TM muestra funcion de la frecuencia funcion de aviso Monitor la carga nominal de salida. del generador Tambien de mantenimiento incluye en ADVERTENCIA una integrada. de potencia El visor de LED Parpadear& indicara cuando 90% y, si supera una carga la carga el 95%, nominal nominal mostrara del 0-95%. sea igual o superior el indicador al "OL" CUANDO parpadeando.
Comprobaci6n del Nivel Compruebe 5 horas de funcionamiento, necesario. 1. Coloque 2. Retire antes como de cada uso o cada minimo. Rellene Cambie si es sobre de medici6n una superficie y limpie nivelada. la varilla Adici6n de Aceite Coloque 2. Compruebe de las primeras el aceite en adelante. de Siesta utilizando su generador bajo PRECAUCION el nivel una superficie de aceite Completamente nivelada. tal como se indica NIIqOS.
4. Reemplace la bujia si los electrodos estan picados, quemados o si la porcelana esta rota. Utilice una bujia de repuesto recomendada. 5. Instale la bujia y aprietela NOTA: Puede adquirir nuevos 1-800-4=MY-HOME (469-4663). Limpie la Pantalla El silenciador apagachispas. de operacion del escape Retire los cuatro apagachispas. 3. Inspeccione la pantalla y reemplacela si esta rota, perforada o da_ada. NO use pantallas defectuosas. Si la pantalla no esta da_ada, limpiela con un disolvente comercial.
GENERALIDADES El generador siete dias debera y debera 30 minutos. unidad como ser encendido dejarlo Si no puede para preparar al menos funcionar hacer por mas de 30 dias, guia Cambio una vez cada al menos use la siguiente su unidad la informacion Aceite el Di_metro Quite evitar que se formen partes esenciales carburador, combustible, experiencia (llamados dep6sitos del sistema de combustible, filtro de combustible, durante manguera el almacenamiento.
Problema Soluci6n Causa 1. Uno de los cotacircuitos esta 1. Reajuste el cortacircuito. 2. Pongase en contacto con la Planta de Servicio de Sears. abierto. El motor existe est_ salida El motor funcionando pero funciona bien sin Falla en el generador. 3. Mala conexion defectuoso. 4. no de AC disponible, cargas pero "funciona real" cuando cargas son conectadas. 2. o juego de cordones 3. Revise El dispositivo mal estado. conectado est& en 4.
Sears, California, Roebuck and BARB, Co., por sus U.S.A. siglas (Sears), California Air en ingles) y United States Ambiental Declaraci6n (derechos de EE.UU., de garantia y obligaciones Resources EPA, por sus del sistema del propietario c. d. e.
Informaci6n Durabilidad de Aire Sobre el Periodo de las Emisiones en la Etiqueta de y el indice de Emisiones Periodo de Cumplimiento de la Normativa de Emisiones en la Etiqueta de Curnplimiento de Emisiones del Motor del Motor Desde Los motores con certificaci6n de cumplimiento de la normativa sobre emisiones de nivel 2 del California Air con la certificacion de cumplimiento de la fase 2 de las normas sobre emisiones de la United States Environmental Resources Board (CARB) deben mostrar info
.................................... _:_H_H_i;_' .... _i!!iiiiiii!!iiiiii!!iiiii!iiiiiiiiii Your Home ....