Operator'sIVianual ® 2000 PSi MAX@ 1.8 GPIViMAX* iViodelNo. 580.750700 HOURS: IVlon. - Fri. B a.m. to 5 p.m. (CT) WARNING Before using this product, read this manual and follow all Safety Rules and Operating instructions. ADVERTENCIA Antes de utilizar el producto, lea este manual y siga todas las Reglas de Seguridad e Instrucciones de Uso. ,, Safety ,, Assembly ,, Operation ,,Maintenance ,, Parts ,, Espafiol,p.
WARRANTY .......................................... 2 MAINTENANCE.................................... REPAIR PROTECTIONAGREEMENT........................ 2 STORAGE........................................... SAFETYRULES...................................... 3-5 FEATURESAND CONTROLS.............................. ASSEMBLY ......................................... OPERATION....................................... SPECIFICATIONS.....................................
Read this pressurewasher. manual carefully and becomefamiliar with your Knowits applications, its limitations, and any hazards involved. WARNING The engine exhaust from this product contains chemicals known to the State of California to cause cancer, birth defects, or other reproductive harm. importantSafetyinformation A WARNING This product contains lead and lead compounds, known to the State of California to cause birth defects or other reproductive harm. Washyour hands after handling this product.
,&. WARNING ,_can Starter cord kickback (rapid retraction) will pull hand and arm toward engine faster than you let go which could cause broken bones, fractures, bruises, or sprains resulting in serious injury. • NEVERpull starter cord without first relieving spray gun pressure. • When starting engine, pull cord slowly until resistance is felt and then pull rapidly to avoid kickback.
_1_WARNING Use of pressure washer could create puddles and slippery surfaces causing _ you to fall resulting in death or serious 1injury. Kickback from spray gun could cause you to fall resulting in death or serious injury. • Operate pressure washer from a stable surface. ,& WARNING Risk of eye or bodily injury. Ll= Spray could splash back or injury. propel objects resulting in serious • Always wear indirect vented (chemical splash) safety goggles marked to comply with ANSI Z87.
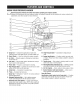
KNOWYOURPRESSUREWASHER Read the Operator's Manual rules beforetooperating your pressure Comparethe illustrations with and yoursafety pressure washer familiarize yourself with washer. the locations of various controls and adjustments. Savethis manual for future reference. A - Spray Gun -- Controls the application of water onto cleaning surface with trigger device, includes trigger lock. M - High Pressure Outlet-- Connectionfor high pressure hose.
Your pressure washer requires some assembly and is ready for use only after it has been properly serviced with the recommended oil and fuel. If you have any problemswith the assembly of your pressurewasher, please call the pressurewasher helpline at 1=800-222-3136. UNPACKTHEPRESSUREWASHER 1. Removeeverything from carton except pressure washer. 2. Open carton completely by cutting each corner from top to bottom. 3. Remove pressure washer from carton. Add EngineOil 1.
Toprotect thefuelsystem fromgumformation, mixin a fuel HighAltitude stabilizer when adding fuel. See Storage. All fuel is not the same. If you experience starting or performance problems after using fuel, switch to a different fuel provider or change brands. This engine is certified to operate on gasoline. The emission control system for this engine is EM (Engine Modifications). At altitudes over 5,000 feet (1524 meters), a minimum 85 octane / 85 AKI (89 RON) gasoline is acceptable.
ConnectHose and Water Supply to Pump NOTICE DO NOT run the pump without the water supply connected and turned on. • Damageto equipmentresultingfrom failureto follow this instructionwill voidwarranty. NOTICE Remove and discard the shipping caps from the pump's high pressure outlet and water inlet before attaching hoses. 1. Uncoil high pressure hose and attach one end of hose to base of spray gun. Tighten by hand. 4. Run water through your garden hose for 30 seconds to clean out any debris.
HOWTO USEYOURPRESSUREWASHER To Start Your Pressure Washer If you have any problems operating your pressure washer, please call the pressure washer helpline at 1-800-222-3136. To start your engine-powered pressure washer for the first time, follow these instructions step-by-step. This information also applies whenever you start the engine after you have let the pressure washer sit idle for at least a day. 1.
To start the engine for the very first time: 9A. Push primer bulb firmly 5 times, waiting 2 seconds between each push. 11. Return recoil starter slowly. DO NOT let rope "snap back" against starter. NOTICE Always keep the throttle lever in the "Fast" position when operating the pressure washer. To start engine thereafter: 9B. Press primer bulb firmly 3 times, waiting 2 seconds between each push. For a warm engine, DONOT press primer bulb.
How to Stop Your PressureWasher How to Use SprayTips 1. The quick-connect on the nozzle extension allows you to switch between three different quick connect spray tips. Spray tips can be changed while pressure washer is running once spray gun trigger lock is engaged. The spray tips vary the spray pattern as shown. . 3. Releasespray gun trigger and let engine idle for two minutes. Move throttle to SLOW position, then STOPposition.
Cleaning andApplying Detergent AWARNING Pressure Washer Rinsing Chemical Burn Hazard. For Rinsing: i:__., Chemicals could cause burns resulting in death or serious injury. , DONOTusecausticliquid with pressurewasher. , UseONLYpressurewashersafedetergents/soaps. Followall manufacturers instructions. 1. Remove black spray tip from nozzle extension. 2. Select and install desired high pressure spray tip following instructions How to Use Spray Tips. To apply detergent,follow these steps: 1.
ENGINETECHNICALiNFORMATiON PRODUCTSPECIFICATIONS This is a single cylinder, L-head, air cooled M/odei100000 engine. The Emission Control System for this pressure washer is warranted for standards set by the Environmental Protection Agency and the California Air Resources Board. Certification does not grant the purchaser, owner or operator of this engine any additional warranties with respect to the performance or operational life of this engine.
OWNER'SRESPONSiBiLiTiES Emissions Control Follow the hourly or calendar intervals, whichever occurs first. More frequent service is required when operating in adverse conditions noted below. Maintenance, replacement, or repair of the emissions controldevices and systemsmay be performedby any nonroad engine repair establishment or individual. However, to obtain "no charge" emissions control service, the work must be performed by a factory authorized dealer. See the Emissions Warranty.
Check Detergent SiphoningTube Check Spray Gunand Nozzle Extension Examine detergent tube and clean if clogged. The tube should fit tightlyon the barbed fitting. Examine the tube for leaks or tears. Replacethe tube if damaged. Examinehoseconnectionto spraygun and makesure it is secure.Testtrigger by pressingit and makingsure it springs back into placewhenyou releaseit. Do not depress red button and test trigger. You shouldnot be ableto presstrigger.
O-Ring Maintenance Checking Oil Level Purchasean O-Ring Repair Kit,Sears item75116, at your local Searsor by calling 1-800-4-1VlY-NOIVlE (469-4663) or online at www.sears.com. It is not includedwith the pressurewasher. This kit includesreplacemento-rings and a water inletfilter. Referto the instruction sheet providedin the kit to serviceyour unit's o-rings. Oil level should be checked prior to each use or at least every 8 hours of operation. Keep oil level maintained.
Change oiJ whiJe engine is stiJJwarm from running, as follows: 1. Drain fuel tank by running pressure washer until fuel tank is empty. 2. Disconnect spark plug wire and keep it away from spark plug. 3. Cleanarea around oil fill, remove oil fill cap/dipstick. Wipe dipstick clean. 4. Tip your pressure washer to drain oil from oil fill into a suitable container making sure you tip your unit away from spark plug. When crankcase is empty, return pressure washer to upright position.
Air CoolingSystem AFTEREACHUSE Over time debris may accumulate in cylinder cooling fins and cannot be observed without partial engine disassembly. For this reason, we recommend you have a qualified Sears service dealer clean the cooling system per recommended intervals (see MaintenanceSchedule). Equally important is to keep top of engine free from debris. See CleanDebris. Water should not remain in the unit for long periods of time.
WINTERSTORAGE NOTICE You must protect your unit from freezing temperatures. • Failure to do so will permanently damage your pump and render your unit inoperable. • Freezedamage is not covered under warranty. Change Oil While engine is still warm, drain oil from crankcase. Refill with recommended grade. See ChangingEngine Oil. Protect Pump To protect the pump from damage caused by mineral deposits or freezing, use PumpSaver,Sears item 74403, to treat pump.
Problem Cause Correction 1. Water inlet is blocked. 1. Clear inlet. 2. inadequatewater supply. 2. Provide adequatewater flow. 3. inlet hose is kinked or leaking. 3. Straighten inlet hose, patch leak. i i Clogged inlet hose strainer. i4. Water supply is over IO0°F. 5. Provide cooler water supply. High pressure hose is blocked or leaks. 6. Clear blocks in high pressure hose or replace hose. 7. Gun leaks. 7. Replace gun. 8. Spray tip is obstructed. 8. Cleanspray tip. 9.
CRAFTSMAN2000 PSi PressureWasher 580.
ENGINE,Briogs & Stratton, 10L802 - ExplodedView 358 ENGINE GASKET SET @ 163O 12 524 O 523 287 (_ 525 5240 1_7o II869II8711 2L-_-J _os @ 562 615 404 616 (_) J 1095 VALVE GASKET SET 7 635 24
ENGINE,Briogs & Stratton, 10L802 - ExplodedView 334 73 24 851A 55 356A_ 1211 (_ 1210 635 _ 6O 689 456 @ 24 597 _ 78 37A 78 304 3os 332 37 @ 22 23 15 @ _ 22A 25
ENGINE,Briogs & Stratton, 10L802 - ExplodedView 621 535 188 Y 529 106 (_ o% 612 390 957 670 190_ © 190A 26 %
ENGINE,8riggs& Stratton, 10L802 - Parts List item 1 2 3 4 5 7 8 9 10 11 12 13 15 16 20 22 22A 23 24 25 26 27 28 29 32 33 34 35 36 37 37A 40 43 45 46 50 50A 51 54 55 58 60 65 73 78 90 97 106 130 163 180 188 190 190A 202 209 222 227 287 300 Part # 590770 796961 299819s 590569 790169 698717 791781 695890 691666 691245 799587 691640 691680 796218 391483s 692551 590763 795695 222698s 795691 795689 795690 795688 691588 699659 699654 691664 296676 296677 690520 690520 793748 697403 692194 697799 691762 691998 699
California, U.S. EPA,and Sears Emissions ControlWarranty Statement Sears Emissions Control Warranty Provisions The following are specific provisions relative to your Emissions Control Warranty Coverage. It is in addition to the Sears engine warranty for non-regulated engines found in the Operator's Manual. YourWarranty RightsAnd Obligations 1.
The warranty on emissions-related parts is as follows: Look For Relevant EmissionsDurability Period and Air index information On YourSmaJJOff-Road EngineEmissionsLabel • Any warranted part that is not scheduled for replacement as required maintenance in the owner's manual supplied, is warranted for the warranty period stated above. If any such part fails during the period of warranty coverage, the part will be repaired or replaced by Sears at no charge to the owner.
GARANTIA.......................................... CONTRATO DEPROTECCION PARAREPARACIONES ......... REGLASDESEGURIDAD............................ 30 30 31-33 CARACTERiSTICAS Y CONTROLES ....................... MONTAJE........................................ OPERACION ....................................... 34 35-37 38-41 ESPECIFICACIONES ................................... 42 MANTENIMIENTO .................................. ALMACENAM lENTO ...................................
,A ADVERTENCIA El escape del motor de este producto contiene eiementos quimicos reconocidos en el Estado de California por producir c_.ncer,defectos de nacimiento u otros da_os de tipo reproductivo. Leaestemanualminuciosamente y conozca a fondolas partesy el funcionamiento desum_quina limpiadoraa presi6n.
A AI:IVERTENCIA Ei combustible y sus vapores son extremadamenteinfiamablesy expiosivos, A ADVERTENCIA El retroceso (repliegue r_.pido) del cable del arrancador impedir_, que ei usuario _,_,_ sueite ei cable a tiempo y tirar_, de su mano y T-brazo hacia ei motor, io que podria provocar fracturas, contusiones 0 esguinces; asi como lesiones g raves. • NUNCAtire dei cable dei arrancador sin eiiminar previamente la presi6n de la pistola rociadora.
,A ADVERTENCIA Peligro de quemadura quimica. ,A ADVERTENCIA Las sustanciasasiquimicas podrian graves provocar quemaduras, como lesiones o incluso la muerte. • NO use liquido c_ustico con la limpiadora a presi6n. cuerpo. El agua rociada podria salpicar 0 propulsar objetos, Io que puede provocar lesiones graves. • Cuando utilice este equipo o est_ cerca de _l, siempre use gafas de seguridad con ventilaci6n indirecta (contra salpicaduras de productos quimicos) marcadas para cumplir con ANSI Z87.1.
CONOZCASU iViAQUINA LllViPIADORA A PRESION Lea ei manual dei eperarie y ias regias de seguridad antes de porterencon marchasu iimpiadera a presi6n. Compare las ilustraciones con su limpiadora a presi6n para familiarizarse las ubicaciones de los diferentes controles y ajustes. Guarde este manual para referencias futuras. A - Pistola de Reciado -- Controla la aplicaci6n de agua sobre la superficie de limpieza con el gatillo. Incluye cerrojo de seguridad. [Vi- .
Sulimpiadora apresi6n requiere decierto ensamble yestar_ lista para serusado _nicamente despu_s dehaber depositado el combustible yelaceite recomendado. Sitieneproblemasconel ensambledesum_quinalimpiadoraa Aoregue Aceite de Motor presi6n,llamea la lineadeayudade la m_quinalimpiadoraa presi6nal 1-800-222-3136= Desembale la Limpiadora a Presi6n 1. Saque todo el contenido de la caja de cart6n, a excepci6n de la limpiadora a presi6n. 2.
Granaititud ,A ABVERTENCIA El combustible y sus vapores son extremadamenteinfiamablesy explosivos, _lo que podria provocar quemaduras, incendios o explosiones;asi como lesiones graveso incluso la muerte. CUANDO ANADACOMBUSTIBLE ELDEPOSITO En altitudes superiores a 1.524 metros (5.000 pies), se deber_ utilizar gasolina con un minimo de 85 octanos / 85 AKI (89 RON). Para seguir cumpliendo la normativa sobre emisiones, es necesario ajustar la unidad para su uso a gran altitud.
Conecle la iVlangueray el Suminislro de Agua a la Bomba 4. AIflSO NO haga funcionar la bomba si no tiene el suministro conectado y abierto. AVI$O Hace NO agua de parar de siphon para ei abastecimiento de agua. Useagua SOLOfrfa (menos que IO0°F). • El da_oa la limpiadoraa presidn,resultadode la desatencidn a estaprecaucidn,no ser_cubiertopor la garantia. AV/SO El uso de una vD.Ivula unidireccional (igualador de presi6n o vD.
COIViOUSARSU LllViPIADORA A PRESI6N Para Poner en iVlarchael Lirnpiadoraa Presi6n Si tiene problemas con el funcionamiento de su m_quina limpiadora a presi6n, por favor liame a la linea de ayuda de la m_quina limpiadora a presi6n al 1-80D-222-3136. Para darle arranque a su limpiadora a presi6n movido a motor por primera vez, siga estas instrucciones paso a paso.
11. Jale la cuerda de arranque lentamente.NO permita que la cuerda regrese bruscamenteen contra del arrancador. Para comenzarel motor para el tiempo muy primer: 9A. Empuje bombilla m_s principal firmemente vez de 5, esperando 2 segundos entre cada empuj6n. AVI$O Siempre mantenga la control de v_lvula de regulaci6n en el "Rdpido" ("Fast") posicione cu_ndo operar la limpiadora a presi6n. Para comenzarmotor despu_s: 9B.
C6rfloDetenersu Limpiadoraa Presi6n C6rnousar las puntasde rocio 1. Suelte el gatillo de la pistola rociadora y deje funcionar el motor al ralenti durante dos minutos. 2. Mueva el acelerador a la posici6n "Slow" (Lento), y luego a la posici6n "Stop" (Parada). 3. SIEMPREfusil de punto en una direcci6n segura, presione el seguro (bot6n rojo) y el disparador del fusil del rodo del estruj6n para liberar la presi6n retenida de la pleamar.
Limpiezay Aplicaci6ndel Deteroente 2. Seleccione e instale la puntas de rocio de alta presi6n deseada conforme alas instrucciones de la secci6n C6mo usar el puntas de rocio. 3. Mantenga la pistola de rociado a una distancia segura del _rea que planea rociar. ADVERTENCIA Peligro de quemadura quimica. _,,., quemaduras,asi come lesionesgraves Lassustanciasquimicaspodrian provocar o incluso la muerte. • NO use I[quido c_ustico con la limpiadora a presi6n. ,&.
INFORMACIOHTI CNICASOBREEL ESPECIFICACIONES DELPRODUCTO MOTOR Especificacionesde la iVl quinaLirnpiadoraa Presi6n El Modelo 100000 motor es de uno cilindros, de L-cabeza, refrigerado por aire. El Sistema de Control de Emisiones para este generador est_ garantizado para juegos est_ndares por la Agencia de Protecci6n Ambientai y el Consejo de recursos de aire de California.
RECOIViENDACIONES GENERALES eacargarse dei maateaimiento, ia sustituci_ny la reparaci_a de los dispositivos y sistemas de control de emisioaes.No obstante, para realizar la revisi6n gratuita de control de emisiones, deber_ acudir a un distribuidor autorizado por el fabricante. V_ase Garantfa de emisiones. Plan de manlenimienlo Siga los intervaios de horas o de calendario, los que sucedan antes. Si opera en condiciones adversas (se_aladas m_.s abajo) es necesario un mantenimiento m_.s frecuente.
Chequeeel tubo de sif6n del detergente Revise la pistola Examine el tubo del detergente y Ifmpielo si se encuentra sucio. El tubo deberfa quedar apretado en la pieza. Examine el tubo para ver si existe cualquier tipo de goteo o est_ roto. Reemplaceel tubo si da_ado. Examine la conexi6n de la manguera con la pistola rociadora y asegOresede que es correcta. Pruebe el gatiNo apretando el bot6n rojo para asegurarse de que el gatiNo vuelve a su posici6n original cuando se suelta.
10. Ponga enmarcha elmotor siguiendo lasinstrucciones dela secci6n CSmoponer en funcionamiento la limpbdora a presi6n. ** Per encima de 27 °C (80 °F) el use de aceite 10W30 puede aumentar el consume de aceite. Compruebe el nivel de aceite con mayor frecuencia. 11. Pruebe el limpiadora a presi6n al hacer funcionar con cada una de las puntas de rocio de conexiones rApidas que viene con el limpiadora a presi6n.
Cambie ei aceite cuandoel motor siga estafldo Rempiacela bujia calieflte despu_s de haber funcionado: 1. Drene eltanque del combustible haciendofuncionar la mAquina limpiadora a presi6n hasta que el tanque est_ vacio. 2. Desconectealambre de bujb y Io mantiene lejos del bujb. 3. Limpie el Areaalrededor de la abertura para llenadode aceite, retire la varilla de medici6n. Limpie la varilla de medici6n. 4.
$isterna de refrioeraci6nde aire DESPUESDECADAUSO Con eltiempo, se pueden acumuhr residuos en las aletas de refrigeraci6n del cilindro y pasar inadvertidos mientras no se desmonte parcialmente el motor. Recomendamos que encargue la fimpieza del sistema de refrigeraci6n a un distribuidor autorizado de servicio Sears siguiendo los intervalosrecomendados (consulte la secci6n Calendario de Mantenimiento). Es igualmente importante que no se acumulen residuos en el motor. Consulte la secci6n Limpb los Residuos.
ALlViACENAlVllENTO PARAINVIERNO Cambiode aceite Con el motor todavia caiiente, drene el aceite de la caja dei cig_Je_ai. Vuelva a Ilenarlocon ei grado de aceite recomendado. Vea Cambio de Aceite del Motor en la secci6n Mantenimiento del Motor. AI/ISO Usted deber_, proteger su unidad de las temperaturas de congelamiento. • Si no Io hace, da_ar_ permanentementela bombay la unidad no podr_ funcionar. Protecci6n de la bomba • La garantia no cubre el da_o de la unidad ocasionado por congelamiento.
Problema Soluci6n Cagsa LabombapresentaBos siguientes problemas: no producepresi6no produceuna presi6nerrada,traqueteo, p_rdidade presi6n,bajo voJumen de agua. 1. EstAusando la puntas de rocio de baja presi6n (negra). 1. Gamble la puntas de rocio a una de las puntas de rocio de alta presi6n. 2. La entrada de agua estA bloqueada. 2. Limpie la entrada. 3. Suministro de agua inadecuado. 3. Proporcione fiujo de agua adecuado. 4. La manguera de entrada estA doblada o presenta fugas. 4.
Garantiade controlde emisionesde California, U.S. EPAy Sears Dispesicienes de la garantia contra defectes deJsistema de controJde emisienes de Sears Derechosy obHgaciones de la garantia CaliforniaAir ResourcesBoard,U.S.EPAy SearsBrands Management Corporation,U.S.A.(Sears)le explicana continuaci6n la garantiadel sistemade controlde emisionesde su motor/equipo modelo2012-2013.
La garantia de los componentes relacionados con las emisiones es la siguiente: Consulte la informaci6nsobre el periodo de durabilidad de las emisiones y el [ndice de aire en la etiqueta de emisiones del motor peque_o para m_quinas de servicio • Los fallos de todo componente cubierto por la garantia que no se deba sustituir como parte del plan de mantenimiento obligatorio detaiiado en el manual del propietario entregado quedar_n cubiertos por la garantia durante el periodo de la garantia especificado anter
Your Home For troubleshooting, product manuals and expert advice: managemyiife www.managemylife.com For repair - in your home - of all major brand appliances, lawn and garden equipment, or heating and cooling systems, no matter who made it, no matter who sold it! For the replacement parts, accessories and owner's manuals that you need to do-it-yourself. For Sears professional installation of home appliances and items like garage door openers and water heaters.