Operator'sIVlanual ® 2700 MAX PSi* 2.3 MAX GPM Model No. 580.750910 HOURS: IVlon. - Fri. 8 a.m. to 5 p.m. (CT) WARNING Before using this product, read this manual and follow all Safety Rules and Operating Instructions. ADVERTENCIA Antes de utilizar el producto, lea este manual y siga todas las Reglas de Seguridad e Instrucciones de Uso. o Safety o Assembly o Operation o Maintenance o Parts o Espa_ol, p.
WARRANTY.......................................... REPAIRPROTECTION AGREEMENT ........................ SAFETYRULES...................................... FEATURES ANDCONTROLS .............................. ASSEMBLY ........................................ 2 2 3-5 6 7-10 OPERATION ....................................... SPECiFiCATiONS ..................................... 11-15 16 MAINTENANCE ....................................
Readyour this pressurewasher. manual carefully and become familiar with }(now its applications, its limitations, and any hazards involved. A WARNING The engine exhaust from this product contains chemicals known to the State of California to cause cancer, birth defects, or other reproductive harm. #nportant Safety Mnformation A WARNING This product contains lead and lead compounds, known to the State of California to cause birth defects or other reproductive harm.
,A WARNING Starter cord kickback (rapid retraction) will pull hand and arm toward engine faster than you can let go which could cause broken bones, fractures, bruises, or sprains resulting in serious injury. NEVERpullstartercordwithoutfirst relievingspraygun pressure. Whenstartingengine,pull cordslowlyuntil resistanceisfelt andthenpull rapidlyto avoidkickback.
A WARNING Useofpressure washer couldcreate puddles andslippery surfaces causing _ youtofallresulting indeath orserious T_ injury. Kickback fromsprayguncouldcause youtofallresulting indeath orserious injury. Operate pressure washer fromastable surface. A WARNING Risk of eye or bodily injury. Spray could splash back or propel objects resulting in serious injury. . The cleaning area should have adequateslopes and drainageto reduce the possibility of a fall due to slippery surfaces. .
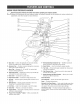
KNOW YOUR PRESSUREWASHER Read the the Operator's Manual ruleswasher beforetooperating your pressurewasher. Compare illustrations withand yoursafety pressure familiarize yourself with the locations of various controls and adjustments. Savethis manual for future reference. A - Spray Dun -- Controls the application of water onto cbaning surface with trigger device, includes trigger lock, P - Warning/Operating instructionsTag -- identifies hazardsand proper procedure to start/stop pressure washer.
Your pressure washer requires some assembly and is ready for use only after it has been properly serviced with the recommended oil and fuel, _fyeu have any problemswith the assembly of your pressurewasher, please caii the pressurewasher heipiine at 1-800-222-3136. 7, Connectwater supplyto pump. 8, 9, Attach nozzle extensionto spray gun. Select/attach quick connect spray tip to nozzleextension.
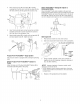
4. Place accessory tray (A) over hobs (B) on handle (viewing from front of unit). Push the tree clips (C) into the hobs until they sit fiat against the accessory tray. Attach PerfectNIW M Detergent $iphen to Concentrate Bettle Place PerfectMWMbottle (not included) in the wire-form bracket on the handb. Removecap from bottb and insert the PerfectMWMSiphon (J). Screw the siphon unit to the top of the bottb (K).
Add Fuel 4. WARNING Fueland its vapors are extremely flammable and explosivewhich could cause burns, fire or explosion resulting in death or serious injury. WNEN ADDINGFUEL , TurnpressurewasherengineOFFand letit coolat least2 minutesbeforeremovingfuel cap.Loosencapslowlyto relieve pressurein tank. , Fillfueltank outdoors. , DONOToverfilltank.Mow spacefor fuelexpansion. , if fuel spills,wait until it evaporates beforestartingengine.
4. ConnectHose and Water Supply to Pump NOTICE DO NOTsiphon standing water for the water supply. Use ONLYcold water (less than 100%). NOTICE DO NOT run the pump without the water supply connected and turned on. , Damageto equipmentresultingfrom failureto follow this instructionwill voidwarranty. 5. NOTICE Remove and discard the shipping caps from the pump's high pressure outlet and water inlet before attaching hoses. 1. Run water through garden hose for 30 seconds to flush it of debris.
HOWTO USEYOURPRESSUREWASHER To Start Your Pressure Washer if you have any problems operating your pressure washer, please carlthe pressure washer helpline at 1-880-222-3136. To start your engine-powered pressure washer for the first time, follow these instructions step°by-step. This information also @pries whenever you start the engine after you have let the pressure washer sit idle for at bast a day. 1.
9. Pull choke rod (A) to "Ciesed" position. A WARNING Starter cord kickback (rapid retraction) will pull hand and arm toward engine faster than you _ can let go which could cause broken bones, fractures, bruises, or sprains resulting in serious injury. NEVERpull startercordwithoutfirst relievingspraygun pressure. Whenstartingengine,pull cordslowlyuntil resistanceisfelt andthenpull rapNlyto avoidkickback.
How to Stop Your Pressure Washer How to Use Spray Tips 1. Releasespray gun trigger and let engine idle for two minutes. 2. Move engine stop switch to "Off" position. 3. ALWAYS point spray gun in a safe direction, push red button and squeezespray gun trigger to releaseretained high water pressure. The quick-connect on the nozzle extension allows you to switch between four different quick connect spray tips. Spray tips can be changedwhile pressure washer is running once spray gun trigger is locked.
* . . For maximum rinsing, for stubborn or hard to reach surface such as second story surfaces, paint removal, oil stains, rust removal or other stubborn substances (tar, gum, grease, wax, etc.), select red 0° spray tip. Cleaning and Applying Detergent A WARNING Chemical Burn Hazard. Chemicals could cause burns resulting in death or serious injury. DO NOTuse caustic liquid with pressure washer.
Pressure Washer Rinsing Autematic Cool Dewn System (Thermal Relief} 1. Remove black detergent spray tip from nozzle extension. 2. Select and install desired high pressure spray tip following instructions How to Use Spray Tips. if you run the engine on your pressure washer for 3-5 minutes without pressing the trigger on the spray gun, circulating water in the pump can reach temperatures above 125°F. The system engages to cool the pump by discharging the warm water ente the greund.
Pressure Washer Specifications Max Outlet Pressure ...................... Max Flow Rate............................. Detergent Mix ........................ Water Supply Temperature .......... 2,700 PSI* 2.3 GPM Use as directed Not to exceed 100% EngineSpecifications Bore ............................... 2.5 in. (64 ram) Stroke ............................. 2.0 in. (50 mm) Displacement ..................... 9.8 cu. in. (161 cc) Spark Plug Resistor ............................ Set Gap To: ...........
OWNER'SRESPONSIBMLITIES Some adjustments will need to be made periodically to properly maintain your pressure washer. Follow the hourly or calendar intervals, whichever occurs first. More frequent service is required when operating in adverse conditions noted below. All service and adjustments should be made at bast once each season. Follow the requirements in the Maintenance Schedulechart above.
Check High PressureHose High pressure hoses can develop leaks from wear, kinking, or abuse, inspect hose before each use. Checkfor cuts, leaks, abrasions, bulging of cover, or damageor movement of couplings, if any of these conditions exist, replace hose immediately. WARNING The high pressure stream of water that this equipment produces could cut through skin 6. Repeatsteps 4 and 5 if necessary. 7, Reinstall detergent siphoning hose onto barb fitting. 8.
8. Reconnect nozzle extension tospraygun. 9. Makesuregarden hoseisconnected towaterinlet. Check thathighpressure hoseisconnected tospraygun andpump. Turnonwater. 10. Startengine following instructions How to Start Your Pressure Washer. Checking Oil Levem Oil level should be checked prior to each use or at bast every 8 hours of operation. Keep oil level maintained. 1. Place pressure washer on a level surface and clean area around oil dipstick. 2. Removeoil dipstick and wipe dipstick with clean cloth.
Change di whileengine is still warm from running, as fallows: 2. Carefully remove air cleaner (C) from base (B). 3. Cleanair cleaner by tapping it several times on a hard surface to remove dirt, or blow compressed air (not to exceed30 psi) through air cleanerfrom clean side that faces engine. 1, Drain fuel tank by running pressure washer until fuel tank is empty. 2, Disconnect spark plug wire and keep it away from spark plug. 3. Cleanarea around oil fill, remove oil fill cap/dipstick.
inspect Muffler and Spark Attester AFTER EACH USE inspect the muffler for cracks, corrosion, or other damage. Removethe spark arrester, if equipped, and inspect for damage or carbon blockage, if replacement parts are required, make sure to use only original equipment replacement parts. Water should not remain in the unit for long periods of time. Sediments or minerals can deposit on pump parts and "freeze" pump action. Follow these procedures after every use: WARNING 1.
WINTER STORAGE Draining Fuel Tank and Carburetor: if fuel additive is not used, remove all fuel from tank and carburetor. NOTICE You must protect your unit from freezing temperatures. Failureto do so will permanentlydamageyour pumpand render your unit inoperable. Freezedamageis not coveredunderwarranty. o Place an approved fuel container below carburetor and use a funnel to avoid spilling fuel, o Remove carburetor drain bolt (A), then move fuel valve lever to "On" position.
Protect Pump Other Storage Tips To protect the pump from damage caused by mineral deposits or freezing, use PumpSaver,Sears item 74403, to treat pump. This prevents freeze damageand lubricates pistons and seals. 1. DO NOTstore fuel from one season to another unless it has been treated as described in Protect Fuel System. 2. Replacefuel container if it starts to rust. Rust and/or dirt in fuel can cause problems if it's used with this unit. 3.
Pump has following problems:failure to producepressure, erratic pressure, chattering, loss of pressure, low water voJume. Cause Correction 1. Low pressure spraytip installed. 1, Replacewith high pressure spray tip. 2. Water inlet is blocked. 2. Gearinlet. 3. inadequatewater supply. 3. Provide adequatewater flow. 4. Inlet hose is kinked or leaking. 4. Straighten inlet hose, patch leak. 5. Clogged inlet hose strainer. 5. Checkand clean inlet hose strainer. 6. Water supply is over 100%.
CRAFTSMAN2700 PSMPressure Washer 580,750910 Main Unit -- Exploded View and Parts List _900 -- 3 --6 ! ;D _14 $7 _13 \\ j- J / @ \ / _9 / / IS Hem 1 2 3 Part # 317098GS 314787BNGS 319863GS B1797GS 4 208041GS 195983AKGS 195983AJGS 195983AMS 198841GS 5 204658GS 6 311553GS 7 315134GS 8 703347 9 313835GS 10 207784GS 11 317099GS 12 206566GS 13 204627GS 14 196006GS 15 192310GS 16 315033GS 17 196002GS 18 205910GS 19 B2203GS 9OO NSP 17 Parts Net illustrated Part # 319241GS 23139GS 192050GS 317999GS
CRAFTSMAN 2700 PSMPressure Washer 580,750910 Pump _ Exploded View and Parts List L ,L @ @ @ _Gt o % % c 33 C 36 C lem 33 36 A B C D E F G H J K Part # 200275GS B2384GS 200344GS 200345GS 200346GS 315747GS 192914GS 200349GS 200350GS 201497GS 201496GS 317057GS SCREW FILTER-GARDENHOSE KIT-CHECKVALVE KIT-WATERSEAL KIT-O-RING KIT-UNLOADER KIT-CHEMICALINJ KIT-EASYSTART SCREW-GRUB FiTTiNG KIT-WATERiNLET KIT-PLUG Parts Nat illustrated Part # Ieseriptian 208673GS VALVE-THERMORELIEF Optional Accessorie
ENGMNE, florida, GCV160LAONSRB - Exploded View 13 10 11 4 7 31o 27 3O 27
EENGMNE, florida, GCV160LAONSRB - Exploded View 28
ENGMNE,HondB, GCV160LAONSBB - ExplodedView 84 80- 91 92 ___¸¸¸¸ii 29
ENGMNE, florida, GCV160LAON5RB - Exploded View _112 07 110_ q06 116 123 40 30
ENGMNE,Honda, GCV160LAON5RB - Parts List item 01 02 02 02 03 04 05 06 07 08 09 09 09 10 11 12 13 14 15 16 17 18 19 20 21 22 23 23 24 25 26 27 28 29 30 31 32 33 34 34 35 36 37 38 39 40 41 42 43 44 45 46 47 48 49 50 51 52 53 54 55 56 57 58 59 60 61 62 63 64 65 66 67 68 69 70 71 72 73 74 Part # 12000-ZOL-940 12310-ZOJ-O00 12311-ZL8-DO0 12311-ZL8-000 12355-ZL8-000 90013-883-000 90014-952-000 91201-ZL8-003 98079-56846 12209-ZM0-003 14711-ZL8-O00 14711-ZOJ-O00 14711-ZOJ-800 14721-ZL8-000 14751-ZL8-000 14771-ZOJ-
California, U.S. EPA, and Sears Emissions Control Warranty Statement-- Sears Emissions Control Warranty Provisions The following are specific provisions relative to your Emissions Control Warranty Coverage. It is in addition to the Sears engine warranty for non-regubted engines found in the Operator's Manual. 1. Warranted Emissions Parts Your Warranty Rights And Obligations The Caiifornb Air Resources Board, U.S. EPA,and Sears Brands Management Corporation, U.S.A.
The warranty on embsions=rebted parts is as follows: Look For Relevant Emissions Durability Period and Air index information On YourSmall Off-Road Engine Emissions Label Any warranted part that is not scheduled for repbcement as required maintenance in the owner's manual supplied, is warranted for the warranty period stated above, if any such part faib during the period of warranty coverage, the part will be repaired or repbced by Sears at no charge to the owner.
GARANTIA .......................................... CONTRATODE PROTECCIONPARA REPARACIONES......... REGLASDE SEGURIDAD ............................ ESPECIFICACIONES ................................... 34 34 MANTENIMIENTO .................................. ALMACENAM lENTO................................. 35°37 CARACTERiSTICASY CONTROLES....................... REPARACION DEDANOSREPUESTOS .................... 38 MONTAJE ........................................ 39°42 OPERACION.........................
_. ADVERTEN@A El escape del motor de este producto contiene elementos quimicos reconocidos en el Estado de California por producir cancer, defectos de nacimiento u otros da_iosde tipo reproductivo. Lea estemanaalminaciosamente y conozca a fondoias partes y ei fancionamientode sa m_qainaiimpiadora a presiOn.Oonozcasas apiicaciones,sas iimitaciones y los peiigrosinvoiacrados. MnformaciOn importante de seguridad _.
A ADVERTENOIA EIretroceso (replbgue r@ido)dd cabledd arrancador impedira que eI usuado _ A ADVERTENCIA El combustible y sus vapores son extremadamenteinflamablesy explosivos, suelte eI cable a tbmpo y tirar_, de su mano y 1oque podria provocar quemaduras, incendioso explosiones,lesiones graves o incluso la muerte. CUANDO ANADA COMBUSTIBLE0 VACiEELDEPOSITO T_ brazo hada eI motor, Io que podria provocar fracturas, contusiones o esguinces; as[ como lesiones g raves.
,A ADVERTENCEAPeligro de quemadura quimba. A ADVERTENCIA Riesgo de lesiones en los ojos o el cuerpo. El agua rociada podria salpicar o propulsar objetos, Io que puede provocar lesiones graves.
CONOZCASU lVlAQUINALIMPIADORAA PRESI6N Lea el Manual del Operatic laslimpiadora reglas de a seguridadantes de porter encon marcha su limpiadora a presi6n. Compare hs ilustraciones cony su presi6n para familiarizarse las ubicaciones de los diferentes controles y ajustes. Guarde este manual para rderencias futuras. A =Pistelade reciade-- Controiala aplicaci6nde aguasobre la superficiede limpiezacon ei gatilio. IncJuyecerrojode seguridad.
Su limpbdora a presi6n requiere de cierto ensamNe y estar_ lista para ser usado Qnbamente desp@s de haber depositado eI combusfiNe y eI aceite recomendado. 6. Conecte manguera a alta presi6n a pistola rociadoray a bomba. 7. Conecte el suministro de agua a bomba. 8. Conecte boquilla la extensi6n al pistola rociadora. Si tiene probiemascon el ensambie de su m_quina iimpiadora a presi6n, iiame a ia iinea de ayuda de ia m_quina iimpiadera a presi6n ai 1-800-222-3136. 9.
. Coioque la bandeja de accesories (A) sobre los orifMos (B) deI manubrio (vista des@ la parte dentr_s de b unidad). Presione bs pinzas de _rboI (C) para introducir bs en los orifMos hasta que queden a niveI con b bandejade accesorios. 5. Inserte los accesorios suministrados en los espacios correspondientes en la bandejade accesorios. Consulte C6mo Usar ia Bandejade Accesorios. 6. Fije los soportes para botellas (B) al asa con pernos de cabeza redonda (E) y pomos de plAstico negro (F). Apriete a mano.
4. Agregue gasoiina ADVERTENCJA El combustibb y sus vapores son extremadamenteinflamablesy explosivos, _lo que podria provocar quemaduras, incendios o explosiones;lesionesgraves o incluso la muerte, CUANDO ANADA COMBUSTIBLEELDEPOSITO iPRECAUCJi)N! Los combustibles con mezcla de alcohol (gasohol, etanol o metanol) pueden atraer la humedad y provocar la separaci6n y formaci6n de _cidos durante el almacenamiento. Los gases_cidos pueden da_ar el circuito de combustible y el motor durante el almacenamiento.
Conecte ia manguera y ei suministro de agua a ia bomba 4. AlflSO NO haga funcionar la bomba si no tiene el suministro conectado y abierto. AVI$O Hace NO agua de parar de siphon para el abastecimiento de agua. Useagua SOLOfda (menos que 38°C). El da_oa la limpiadoraa presi6n,resultadode la desatenci6n a estaprecauci6n,no ser_cubiertopor la garantia.
COMO USAR SU LIMPIAOORA A PRESI6N Para porter en marcha ei iimpiadoraa presi6n Si tiene proNemas con el funcionamiento de su m_quina fimpiadora a presi6n, por favor flame a la linea de ayuda de la m_quina fimpiadora a presi6n al 1-800-222-3136. Para dade arranque a su fimpiadora a presi6n movido a motor por primera vez, siga estas instrucciones paso a paso.
9. Tiredeb vadihdeIestrangubdor (A)hasta b posM6n "Cerradd' ("Closed"). A ADVERTEN@A El retroceso (repliegue r@ido) del cable del arrancador impedir_ que el usuario _ suelte el cable atiempoytirar_ de su mano y brazo hacia el motor, Io que podria provocar fracturas, contusiones o esguinces; asi como lesiones graves. NUNCAtire del cane del arrancador sin eliminar previamente la presi6n de la pistola rociadora.
AIVERTENCIA Losgases y elcalordeescape podfian inflamar losmateriales combustibles y lasestructuras o dafiar eldep6sito decombustible y provocar incendios, lesiones graves o incluso lamuerte. Elcontacto conlazonadelsilenciador podriaproducir quemaduras y lesiones graves. NOtoque lassuperficies calientes yevite losgases delescape a o Permita que el equipo se enfrie antes de tocarlo. o Deje un espacio minimo de 1.5 m (5 pies) alrededor del limpiadora a presi6n, incluida la parte superior.
2. Seleccione la punta de rociado deseada: o NOcoloque la boquilla a menos de 15 cm (6 pulgadas) cuando est6 limpiando llantas. La PresWOn Baja Limpiezay aplicaci6n dei detergente A ADVERTENCtA Peligro de quemadura quimica. l_ Lassustanciasquimicaspodrian provocar quemaduras,lesionesgraves o incluso la muerfe. Negra Usada para aplicar detergentes NO use liquido caustico con la limpiadora a presi6n. Use EXCLUSIVAMENTEdetergenteso jabones especialespara la limpiadora a presi6n.
, $istema de enfriamiente Permita que el detergente "penetre" de 3 a 5 minutos antes de enjuagar. Vuelva a aplicarlo cuando sea necesario para evitar que la superficie se seque. NO permita que el detergente se seque. Si permite que el detergente se seque, la superficie podfia quedar con manchas.
ESPECIFICACIONES[}EL PRODUCTO Espe.c)ficacienes de ia m_quina iimpiadera a preslen Presi6n de saiida m_xima ........................ Caudalm_ximo .................................. 2,700 PSI* 2.3 GPM Mezcla de quimicos .................. Use seg_n instrucciones Temperatura del suministro de agua ............................ Que no exceda los 38°0 Especificacienes dei mater Di&metro de camisa .................... 64 mm (2,5 pulgadas) Carrera ..............................
RECOMENDACIONESGENERALES Recemendacienes Plan de mantenimiento El mantenimiento peri6dico mejorar_ el rendimiento y prolongar_ la vida 8til del limpiadora a presi6n. Si necesita asistencia, consulte con un distribuidor de Sears o con otro distribuidor cualificado. Siga los intervalos de horas o de calendario, los que sucedan antes.
MANTENIMIENTGDELA MAQUINA LIMPIADGRAA PRE$10N tieia de retenci6n de inyecci6n de detergente En ocasiones, b bob de retenci6n se atasca en el sistema de inyecci6n de detergente cuando ha pasadoalmacenado o per acumulaci6n de jab@ seco o minerales en elagua. La bob de retenci6n se puede desatascar mediante los siguientes pasos: Limpie los residues Limpiea diado, o antes de cada use, los residues acumubdos en el limpiadora a presi@. Mantenga limpias bs conexiones, los muelles y los mandos.
10. Enciendael motor siguiendo bs instrucciones de b secci6n C6mo arrancar su iimpiadora a presi@. Revise ia pistoia rociadora Examine la conexi6n de b manguera con b pbtob rocbdora y aseg_resede que es correct& Pruebe eI gafiIIo apretando el bot6n rojo para asegurarse de que el gatillo vuelve a su posici6n original cuando se suelta. No debe ser posiNe apretar el gatillo sin apretar el bot6n rojo. Cambie inmediatamente b pistob rociadora si falb cualquiera de estas pruebas. Nlantenimiento 11.
Comprobaci6n dei nivei de aceite Cambie ei aceite cuandn ei meter siga estandn caiiente despu_s de haber funcionadn: Compruebe eI niveI de aceite antes de cada uso o cada 5 horas de funcionamiento, como minimo. Reiiene si es necesano. 1. Sit_e eI limpbdora a presi6n en una superfMe pbna y limpie b zona de airededor deI tap6n de Iienadode aceite. 2. Quite la vadib de niveI de aceitey limpieia con un trapo limpio. Introduzca b varilla de nivel de aceite y s_queb sin enroscarb en b boca de Ilenado. .
4. Limpie la suciedad del cuerpo y la tapa del filtro de aire con un trapo himedo. H_galo con cuidado para evitar que la suciedad penetre en el conducto de aire (E) que va al carburador. 5. Instale un filtro de aire Iimpio (o nuevo) en la base. El filtro de aire debe encajar bienen la base. 8. Vuelva a colocar la tapa del filtro de aire. lnspelliene et silenliader apagachispas y ia pantaila Inspeccione que el silenciador no presente fisuras, corrosi6n u otros daios.
AVI$O Susfituya b pantaib apagachbpas si est_ rota o perforada. 4. DESPUESDECADAUSO No deber_ haber agua en b unidad por brgos periodos de tbmpo. Los sedimentos de minerabs se pueden depositar en partes de b bombay "congebr" su funcionambnto. Lieve a cabo estos procedimbntos despu6s de cada uso: 1. 2. Desconectemanga del fusil del rocio y salida alta de presi6n en la bomba. Desag{ie agua de la manga, del fusil, y de la extensi6n de boquilla. Use un harapo para quitar la manga. 3.
ALMACENAMIENTO PARAINVIERNO Proteja ei sistema de combustible Aditive pata Cembustibie: AVI$O Usted deber_ proteger su unidad de las temperaturas de congelamiento, Si no Io hace,da_ar_permanentemente la bombay la unidadno Si va a usar aditivo para combustible, llene el tanque de combustible con gasolina fresca. Si el tanque est_ parcialmente lleno, el aire del tanque va a promover el deterioro del combustible durante el almacenamiento.
Cambio de aceite Otras sugerencias para ei atmacenamiento Con el motor todavia caliente, drene el aceite de la caja del cigOe_al. Vuelva a llenarlo con el grado de aceite recomendado. Yea @mbio de Aceite de/Motor en la secci6n Mantenimiento de/Motor. 1. NO guarde combustible de una temporada a otra a menos que Io hayatratado como se indica en la secci6n Proteja el Sistema de Combustible. 2. Reemplacela canecade gasolina si comienza a oxidarse.
Probiema Labombapresentalos siguientes probiemas: no producepresi6no produceuna presi6nerrada,traqueteo, p6rdidade presi6n,bajo voiumende agua. Soiuci6n Causa 1. Est9 usando la puntas de rodo de baja presi6n (negra). 2. La entrada de agua est9 bloqueada. 3. Suministro de agua inadecuado. 4. !, 3. Limpieb entrada, Proporcionefiujo deaguaadecuado. La manguera de entrada est_ dobbda o presenta fugas. 4. 5. El cobdor de b manguera de b entrada de agua estA tapado. 5.
30 dias en ningSn caso. En caso de preguntas sobre los derechosy responsabilidadesrelativosa la garant_a,p6ngaseen contactocon Sears llamando al (800) 469°4663. Garantia de control de emisionesde California, U.$. EPAy Seats Disposiciones de ia garantia contradefectos dei sistema de control de emisiones de Sears [}etechos y obiigaciones de ia garantia A continuaci6n se detallan las disposiciones concretas relativas a la Cobertura de la garant_acontra defectos del sistema de control de emisiones.
La garantia de los componentes relacionados con las embiones es Oonsaitela informaei6nsobre ei pedodo de darabiiidad de ias emisiones y el indite de aire ea ia etiqaeta de emisiones del motor pequeHopara m_quinaa de aervicio Los faiios de todo componente cubierto por b garantia que no se deba susfituir como parte deI pbn de mantenimiento oNigatodo detaibdo en eI manual deI propietado entregado quedarAncubiertos por b garantia durante eI periodo de b garantia especificado antedormente.
Your For troubleshooting, Home product manuals and expert advice: www.rnanagemylife.com For repair - in your home = of all major brand appliances, lawn and garden equipment, or heating and cooling systems, no matter who made it, no matter who sold it! For the replacement parts, accessories ..... owner's ma..alsthatyo..e d todo-it-yOUrSelf. For Sears professional installation of home appliances and items like garage door openers an_ wa{er heaters. 1-800-4-M Y-H OM E®(_,8_0.