
Operator`s manual


Yourpressurewasherrequiressomeassemblyandisready
foruseonlyafterit hasbeenproperlyservicedwiththe
recommendedoilandfuel.
Jfyou have any prohtemswith the assembly of your
pressurewasher, pmeasecall the pressurewasher hempline
at 1o800o222o3136.
UNPACKPRESSUREWASHER
1. Remove everything from carton except pressure washer.
2. Opencarton completely by cutting each corner from top
to bottom.
3. Remove pressure washer from carton.
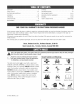
CARTONCONTENTS
Checkali contents, if any parts are missing or damaged,call
the pressure washer hetpline at 1=800=222=3136.
° Main Unit
° Handle
o Accessory Tray
° High PressureHose
, Spray Gun
o NozzleExtensionwith Quick Connect Fitting
, HydroFoamTM Wash
° Oil Bottle
, Parts Bag (which includes the following):
o Operator's Manual
, Owner's Registration Card
, Safety Goggles
o Bagcontaining 3 multi-coiored ProjectProTM Nozzles
, HydroFoamTM Launcher
, HydroFoamTM Launcher & Wash Instruction Sheet
o FreshStart Fuel Cartridge
, HandieFasteningHardwareKit (whichincludes):
o Carriage Boits (2)
o Plastic Knobs (2)
, Tree Ciips (4)
Becomefamiiiar with each piece before assembling the
pressure wasiser,identify aii contents with the iiiustration on
page 6. if any parts are missing or damaged,calIthe
pressure washer helpline at 1=81}1}=222=3136.
ASSEMBLINGPRESSUREWASHER
Your Craftsman pressure washer wJflneed assembly before
operation:
1. Fiii out and send in registration card.
2. Attach handleand accessory tray.
3. Add oii to engine crankcase.
4. Add fuel to fuel tank.
5. Connect pressure hose to spray gun and pump.
6. Connect water supply to pump.
7. Attach nozzleextension to spray gun.
8. Sebct/attach quick connect ProjectProTM nozzleto nozzle
extension.
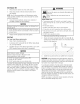
Attach tlandJe and Accesse_ Tray
1. Placehandle (A) onto handlesupports (B) connected to
main unit. Make sure holes (C) in handb align with holes
(C) on handle supports.
NOTE:it may be necessaryto move the handle supports
from side to side in order to align the handle so it will slide
over the handb supports.
2. insert carriage bolts (A) through holes from back of unit
and attach a plastic knob (B) from front of unit. Tighten
by hand.
3. Placeaccessorytray (A) over holes (C) on handte
(viewing from front of unit). Push the tree clips (B) into
the holes untii they sit fiat againstthe accessory tray.
4. Insert multi-colored ProjectProTM nozzlesand other
suppiied accessories in spaces provided in accessory
tray. SeeHow to UseAccessory Tray.