Operator's iVlanual ® 3100 PSi MAX 2.8 GPM MAX Model No. 580.752290 CUSTOMERHELPLINE PRESSURE WASHER ,_ HOURS: Non. - Fri. 8 a.m. to 5 p.m. (CT) WAemG Before using this product, read this manual and follow all Safety Rules and Operating Instructions. 1_-illADVERTEHCIA Antes de utilizar el producto, lea este manual y siga todas las Regias de Seguridad e Instrucciones de Uso. Sears, Roebuckand Co., RoffmanEstates,IL 60179 U.S.A. Visit our Craftsman website: www.craftsman.cnm Part No.
WARRANTY.......................................... SAFETYRULES...................................... 2 2-5 FEATURES ANDCONTROLS .............................. ASSEMBLY ........................................ 6 7-10 OPERATION ....................................... SPECIFICATIONS ..................................... 11-16 17 MAINTENANCE .................................... 18-22 STORAGE........................................... 23 TROUBLESHOOTING..................................
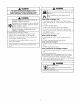
WARHIHG WARHING The engine exhaustfrom this productcontains chemicalsknownto the State of California to cause cancer,birthdefects, or otherreproductiveharm. WARHIHG Running engine gives off carbon monoxide, an odorless, colorless, poison gas. Breathing carbon monoxide can cause headache, nausea, fainting orvomiting, death. confusion, seizures, atigue, dizziness, Some chemicals or detergents may be harmful if inhaled or ingested, causing severe nausea, fainting, or poisoning.
WARHIHG _,_< Starter cord kickback (rapid retraction) can result in bodily injury. Kickback will pull hand and arm toward engine faster than you can let go. Broken bones, fractures, bruises, or sprains could result. * NEVERpull startercordwithout first relievingspraygun pressure. * Whenstartingengine,pull cord slowlyuntil resistanceis felt andthenpull rapidlyto avoidkickback.
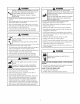
WARHJHG NOTICE High pressure spray may damage fragile items including lass. _ hands, hair, clothing, or accessories. IStarter and other rotating parts can entangle * NEVERoperate pressure washer without protective housing or covers. . DO NOTwear loose clothing, jewelry or anything that may be caught in the starter or other rotating parts. . Tie up long hair and remove jewelry. WARNING DONOTpoint spraygun at glasswhen using red (0°) spraytip. NEVERaim spray gun at plants.
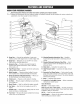
KNOWYOURPRESSUREWASHER _Head Compare the the Operator'sManual rules beforetooperatingyour pressurewasher. illustrations with and yoursafety _ressurewasher familiarize yourself with the locations of various controls and adjustments. Savethis manual for future reference. A - Spray Gun-- Controls the application of water onto cleaning surface with trigger device. Includes trigger lock. B - Spray Tips -- Detergent, 0°, 15° and 40°: for various high pressure cleaning applications.
Your pressure washer requires some assembly and is ready for use only after it has been properly serviced with the recommended oil and fuel. 7. 8. If you have any problemswith the assemblyof your pressurewasher, please call the pressurewasher heipline at 1-800-222-3135. Attach Handle and Accessory Tray 1. UNPACKPBESSUREWASHER 1. Remove everything from carton except pressure washer. 2. Open carton completely by cutting each corner from top to bottom. 3. Remove pressure washer from carton.
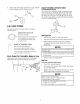
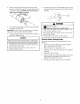
5. Attach bottle bracket (A) to handle with carriage bolt (B) and black plastic knob (C). Tighten by hand. Attach PerfectMix,, Detergent Siphon to Concentrate BottJe Place Project Pro® PerfectMixTM bottle (not included) in the wire-form bracket on the handle. Removecap from bottle and insert the Project Pro®PerfectMixTM Siphon (F). Screw the siphon unit to the top of the bottle (6). Usethe clip on the cap (F) to snap siphon to wire form bracket when siphon is not in a concentrate bottle.
Toprotect thefuelsystem fromgumformation, mixinafuel stabilizer whenadding fuel.SeeStorage. All fuel is not the same. If you experience starting or performance problems after using fuel, switch to a different fuel provider or change brands. This engine is certified to operate on gasoline. The emission control system for this engine is EM (Engine Modifications). WARRIRG Fueland its vapors are extremely flammable and explosive. Fire or explosion can cause severe burns or death.
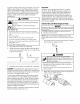
, Before connecting garden hose to water inlet, inspect inlet screen. Cleanscreen (A) if it contains debris or have it replacedif damaged. DO NOTrun pressurewasher if inlet screenis damagedor missing. 6. Turn ONthe water, press red button (B) on the gun and squeezethe trigger to purge the pump system of air and impurities. WARHIHG 4. of eye injury. ISpray can splash back or propel objects. Alwayswearsafetygoggleswhenusingthis equipmentor in vicinityof whereequipmentis in use.
HOWTO USEYOUR PRESSUREWASHER To Start Your Pressure Washer If you haveany problems operating your pressure washer, please call the pressure washer helpline at 1-800-222-3136. To start your engine-powered pressure washer for the first time, follow these instructions step-by-step. This information also applies whenever you start the engine after you have let the pressure washer sit idle for at leasta day.
9. Move throttle lever (A) to "Fast" position, shown here as a rabbit. WARNING Starter cord kickback (rapid retraction) can result in bodily injury. Kickback will pull hand and arm ___ toward engine faster than you can let go. Broken bones, fractures, bruises, or sprains could result. • NEVERpull startercord withoutfirst relievingspraygun pressure. • Whenstartingengine,pull cord slowlyuntil resistanceis felt andthen pull rapidlyto avoidkickback.
NOTE:The extra hole in the tray is for storing a utility brush. The extra clip in the tray is for storing a turbo spray tip. The brush and turbo spray tip are NOT included with your pressure washer. You can buy these items as optional accessories. WARHIHG area can s_ Contact with muffler burns. result in serious f_ structures or damage fuel tankcombustibles, causing a fire. Exhaustheat/gases can ignite 1. Placespray tip extension through hole on accessory tray, as shown.
2. 2-IH-1 SOAPSYSTEM Select desired spray tip: Low Pressure CAUTION Chemicals can cause bodily injury, and/or property damage. NEVERusecausticliquidwith pressurewasher. UseONLYpressurewashersafedetergents/soaps. Followall manufacturersinstructions. Black Use to apply chemical Cleaning and Applying Detergent with the Project Pro® PerfectMix TM Siphon Tn apply undiluted detergent using the blue PerfectMix" siphnn, felJnw these steps: 1. Review use of black spray tip.
Cleaning and Applying Detergent with the Standard Clear Siphon NOTICE You must attach all hoses before you start the engine. Startingthe enginewithoutall the hosesconnectedandwithout thewaterturnedONwill damagethe pump. Damageto equipmentresultingfrom failureto followthis instructionwill void warranty. To apply diluted detergent usingthe standard cJearsiphontube, folJowthese steps: 1. Review use of black spray tip. 2. 3. Attach clear siphon hose to pump. Mix detergent solution as required by job. 7.
Cleaning DetergentSiphoning Tube PressureWasher Rinsing If you used the clear detergent siphoning tube, you must flush it with clean water before stopping the engine. 1. Placedetergent siphoning tube/filter in a bucket full of clean water. For Rinsing: 1. Remove soap spray tip from spray tip extension. 2. 3. Select and install desired high pressure spray tip following instructions How to Use Ouick ConnectSpray tip System. Keep the spray gun a safe distance from the area you plan to spray.
EHGINETECHNICALINFORMATIOH PRODUCTSPECIFICATJOHS This is a single cylinder, overhead valve (OHV), air cooled engine. It is a low emissions engine. Pressure Washer Specifications Max Outlet Pressure ....................... Max How Rate ............................. In the State of California, Model Series 120000 engines are certified by the California Air Resources Board to meet emissions standards for 125 hours.
GENERALRECOMMENDATiOHS Pump Oil Follow the hourly or calendar intervals,whichever occurs first. More frequent service is required when operating in adverse conditions noted below. DONOT attempt any oil maintenanceon this pump. The pump is pre-lubricated and sealed from the factory, requiring no additional maintenancefor the life of the pump.
WARNING _! WARNING pressure stream of water that th_ nt produces can cut through skin and its ng tissues, leading to serious injury and amputation. NEVERrepairhigh pressurehose.Replaceit. ReplacementhoseratingMUSTexceedmaximumpressure ratingof unit. The high pressure stream of water that this equipment produces can cut through skin and its )ossible amputation.
ENGINEMAINTENANCE AddingEngineOil 1. Make sure pressure washer is on a level surface. 2. Checkoil level as described in Checking Off Level 3. If needed,slowly pour oil into oil fill opening to the point of overflowing at oil fill cap. 4. Replaceand tighten oil fill cap. WARHIHG _ Unintentional sparking can result in fire or _¢ ChangingEngineOil electric shock.
Service Air Cleaner Spark Arrester Service Your engine will not run properly and may be damagedif you run it with a dirty air cleaner. Service the air cleaner once every 25 hours of operation or once eachyear, whichever comes first. Service more often if operating under dirty or dusty conditions. Replacementsare available at your local Sears service center. Your engine is not factory-equipped with a spark arrester. In some areas, it is illegal to operatean engine without a spark arrester.
AFTEREACHUSE 3. Water should not remain in the unit for long periods of time. Sediments or minerals can deposit on pump parts and "freeze" pump action. Follow these procedures after every Empty pump of all pumped liquids by pulling recoil handle about 6 times. This should remove most liquid in pump. 4. Coil high pressure hose and properly hang it on hook provided on accessorytray. 5. Store unit in a clean, dry area. 6. If storing for more than 30 days see Long Term Storage on next page. use: 1.
WINTERSTORAGE Change Oil While engine is still warm, drain oil from crankcase. Refill with recommended grade. See ChangingEngine Oil. HOTICE You must protect your unit from freezing temperatures. Failureto do so will permanentlydamageyour pumpand renderyour unit inoperable. Freezedamageis not coveredunderwarranty. Oil Cylinder Bore * Removespark plug and pour about 1/2 ounce (15 m]) of clean engine oil into the cylinder. * Install spark plug and pull starter handle slowly to distribute oil.
Problem Pump has fellewing preblems: failure te preducepressure, erratic pressure, chattering, less ef pressure, lew water volume. Detergentfails te mix with spray. Engine runs goed at ne-lead but "begs" when lead is added. Enginewill net start; or starts and runsrough. Cause Correction 1. Water inlet is blocked. 1. Clearinlet. 2. Inadequate water supply. 2. Provide adequatewater flow. 3. Inlet hose is kinked or leaking. 3. Straighten inlet hose, patch leak. 4.
CRAFTSMAH3108 PSI Pressure Washer 580.752290 Main Unit -- Exploded View and Parts List @ /_- 900 _15 Item 1 2 3 4 5 6 7 8 9 10 11 12 13 14 15 16 17 18 19 20 21 900 Part # 202974GS B201499GS 206332GS 195964GS 30809GS 192134GS 203901GS 189971GS 23139DGS B2384GS 204085GS 192914GS 194298GS 202978GS 200517GS 192050GS 192131GS 202634GS 198690GS 195983AAGS 195983ABGS 195983ADGS 198841GS B2203GS 192553GS 204658GS 204484GS 200595GS 199990GS NSP ........
EHGIHE, BrJggs& Stratto.
EHGIHE, Briggs & Stratto., 12T412 - Exploded View .........
EHGIHE, BrJggs& Stratton, 12T412 - ExpJodedView 209A 562 427 ® 209 334 6680_ 188 615 0 190 300 836___ 356 613 _' 883 _'_ 240 836A ¢_"_Y 65 _ .......... _1 958 456 1210 23 1095 VALVE GASKET SET 1005 lO7O_ 993 10 2_ _._0__ 455 703 332 @ 825 868_ 51 l 7 ..... .
ENGINE, Briggs & Stratton, 12T412 - Parts List Item 1 2 3 5 7 11 12 13 15 15A 16 18 20 21 22 23 24 25 26 27 28 29 39 32 32A 33 34 35 36 40 45 46 51 55 58 60 65 95 97 98 104 108 109 117 118 121 122 125 127 130 133 134 137 146 155 161 163 186 187 187A 187B 188 190 192 209 299A 219 229 222 227 238 249 271 276 281 399 394 395 396 Part # 699510 399269 299819S 699486 698210 791584 699485 699482 691686 691682 699445 699804 692550 281658S 699478 699488 222698S 791097 791326 791969 791324 691866 499423 791584 69256
Sears, Roebuckand Co., U.S.A. (Sears), the CaliforniaAir ResourcesBoard(CARD)and the UnitedStates EnvironmentaJProtectionAgency(U.S.EPA} EmissionsControlSystemWarrantyStatement (Owner'sDefect WarrantyRightsand Obligations) The California Air Resources Board (CARB), U.S. EPA and Sears are pleased to explain the Emissions Control System Warranty on your small offroad engine (SORE).
Emission information Enginesthat are certified to meet the California Air Resources Board (CARB) Emission Standards must display information regarding the Emissions Durability Period and Air Index. The engine manufacturer makesthis information availableto the consumer on emission labels. The engine emission label will indicate certification information.
GARANTIA .......................................... REGLASDE SEGURIDAD ............................ 32 MANTENIMIENTO .................................. 32-35 CARACTERiSTICASY CONTROLES....................... 47-51 ALMACENAMIENTO ................................... 52 36 REPARACIONDE DANOSREPUESTOS .................... 53 MONTAJE ........................................ 37-40 GARANTIADEL CONTROLDE EMISIONES ............... 54-55 OPERACION.......................................
ADVERTEHCiA ADVERTENCIA EI escape del motor de este preducte centiene eiernentoe qgirnicos recenocidos en el Estado de California _La. per prodgcir cancer, defectos de nacirniento gasolina y sus vapores son inflamables y explosivos. extremadamente u otros danes de ripe reprodgctivo. severas Is muerte.
ADVERTENCIA _-_ ADVERTEHCIA El retroceso (repliegue r_.pido) del cable del arrancador El chorro de agua a alta presi6n que este equipo puede producir produce,puedeatravesar lesiones. El retroceso impedir_ que el usuario suelte el cable a tiempo y tirar_, de su mano y brazo hacia el motor. contusiones podrian producirse fracturas, tejidos • NO permita en ningOn momento que NINOS operen la mdquina limpiadora a presi6n. NUNCA repare la manguera de alta presi6n. Remplacela.
AVISO ADVERTEHCIA o ,_ El arrancador y otras piezas que rotan pueden enredar las manos, el pelo,la El rociadode altapresi6npuededa_arelementosfr_.giles, incluyendoel vidrio. NO dirija la pistola rociadora hacia un cristal cuando utilice la punta de rocio de roja de 0°. NUNCA apunte la pistola a plantas. ropa, o los accesorios. • NUNCA utilice la limpiadora a presi6n sin sus carcasas o tapas de protecci6n.
COHOZCASU MAQUIHA LIMPIADORAA PRESIOH !i _!i_!i] Lea el Manual deJOperarie y su laslimpiadoraa regJasde segnridad antes de pener encon marcha su limpiadora a preston. I................. Compare las ilustracionescon presi6n para familiarizarse las ubicaciones de los diferentes controles y ajustes. Guarde este manual para referencias futuras. B - Pistoia de Reciade -- Controla la aplicaciOnde agua sobre la superficiede limpieza con el gatillo. Incluye cerrojo de seguridad.
Sulimpiadora apresiOn requiere decierto ensamble yestar_, lista para serusado 8nicamente despu_s dehaber depositado el combustible yelaceite recomendado. Sitiene prohlemasconel ensamhledesu m;_quinalimpiaderaa Conecte el Manubrio y Bandeja Accesoria 1. Coloque el manubrio (A) sobre los soportes del mismo (B) que ya est_n adheridos a la unidad principal. AsegL_resede que los orificios (C) en el manubrio est_n alineados con los orificios (C) en los soportes del mismo manubrio.
5. Fijelossoportes para botellas (A)alasaconpernos decabeza redonda (B)y pomos depl_stico negro (C).Apriete amano. Agregue Aceite de Motor SISTEMADE IHYECCI6N"2 EN 1" La limpiadora a presi6n est_ equipada con dos mangueras de inyecci6n de detergente. 1. Coloque la limpiadora a presi6n en una superficie plana y nivelada. 2. Limpie la zona de alrededor del orificio de Ilenado de aceite y quite el tap6n amarillo. 3.
Gran altitud ADVERTEHCIA _La En altitudes superiores a 1.524 metros (5.000 pies), se deber_. utilizar gasolina con un minimo de 85 octanos / 85 AKI (89 IRON). Para seguir cumpliendo la normativa sobre emisiones, es necesario ajustar la unidad para su uso a gran altitud. De no realizarseeste ajuste, el rendimiento se reducir_ y el consumo de combustible y las emisiones aumentar_.n.Para obtener m_s informaci6n sobre el ajuste para gran altitud, consulte con un distribuidor cualificado de Sears.
Antes de que conecte la manguera de jardin a la entrada de agua, inspeccione el colador de la entrada.Limpie el colador (A) si tiene residuos o solicite su remplazosi est_ da_ado. NO haga funcienar la limpiadoraa presi6nsi el filtre de entrada falta e est;_danado. Abra el grifo, pulse el bot6n rojo (B) de la pistola rociadora y apriete el gatillo para eliminar el aire y las impurezas del sistema de bombeo. ADVERTENCIA 4.
COMOUSARSU LIMPIADORAA PRESIOH Para Porter en Marcha el Limpiadora a Presi6n Si tiene problemas con el funcionamiento de su m_.quinalimpiadora a presi6n, por favor Ilamea la lineade ayuda de la m_quina limpiadora a presi6n al 1-801)-222-3136. Para darle arranque a su limpiadora a presi6n movido a motor por primera vez, siga estas instrucciones paso a paso. Esta informaci6n acerca de la puesta en marcha inicial tambi_n es v_.lida para cuando vaya a darle arranque al motor despu_s de haberlo dejado la m_.
9. Muevael control de la v_.lvulade admisiOn(A) a la posici6n "R_.pido" ("Fast"),quesedistingueconla figura de un conejo. ADVERTEHCIA El retroceso(replieguerApido)del cabledel arrancador puede producir lesiones. El retroceso impedir_ que el _I!_ usuario suelte el cable a tiempoy tirarA de su mano y brazohaciael motor. Comoresultado,podrianproducirsefracturas, contusioneso esguinces. • NUNCAtire del cable del arrancador sin eliminar previamente la presiOn de la pistola rociadora.
UtilizatiOn de Ja Bandeja de Accesorios ADVERTEHCIA s_ La unidad dispone de una bandeja de accesorios con compartimentos para guardar la pistola rociadora, el prolongador de la punta de rociado y las puntas de rociado de conexi6n r_.pida.La parte delantera de la bandejatambi_n incluye un gancho para sujetar la manguera de alta presi6n. El contacto con la zona del silenciador puede producir quemaduras graves.
2. SISTEMA DE INYECCI6N"2 EN 1" Seleccione la punta de rociado deseada: La Presi6nBaja ,_PRECAUCI6H Los productos quimicos pueden provocar lesiones de gravedad /y/o da_os materiales. NUNCAutiliceliquidosc_usticoscon la limpiadoraa presi6n. UseEXCLUSIVAMENTE detergenteso jabonesespecialespara la limpiadoraa presi6n.Sigatodaslas instruccionesdelfabricante.
4. Introduzca elextremo delfiitropeque_o deltubodeinyecci6n transparente enelcontenedor delasoluci6n diluida, como se hadescrito anteriormente. ADVEBTENCiA AVISO caidas. EI retroceso de la pistola rociadora puede provocar El contacto con el silenciador a alta temperatura puede producir da_os en el tubo de inyecci6n de detergente. Ouandocoloqueel filtro en labotelladeldetergente,coloqueeltubo de maneraqueno entreen contactoaccidentalmente con elsilenciador caliente.
JNFORMACI6HTECHJCASOBREEL MOTOR ESPECIFICACIONES DELPRODUCTO El motor es de uno cilindros, de v_lvulas en cabeza (OHV), refrigerado por aire y de baja emisi6n. Especificaciones de JaM_quina Limpiadora a Presi6n En el Estado de California, los motores de la serie 120000 han obtenido la cdtificaci6n del California Air Resources Board (Consejo de recursos de aire de California) de cumplimiento de la normativa sobre emisiones durante 125 floras.
RECOMENDACIOHES GENERALES Romba de Aceite Siga los intervalos de horas o de calendario, los que sucedan antes. Si opera en condiciones adversas (se_aladas mAs abajo) es necesario un mantenimiento mAs frecuente. NO realice ninguna operaci6n de mantenimiento con el aceite de la bomba. La bomba se suministra prelubricada y sellada en fAbrica, y no requiere lubricaci6n adicional durante su vida Otil. Control de Emisiones C.alq.ier establecimientoo individuoespecializadoen la reparaci6nde motores q.
Chequee el Tube de Sif_n del Detergente Examine el filtro en el tubo del deteroentey limpielosi se encuentra sucio. El tubo deberia quedar apretado en la pieza. Examine el tubo para ver si existe cualquier tipo de ooteo o est_ roto. Reemplaceel filtro o el tubo si alouno de ellos se encuentra da_ado. 3. Remuevala punta de rocio del extremo de la extensi6n de la boquilla. 4. Useel peque_o sujeta papeles para liberar cualquier material extra_o que est_ tapando la boquilla (A). 5.
MANTENIMIENTODELMOTOR ADVERTENCIA 3. Compruebe que el aceite Ilega hasta el punto de desbordamiento en el orificio de Ilenado. 4. Instale el tap6n de Ilenadode aceite, apriete firmemente. Adici6. de Aceite deJ Motor _'_ Chispear involuntario puedetener como resultado el ¢ fuego o el golpe el_ctrico. CUANDOAJUSTE0 HAGAREPARACIONESA SU M._,QUINA LIMPIADORAA PRESION • Siernpredesconecteelalarnbrede la bujiay col6quelodondeno pueda entraren contactocon labujia. CUANDOPRUEBELA BUJiADEL MOTOR 1.
Servicio del Depurador de Aire Servicio del Apagachispas Su motor no funcionar_ adecuadamentey puede dafiarse si usted Io hace funcionar con un depurador de aire sucio. El motor de su unidad no viene equipado de f_.bricacon un apagachispas. En ciertas _reas,es ilegal operar motores que no tengan apagachispas. Revise las leyes y regulaciones locales. Si necesita apagachispas, Io puede comprar en su centro de servicio Sears m_.scercano.
DESPUESDE CADAU$O 2. No deber_,haber agua en la unidad por largos periodos de tiempo. Los sedimentos de minerales se pueden depositar en partes de la bombay "congelar" su funcionamiento. Lleve a cabo estos procedimientos despu6s de cada uso: Desconectemanga del fusil del rocio y salida alta de presiOn en la bomba. DesagLieagua de la manga, del fusil, y de la extensi6n de boquilla. Use un harapo para quitar la manga. 3.
ALMACENAMIEHTO PARA INVIERNO Cambiode Aceite Con el motor todavia caliente, drene el aceite de la caja del cigiJe_al. Vuelva a Ilenarlo con el grado de aceite recomendado. Yea Cambio de Aceite. AVISO Usted deber_,proteger su unidad de las temperaturas de congelamiento. si no Io hace,daiiar_iperrnanenternente la bornbayla unidadno podr_ funcionar. Lagarantiano cubreeldaiiode launidadocasionadoporcongelarniento.
Problema Causa 1. La entrada de agua est,. bloqueada. 1. Limpie la entrada. 2. Suministro de agua inadecuado. 2. Proporcione flujo de agua adecuado. 3. La manguera de entrada est_ doblada o presenta fugas. 3. Estire la manguera de entrada, coloque un parche en la fuga. 4. El colador de la manguera de entrada est_ 4. tapado. El suministro de agua est,. per encima de 5. los IO0°F. La bombspresents los siguientes 5.
Sears, Roebuck andCo., U.S.A.(Sears),CaliforniaAir Resources Board(Consejode Recursossobreel Aire de California,CARB,por sus siglas en ingles)y United StatesEnvironmental ProtectionAgency(Agenciade Protecci6n Amhiental de EE.UU., EPA,porsos siglas en ingles). Declaraci6n degarantiadel sistema decontrol de emisiones (derechos y obligacionesdel propietario parala garantiacontradeiectos) California Air Resources Board (CARB), U.S.
InformatiOn sobre emisiones Algunos motores cuentan con la certificaci6n de cumplimiento de la fase 2 de las normas sobre emisiones de la United States Los motores con certificaci6n de cumplimiento de la normativa sobre emisiones del California Air ResourcesBoard (CARB) deben mostrar informaci6nsobre el periodo de durabilidad de las emisiones y el indice de aire. El fabricante del motor ofrece esta informaci6nal consumidor mediante etiquetas de emisiones.
Your Home For expert troubleshooting and home solutions advice: www.managemyhome.com For repair - in your home - of all major brand appliances, lawn and garden equipment, or heating and cooling systems, no matter who made it, no matter who sold it! For the replacement parts, accessories and owner's manuals that you need to do-it-yourself. For Sears professional installation of home appliances and items like garage door openers and water heaters.