Owner's Manual ® 7.0 HORSEPOWER 2800 PSI 2.5 GPM Model No. 580.752400 o o o o o CAUTION: Before using this product, read this manual and follow al Safety Rules and Operating instructions. SEARS, ROEBUCK Visit our Craftsman Pal_t No. 194052 and CO., Hoffman website: Dra_ 2 (09,20,2004) Safety Assembly Operation Maintenance Parts o EspaSol Estates, IL 60179 U.S.A. www.sears.
WARRANTY .................................... SAFETY RULES ASSEMBLY OPERATION 2 STORAGE .................................. 2-4 TROUBLESHOOTING ................................... 6-8 REPLACEMENT ................................. 9-12 EMISSION 12 ESPAI_OL SPECIFICATIONS MAINTENANCE ............................... ............................... .............................. 13-17 L_M_TED WARRANTY HOW 18-19 ............................ PARTS CONTROL 20 .......................
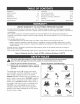
WARNING WARNtNG The engine exhaust from this product contains chemicals known to the State of California to cause cancer, birth defects, or other reproductive harm. , DANGER WHEN ADDING OR DRAINBNG Turn pressure washer minutes before relieve pressure FUEL OFF and let it cool at least removing fuel cap. Loosen 2 cap slowly to in tank. Fil! or drain fuel tank outdoors. DO NOT overfill tank.
WARNING Keep water electric spray shock away from WARNING electric wiring or fatal may result. Always wear eye protection in vicinity WARNING of equipment when using equipment or when in use.
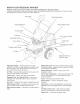
KNOW YOUR PRESSURE WASHER Read the owner's manual and safety rules before operating your pressure washer. Compare the illustrations with your pressure washer to familiarize yourself with the locations of various controls and adjustments. Save this manual for future reference.
Yourpressurewasherrequiressomeassemblyandis Attach Handme readyforuseonlyafterit hasbeenproperlyserviced 1. Place handle assembly onto handle supports withtherecommended oil andfuel. connected to main unit. Make sure holes in handle if you haveany problemswith the assemblyof align with holes on handle supports. your pressurewasher,pleasecall the pressure f washerhelplineat 1-800-222-3136.
Add Engine Add Fuel Oil IMPORTANT: Any attempt to crank or start the engine before it has been properly serviced with the recommended oil may result in an engine failure. NOTE: When adding oil to the engine crankcase, use only high quality detergent oil rated with API service classification SF, SG, SH, SJ or higher rated SAE 30 weight. DO NOT use special additives. 1. Choose a viscosity according to table below.
Connect Hose and Water Supply to Pump IMPORTANT: To avoid pump damage, you must assemble the nozzle extension to the spray gun and attach all hoses before you start the engine. 1. Uncoil high pressure hose and attach one end of hose to base of spray gun. Tighten by hand. llVIPORTANT: DO NOT siphon standing water for the water supply. Use ONLY cold water (less than 100°F). 6. Connect garden hose (not to exceed 50 feet in length) to water inlet. Tighten by hand.
HOW TO USE YOUR PRESSURE WASHER To Start Your Washer Location Pressure Washer Clearance DANGER 2. Operate pressure washer ONLY outdoors, Keep exhaust gas from entering a confined windows, doors, ventilation intakes or other DO NOT operate enclosure, pressure washer inside Check that high pressure hose is tightly connected to spray gun and pump. See "Assembling Your Pressure Washer" for illustrations. 3. Make sure unit is in a level position. 4.
.Movechokeknobto"Choke"position. How to Stop Your Pressure NOTE:Fora warmengine,besurethechokeknobis in the"Run"position. 11.Grasphandleandpullrecoilstarterlightlyuntilyou feelsomeresistance, thenpullbriskly. WARNING Washer 1. Let engine idle for two minutes. 2. Move throttle lever on engine to "Stop" position. L position. O NOT stop engine 3. by moving choke lever to "Choke" Squeeze trigger on spray gun to reWeve trapped pressure in hose to avo{d injury.
2. Pointnozzletowardsa hardsurface,disengage triggerlock,andpresstriggerto testpattern. 4. Slide adjustable nozzle forward to low pressure mode. Detergent cannot be applied with nozzle in high pressure position. 5. Make sure garden hose is connected to water inlet. Check that high pressure hose is connected to spray gun and pump. Start engine. 6. Apply detergent to a dry surface, starting from bottom and working up. 7. Allow detergent to "soak in" for 3=5 minutes before rinsing.
ENGtNE TECHNICAL INFORMATION PRODUCT SPECIFICATIONS This is a single cylinder, overhead valve (OHV), air cooled engine. It is a low emissions engine. Pressure in the State of California, Model Series 120000 engines are certified by the California Air Resources Board to meet emissions standards for 125 hours. Such certification does not grant the purchaser, owner or operator of this engine any additional warranties with respect to the performance or operational life of this engine.
OWNER'S RESPONSIBILmES Follow the hourly or calendar intervals, whichever occurs first. More frequent service is required when operating in adverse conditions noted below.
PRESSURE WASHER Check _n-Line Fi_ter Refer to the illustration and service the inqine filter if it becomes clogged, as follows: C_ean Debris Daily or before use, clean accumulated debris from pressure washer. Keep linkage, spring and controls clean. Keep area around and behind muffler free from any combustible debris. In-line Filter Nozzle Extension Pressure washer parts should be kept clean to reduce the risk of overheating and ignition of accumulated debris. O-rinc 1.
Nozzle Maintenance O-Ring A pulsing sensation felt while squeezing the spray gun trigger may be caused by excessive pump pressure. The principal cause of excessive pump pressure is a nozzle clogged or restricted with foreign materials, such as dirt, etc. To correct the problem, immediately clean the orifice following these instructions: 1. Shut off engine and turn off water supply. 2. Remove orifice from end of nozzle extension. Separate nozzle extension from spray gun.
ENGINE MAINTENANCE 5. Wipe dipstick clean, insert it into oil fill hole and tighten securely, remove dipstick. Add recommended oil up to "Full" mark on dipstick. Pour slowly. Wipe dipstick clean each time oil level is checked. DO NOT overfill. 6. [nstail oil fill plug and dipstick, tighten securely. 7. Wipe up any remaining oil. 8. Reconnect spark plug wire to spark plug.
Service Spark If the engine has been running, the muffler will be very hot. Allow the muffler to cool before servicing the spark arrester. Pmug Service the spark plug every 100 hours of operation or yearly, whichever occurs first. 1. Clean area around spark plug. 2. Remove and inspect spark plug. 3. Replace spark plug if electrodes are worn, or if insulator is cracked or chipped. 4.
AFTER EACH USE WINTER Water should not remain in the unit for long periods of time. Sediments or minerals can deposit on pump parts and "freeze" pump action. Follow these procedures after every use: 1. Flush detergent siphoning tube by placing filter into a pail of clean water while running pressure washer in low pressure mode (adjustable nozzle in forward position). Flush for one to two minutes. 2. Shut off engine, let it cool, then remove all hoses. 3. Disconnect spark plug wire from spark plug. 4.
LONG TERM STORAGE Protect if you do not plan to use the pressure washer for more than 30 days, you must prepare the engine and pump for long term storage. To protect the pump use Sears pump saver to prevent freeze damage and lubricate pistons and seals. NOTE: Sears pump saver, item number 71-74403, is available as an optional accessory. [t is not included with the pressure washer.
Problem Cause Correction 1. Nozzle in low pressure mode. 1. Pull nozzle backward for high pressure mode. 2. Water inlet is blocked. 2. Clear inlet. 3. inadequate water supply. 3. Provide adequate water flow. 4. inlet hose is kinked or leaking. 4. Straighten inlet hose, patch leak. Clogged inlet hose strainer. 5. Check and clean inlet hose strainer. Water supply is over 100°F. 6. Provide cooler water supply. 7. High pressure hose is blocked or leaks. 7.
CRAFTSMAN 2800 PSE Pressure Main Unit m Exploded Washer 580.752400 View and Parts List 900 \\ 16 \ _ item 1 2 3 4 5 6 7 8 9 Part # Description 192393GS BASE E 194719G S HANDLE 194048GS ASSY, Billboard 194548GS HOSE 192133GS KIT, Engine Mounting Hardware 192131GS KIT, Pump Mounting Hardware B3263GS GUN B2203GS KIT, Handle Connector 192310GS KIT, Vibration Mount items Not Illustrated Part # 194052GS 194263GS AB3061BGS item 10 11 12 13 14 15 16 17 900 --13 Part # 192309GS 194264GS 191265GS 195303
CRAFTSMAN 2800 PSi Pressure Washer Pump m Exploded View and Parts List 580.
ENGINE_ 7 HP, Briggs and Stratton, 12G612 - E×p_oded View 883_ 584 _84 8j 9 1029 830 t022 24 _'
ENGINE, 7 HP, Briggs and Stratton, 12G612 - E×p_oded View 365 51 276 _ 188 443 2o2 968_ f 445 _ 670 2s7_ 842 977 CARBURETOR GASKET SET 276 @ i37 633 @ 524_ 163 _ 25 633A@
ENGINE, 7 HP, Briggs and Stratton, 12G612 - E×p_oded View 121 CARBURETOR OVERHAUL KiT 58 276_ 1o4_ 633 @ 60 633A 51 @ 134 163 127_ 137 564 305_ 592 ® 37 930 78 358 _%_ _o@ sss_ ENGUNE GASKET SET 332 ® 868% 32,, 883J_ _J 1005_ 51 122 524_ 26
ENGINE, Item 1 2 3 4 5 7 8 9 10 11 12 13 15 16 20 22 23 24 25 26 27 28 29 32 32A 33 34 35 36 37 40 43 45 46 51 51A 55 58 60 65 78 95 97 104 108 109 117 118 121 125 127 130 133 134 137 146 163 187 188 190 192 202 209 222 227 238 276 287 300 304 305 306 307 324 Part# 697893 399269 299819 498983 695276 695166 495786 272481 691125 691260 692232 691137 691680 691457 399781 691092 697586 222698 890021 694167 694168 694169 499631 692785 692786 692787 691866 499423 499424 691664 695759 499642 499641 691304 69130
Sears, Roebuck and Co., U.S.A.(Sears),the California Air Resources Board (CARB)and the United States Environmenta_Protection Agency (U.S.
Emissions Durability Period and Air Information Engines On Your that are certified Resources display Board (CARB) information Engine to meet Emissions the California Tier 2 Emission regarding index Labe_ Air must Durability Period and Air Index. The engine manufacturer makes this information available to the consumer on emission labels.
GARANTIA ................................ INSTRUCCIONES DE SEGURIDAD ......... MONTAJE .............................. OPERACION ........................... ESPECIFICACIONES ....................... GARANT_A L_M_TADA DE LA MAQUINA Durante un ado a partir obra, siempre y cuando de acuerdo alas despues lavadora Siesta suministradas es usada maquina de la fecha Esta garantia de la fecha de compra, esta maquina lavadora instrucciones Si esta maquina de compra.
A , ADVERTENCiA E[ escape dei motor de este producto contiene eiementos qu[micos reconocidos en ei Estado de California pot producir c&ncer, defectos de nacimiento u otros dagos de tipo reproduetivo. PELIGRO CUANDO DEP6SITO ANADA COMBUSTIBLE O VACiE EL Apague et lavadora de presi6n (posici6n OFF) y dqelo enfriar al menos pot 2 minutos antes de remover la tapa de la combustible. Afloje la tapa lentamente para dejar que ta presi6n salga det tanque.
Mantenga et chorro det agua alejado de alambrados electricos, de to contrario podrian ocurrir descargas el6ctricas fatales. Siempre use protecci6n para los ojos cuando utilice este equipo o cuando est_ cerca de donde se est6 asando et equipo. ADVERTENCIA NO juegue con partes que puedan aumentar velocidad de mando. o disminuir la NO opere ta maquina tavadora a presi6n con un valor de presi6n superior a su ctasificaci6n de presi6n. NO toque tas superficies calientes.
CONOZCA Lea e[ manual SU MAQUiNA de[ propietado Compare las i[ustraciones controles y ajustes. LAVADORA y [as reg[as con su m&quina Guarde este manual de seguridad [avadora antes a presion para referencias Pistora DE ALTA PRES[ON de poner en marcha para familiarizarse su m&quina [avadora con [as ubicaciones a presi6n.
Su maquina y estara lavadora a presion lista para set usada depositado Si tiene el combustible prob[emas a presi6n, m_quina lavadora IMPORTANTE: de cierto ensamble despues de haber y e! aceite con lavadora requiere Onicamente Cualquier de su m_quina a la linea a presi6n de ayuda de la de hacer e! aceite funcionar el recomendado Alineados resultar& RETtRE LA MAQUtNA LAVADORA PRESION DE LA CAJA Retire la caja de partes enviada con su m&quina Orificios A i lavadora dos esq
Agregue Aceite IMPORTANTE: el motor antes recomendado NOTA: de Motor Cualquier intento de que se haya depositado puede Cuando resultar agregue con la clasificacion API de servicio ADVERTENCIA el aceite del motor, de alta calidad, designado SF, SG, SH, SJ o superior, con el peso SAE 30. NO use aditivos Seleccione Gasolina o arrancar en falla del motor. aceite detergente 1.
Conecte maManguera Agua a _a Bomba mMPORTANTE: antes y e_ Suministro arranque conectar a! motor. todas La bomba daBada si arranca e! motor sin tenet todas conectadas y e! suministro agua abierto. 1. Desenrro!le extremo rociado, 5. la manguera el otro extremo a la salida mano. (no exceder del agua. Apriete 50 pies en con la mano.
COMO USAR SU MAQUINA C6mo Darle Arranque Lavadora a Presi6n LAVA,DORA A PRESTON Para darle Si tiene problemas presion, operando por favor lavadoras Ilame a la linea a presi6n Ubicaci6n su maquina lavadora de ayuda a movida para maquinas paso a paso. al 1o800o222o3136. de_ Lavadora a Presi6n Libre A[rededor de[ Lavadora a PresiSn Esta informaci6n a presi6n debe estar situado 152 cm (5 pies) de toda estructura y/o otras materias combustibles.
10, Mueva la peril!a del cebador a la posici6n "Ahogado" ("Choke"), NOTA: Siempre mantenga la control de valvula de admision en el' R_pido" ("Fast") posicione cuando operar la arandela de la presi6n. C6mo Detener Presi6n su M_quina 1. Espere quo el motor 2. Mueva la palanca Lavadora a descanse. F_ NOTA: En el caso de que el motor de que la perilla "En marcha" dol cebador este ca!iente, se oncuontre asegOrese de control a !a posici6n "Stop" ("Parado"). en la posici6n ("Run"). 1 1.
4. Para una limpieza de rociado limpieza. 5. mas efectiva, mantenga de 8 a 24 pulgadas Si co!oca la boquilla de rociado demasiado daSar la superficie, especialmente e! modo de alta presi6n. 6. No coloque la boquilla este limpiando a menos 2. Apunte la boquilla cerroio de seguridad patr6n de rociado. hacia Mueva la boquilla hacia adelante para obtener el modo de baja presi6n y para la aplicaci6n del detergente.
Enjuaqe Presion Para 1. de la M_quina Lavadora 3. a Aplique la boqui!la alta presion, oprima hacia atras el gatillo para obtener y espere e! modo de 4. que deje de salir detergente. retirando 2. de alta presion en un &rea peque6a, limpieza. Enjuage: Mueva NOTA: un rociado despues revise si la superficie presenta dafios. Si no encuentra daSos, puede continuar con el trabajo de Tambien puede detener e! tubo de succi6n la circulaci6n del detergente del recipiente.
INFORMACION Tg:CNICA SOBRE EL ESPECIFICACtONES PRODUCTO MOTOR El motor es de uno cilindros, refrigerado En e! Estado han obtenido Board de valvulas en cabeza (OHV), Espec!f!caciones por aire y de baja emisi6n.
RESPONSABIUDADES Siga el programa Se requiere ANOTE de mantenimiento de servicio CALENDARIO DEL PROPIETARIO segOn el nOmero con mayor frecuencia opere o segOn el calendario, la unidad Io que suceda en las condiciones adversas primero. descritas a continuaci6n.
Revise MANTENIMIENTO DE LA MAQUINA LAVADORA A PRESION Consulte e_ FHtro en Linea la ilustracion si se tapa siguiendo Limpie y suministre estos Filtro en Linea o antes de cada use, los residuos el lavadora a presi6n. Mantenga limpias las muelles y los mandos. Limpie todo resto de la zona que rodea al silenciador y de detras Extension para Boquillas Anillo 1.
Mantenimiento Si siente una sensacion gatiHo de la pisto[a presi6n excesiva Mantenimiento de [a Boqui[la pulsante rociadora, a[ momento puede en la bomba. de apretar que sea causada La causa principal el de los Anil[os 'O' Compre una O-Juego de Reparaci6n de Anil!o, e! articulo numera 71o75116, en sus Sears locales o Ilamando 1o800-366°PART o en linea en www.sears.com.
MANTENIM ENTO DEL MOTOR 5, Limpie la varilla de medici6n, insertela Ilenado y apdetela firmemente; la varilla de medici6n. Deposite hasta la marca el aceite "Full" vez que revise excesivamente.
Rempmace _a Bu]ia Remplace la bujia Retire anualmente o cada 100 horas de Remplace operaci6n, el area alrededor 1. Retire y revise 2. Para el uso del reemplazo o e! bujia uniforme de la chispa de re6stato, el Champion RC12YC o el bujia (0.50 de platino la separaci6n alambre para limpieza e la pantalla si esta da_ada. y retirela. la bujia. largo de la chispa RC12PYP. Revise de la bujia dei apagachispas ADVERTENCIA Limpie 3. la panta!la inspeccion.
DESPUES DE CADA USO No deber& haber agua tiempo. Los sedimentos ALMACENAMIENTO 1. modo de baja presi6n delantera). 2. la maquina Apague lavadora (boquilla ajustable Lave por un minuto e! motor y dejelo a presi6n PRECAUCION Lleve Lave e! tubo de succi6n de detergente co!ocando filtro en un balde de agua limpia al mismo tiempo hace funcionar INWERNO en la unidad par largos periodos de de minerales se pueden depositar en partes de la bombay "congelar" su funcionamiento.
ALMACENAMIENTO Si usted no planea usar la maquina mas de 30 dias, debera almacenamiento pro!ongado. Es importante las partes PROLONGADO evitar preparar a presi6n por para un de depositos de! sistema de goma alcohol indica del combustible que los combustibles (llamados la humedad, gasoho!, tales etanol con mezclas o metano!) Io que Ileva a la separaci6n acidos durante el almacenamiento.
Prob[ema Causa La bomba presenta los s[gu[entes prob[emas: no produce pres[6n o produce una presi6n errada, traqueteo, p_rd[da de presi6n, ba]o voiumen de agua. E[ detergente no se mezc[a con eJ rociado. E[ motor funciona bien So[uci6n 1, La boquilla presi6n, esta en e! modo de baja 2. La entrada de agua esta bloqueada_ 3. Suministro de agua inadecuado. 4. La manguera de entrada o presenta fugas. 5. E[ motor se apaga [a operaci6n.
Sears, Roebuck California, and CARB, Co., por sus U.S.A. sig[as (Sears), California Air en ingles) y United States Ambienta[ Dec[araci6n (derechos LA COBERTURA APLICA DE LA GARANT[A A LOS MOTORES de EE.UU., DE CONTROL CERTIFJCADOS pot de[ sistema de[ propietado DE EMISIONES ADQUJRJDOS sobre el control SE eontra defectos de [a EPA de en e[ control Los motores pequethos para exteriores modelos 1995 y posteriores una garantfa de dos athos.
Jnformaci6n Sobre el Periodo de Durabilidad de las Emisiones y e_ indice de Aire en _a Etiqueta de Emisiones de_ Motor Periodo de Cump_imiento de _a Normativa de Emisiones en ia Etiqueta de CumpHmiento de Emisiones del Motor Los motores con certificaci6n de cumplimiento de la normativa sobre emisiones de nivel 2 del California Air con la certificacion de cumplimiento de la fase 2 de las normas sobre emisiones de la United States Environmental Resources Protection Agency protecci6n del medioambiente
Your Home For repair - in your home - of all major brand appliances, iiiiiiiiiiiiiiiiii!_ _¸_ lawn and garden equipment, or heating and cooling systems, iiiiiiiiiiiiiiiiiii no matter who made it, no matter who sold it! iiiiiiiiiiiiiiiiiii For the replacement parts, accessories and iiiiiiiiiiiiiiiiiii owner's manuals that you need to do-it-yourself. iiiiiiiiiiiiiiiiiii For Sears professional installation of home appliances iiiiiiiiiiiiiiiiiii and items like garage door openers and water heaters.