Operator'sIVianual ® 3000 MAX PSI* 2.7 MAXGPiVi iViodelNo. 580.752581 HOURS: IVlon. - Fri. B a.m. to 5 p.m. (CT) WARNING Before using this product, read this manual and follow all Safety Rules and Operating instructions. ADVERTENCIA Antes de utilizar el producto, lea este manual y siga todas las Reglas de Seguridad e Instrucciones de Uso. ,, Safety ,, Assembly ,, Operation ,,iVlaintenance ,, Parts ,, Espafiol, p.
WARRANTY .......................................... 2 STORAGE........................................... REPAIR PROTECTIONAGREEMENT........................ 2 TROUBLESHOOTING.................................. SAFETYRULES...................................... 3-5 FEATURESAND CONTROLS.............................. 6 ASSEMBLY ........................................ 7-10 OPERATION....................................... 11-15 SPECIFICATIONS..................................... 16 MAINTENANCE.....
Read this pressure manual carefully become familiar with your washer. and Knowits applications, its limitations, and any hazards involved. _i, WARNING The engine exhaust from this product contains chemicals known to the State of California to cause cancer, birth defects, or other reproductive harm. Important Safety Information _i, WARNING This product contains lead and lead compounds, known to the State of California to cause birth defects or other reproductive harm.
A. WARNING Starter cord kickback (rapid retraction) can A. WARNING Fuel and its vapors are extremely flammable and explosive. result in bodily injury. Kickback will pull hand and ,_arm toward engine faster than you can let go. Broken bones, fractures, bruises, or sprains could result. Fire or explosion can cause severe burns or death. WHENADDING OR DRAININGFUEL • NEVERpull starter cord without first relieving spray gun pressure.
_i, WARNING _' Use of pressure washer can create A, WARNING Risk of eye injury. Spray can splash back or propel objects. Kickback fromslippery spray gun can cause you puddles and surfaces. to fall. • Operate pressure washer from a stable surface. • The cleaning area should have adequateslopes and drainage to reduce the possibility of a fall due to slippery surfaces. • Be extremely careful if you must use the pressure washer from a ladder, scaffolding, or any other similar location.
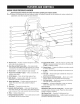
KNOWYOURPRESSUREWASHER Read the the Operator's Manual rules beforetooperating pressure Compare illustrations with and yoursafety pressure washer familiarizeyour yourself with washer. the locations of various controls and adjustments. Save this manual for future reference. A - AccessoryTray -- Provides convenient storage for accessories, such as gun, nozzle extension, etc. B - Hose Wrap and High PressureHose -- Hose wrap provides easy transport and handling of the high pressure hose.
Your pressure washer requires some assembly and is ready for use only after it has been properly serviced with the recommended oil and fuel. 6. 7. Connect pressure hose to spray gun and pump. Connectwater supply to pump. 8. Attach nozzleextension to spray gun. If you have any problemswith the assembly of your pressurewasher, please call the pressurewasher helpline at 1=800-222-3136. 9. Attach quick connect selector nozzle to nozzle extension. UNPACKTHEPRESSUREWASHER 1.
. Attach rope guide (A) through handle with plastic knob (B). Tighten by hand. Route engine recoil rope through guide. Standard Siphon Tube Cleartube with filter: When using the clear siphon tube, dilute 1 part PerfectlViWMExtreme Concentrate to 16 parts water (4 oz of concentrate makes 1/2 gallon of mix.) Attach ProjectPro@PerfectiVIWMSiphon to Pump . Align hose wrap (C) to the back side of accessory tray. Locate notch with "unlock" icon (B) on hose wrap.
Add Fuel CAUTION! Alcohol-blended fuels (called gasohol, ethanol or methanol) can attract moisture, which leadsto separation and formation of acids during storage. Acidic gas can damage the fuel system of an engine while in storage. Fuel mustmeet these requirements: • Clean, fresh, unleaded gasoline. • A minimum of 87 octane/87 AKI (91 RON). High altitude use, see High Altitude. • Gasoline with up to 10% ethanol (gasohol) or up to 15% MTBE (methyl tertiary butyl ether) is acceptable.
4. ConnectHose and Water Supply to Pump NOTICE DO NOTsiphon standing water for the water supply. Use ONLYcold water (less than 100°F). NOTICE DO NOT run the pump without the water supply connected and turned on. = Damageto equipmentresultingfrom failureto follow this instructionwill voidwarranty. 5. Connectgarden hose (not to exceed50 feet in length) to water inlet. Tighten by hand. NOTICE Using a One Way Valve (vacuum breaker or check valve) at pump inlet can cause pump or inlet connector damage.
HOWTO USEYOURPRESSUREWASHER To Start Your Pressure Washer If you have any problems operating your pressure washer, please call the pressure washer helpline at 1-800-222-3136. To start your engine-powered pressure washer for the first time, follow these instructions step-by-step. This information also applies whenever you start the engine after you have let the pressure washer sit idle for at least a day. 1.
NOTICE Before starting the pressure washer, be sure you are wearing safety goggles as described below. _i, WARNING The high pressure stream of water that this equipment produces can cut through skin _i, WARNING Risk of eye injury. Spray can splash back or propel objects. and its underlying tissues, leading to serious injury and possible amputation. Spray gun traps high water pressure, even when engine is stopped and water is disconnected, which can cause injury.
NOTICE Spray gun traps high water pressure, even when engine is stopped and water is disconnected. Follow these instructionsto changenozzle patterns: 1. Howto Use Accessory Tray The unit is equipped with an accessory tray with places to store your spray gun and nozzle extension. There is also a detachable hose wrap at the back of the accessory tray to hold your high pressure hose. 1. Place nozzle extension and selector nozzlethrough hole on accessory tray on left side of unit.
Cleaning and Applying Detergentwith the Standard Clear Siphon 2-1N-1Soap System _i, WARNING Chemical Burn Hazard. _-_ Chemicals could cause bodily injury, property damage or death. • DONOTusecausticliquid with pressurewasher. • Use ONLY pressure washer safe detergents/soaps. Follow all manufacturers instructions. Cleaning and Applying Detergent with the Project Pro® PerfectMW MSiphon To apply undiluted detergent using the blue PerfectMixTM siphon, follow these steps: 1. Review use of selector nozzle. 2.
Pressure Washer Rinsing For Rinsing: 1. Select and change to desired spray pattern nozzle on selector nozzle. See How To Use Selector Nozzle. 2. Keep spray gun a safe distance from areayou plan to spray. _i, WARNING • Be extremely careful if you must use the pressure washer from a ladder, scaffolding, or any other similar location. • Firmly grasp spray gun with both hands when using high pressure spray to avoid injury when spray gun kicks back.
ENGINETECHNICALiNFORMATiON PRODUCTSPECIFICATIONS This is a single cylinder, overhead valve (OHV), air cooled engine, it is a low emissions engine. PressureWasher Specifications Max Outlet Pressure ...................... Max Flow Rate............................. In the State of California, Model 120000 engines are certified by the California Air Resources Board to meet emissions standards for 125 hours.
OWNER'SRESPONSiBiLiTiES EmissionsControl Maintenance, replacement, or repair of the emissions controldevices and systemsmay be performed by any nonroad engine repair establishment or individual.
CheckSpray Gunand Nozzle Extension O-Ring Maintenance Examinehoseconnectionto spraygun and makesure it is secure.Testtrigger by pressingit and makingsure it springs back into placewhenyou releaseit. Do not depress red button and test trigger. You should not be able to presstrigger. Replace spray gun immediatelyif it fails anyof thesetests. Purchasean O-Ring RepairKit at your local Searsor by calling 1-800-4-1VlY-HOIVlE (469-4663) or online at www.sears.com, it is not includedwith the pressurewasher.
Checking OilLevel 1. Make sure pressure washer is on a level surface. 2. Remove oil dipstick and wipe dipstick with clean cloth. Replace and tighten dipstick. Remove and and check oil level. 3. 4. Tip your pressure washer to drain oil from oil fill into a suitable container making sure you tip your unit away from spark plug. When crankcase is empty, return pressure washer to upright position. 5. Slowly pour recommended oil (about 20 oz. (0.6 I)) into oil fill opening. Pauseto permit oil to settle.
Checkelectrode gap with wire feeler gauge and reset spark plug gap to recommended gap if necessary (see Specifications). . AFTEREACHUSE Water should not remain in the unit for long periods of time. Sediments or minerals can deposit on pump parts and "freeze" pump action. Follow these procedures after every use: 1. 5. install spark plug and tighten firmly. _ILWARNING The high pressure stream of water that NOT/CE You can purchase a new spark plug by calling 1-800-4-iVlY-NOiVlE (469-4663).
WINTERSTORAGE Change Oil While engine is still warm, drain oil from crankcase. Refill with recommended grade. See ChangingEngine Oil. NOTICE You must protect your unit from freezing temperatures. • Failure to do so will permanently damage your pump and render your unit inoperable. • Freezedamage is not covered under warranty. Protect Pump To protect the pump from damage caused by mineral deposits or freezing, use PumpSaver, item 7174403, to treat pump.
Problem Cause Correction 1. Soap spray pattern nozzle is selected. 1. Select high pressure spray pattern nozzle on selector nozzle. 2. Water inlet is blocked. 2. Clear inlet. 3. inadequatewater supply. 3. Provide adequate water flow. inlet hose is kinked or leaking. 4. Straighten inlet hose, patch leak. Clogged inlet hose strainer. 5. Checkand clean inlet hose strainer. Water supply is over IO0°F. 6. Provide cooler water supply. High pressure hose is blocked or leaks. 7.
CRAFTSMAN3000 PSi PressureWasher 500.
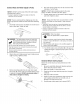
ENGINE,8riogs& $tratton, 121S02- ExplodedView 1376 I 48 SHORT BLOCK 1264 [ 1263 _ 615 _D (_ 404 307 616 718 89 32A_ 32_ 24_] 842 287 27 _ Y 46 524 2o 24 15_ _,
ENGINE,Briogs & $tratton, 121S02- ExplodedView 238 883A _ 883 635 718 36 ,:_ 1034 _I 1022 51 623 914_ 13J 25 1029 %
ENGINE,Briogs & $tratton, 121S02- ExplodedView 957 601 67O % 968 535 _0 883 @ @ 1395 Sl 4_ 76 0 121 CARBURETOR 497 623 0 OVERHAUL ___ KIT 276 _10 104_%' 627_ 6 ¢ 276 163 O 26 365347 209 O_
ENGINE,Briogs& $tratton, 121S02- ExplodedView 1095 VALVE GASKET SET 592 623 0 883A_ 993 868 51 O 304 1022 163 925 _[_ 332 455 ENGINE GASKET SET 163_ 883 524 883A 623 O 842 (_' 868 (_ 993 1022 1430 635 27
ENGINE,irilgs Item 1 3 4 5 7 11 12 13 15 16 20 22 23 24 25 Part # 796509 299819s 493279 796471 796475 796478 692232 796451 691680 796467 399781s 691092 796623 222698s 797302 797303 26 797304 797305 27 691588 28 298909 29 796470 32 691664 32A 695759 33 499642 34 795443 35 691304 36 691304 37 796536 40 692194 43 796650 45 690977 46 694039 48 797363 51 796596 58 791362 60 281434s 78 793480 81 69174O 89 692348 104 691242 117 697355 118 49487O 121 796612 122 796595 125 7966O8 133 398187 134 398188 137 796610 16
California, U.S. EPA,and Sears Emissions ControlWarranty Statement YourWarranty RightsAnd Obligations The California Air Resources Board, U.S. EPA,and Sears, Roebuck and Co., U.S.A. (Sears) are pleasedto explain the emissions control system warranty on your Model Year 2008 and later engine/equipment. In California, new small off-road engines must be designed, built, and equipped to meet the State's stringent anti-smog standards.
Thewarranty onemissions-related partsisasfollows: LookFor ReJevantEmissionsDurability Period and Air Index Information On Your Engine EmissionsLabeJ • Any warranted part that is not scheduled for replacementas required maintenancein the owner's manual supplied, is warranted for the warranty period stated above. If any such part fails during the period of warranty coverage, the part will be repaired or replaced by Sears at no charge to the owner.
GARANTIA .......................................... 32 ESPECIFICACIONES................................... CONTRATODE PROTECCIONPARA REPARACIONES......... 32 MANTENIMIENTO .................................. REGLASDE SEGURiDAD ............................ 33-35 46 47-51 ALMACENAMlENTO ................................... 52 36 REPARACIONDE DAVIes REPUESTOS .................... 53 MONTAJE ........................................ 37-40 GARANTIADEL CONTROLDE EMISIONES ...............
_lL ADVERTENCIA El escape dei motor de este producto contiene eiementos quimicos reconocidos en el Estado de California por producir c_.ncer,defectos de nacimiento u otros da_os de tipo reproductivo. Leaestemanualminuciosamente y conozca a fondolas partesy el funcionamiento desum_quina limpiadoraa presi6n.Conozcasusaplicaciones, suslirnitacionesy los peligrosinvolucrados.
A ADVERTENCIA A AI:IVERTENCIALa gasolina y sus vapores son extremadamenteinfiamables y El retroceso (repliegue r_.pido) del cable del arrancador puede producir lesiones. El retroceso impedir_, que el usuario suelte ei cable a tiempo y tirar_ de su mano y brazo hacia el motor. Como resultado, podrian producirse fracturas, contusiones 0 esguinces. • NUNCAtire dei cable dei arrancador sin eiiminar previamente la presi6n de la pistola rociadora.
A. ABVERTENCIA AVISO El rociado de alta presi6n puede da_ar elementos fr_.giles, incluyendo ei vidrio. * NO dirija la pistola rociadora hacia cristaies cuando use ei patr6n de rociado MAX (m_imo) en el boquiNade selector. El chorro de agua a alta presi6n que los tejidos provocando este equipo subcut_.neos, produce, puede atravesar iesiones ia piei y de gravedad que podrian dar lugar a la amputaci6n de un miembro. * NUNCAapunte la pistola a plantas.
CONOZCASU iViAQUINALIIViPIADORA A PRESI6N Leael Manualdel Operafioy lasreglas antes deponerenmarcha sulimpiadora a presi6n. Compare las ilustraciones con su limpiadoradesegufidad a presi6n para familiarizarse con las ubicaciones de los diferentes controles y ajustes. Guarde este manual para referencias futuras. \ A - Bandeja de accesorios - Permite almacenar cOmodamente los accesorios de serie. M - Interrupter bascalante del motor-- Deber_ estar en la posiciOn de en (I o ON) para darle arranque al motor.
Sulimpiadora apresi6n requiere decierto ensamble yestar_ lista para serusado _nicamente despu_s dehaber depositado el combustible yelaceite recomendado. Sitieneproblemasconel ensambiedesum_quinalimpiadoraa presi6n,llamea la lineadeayudade la m_quinalimpiadoraa presi6nal 1-800-222-3136= Saque todo el contenido de la caja de cart6n, a excepci6n de la limpiadora a presi6n. 2. Abra completamente la caja de cart6n cortando cada una de sus esquinas de arfiba abajo. 3.
Fije la guia de la cuerda (A) al asa con el pomo de pl_stico negro (B). Apriete a mane. Pasela cuerda del arrancador per el fijador. 5. Tubede inyecci6nest_ndartransparente Tubetransparenteconfiltro: __ diluya1 partede concentrado per 16 partesde agua.(120ml uandoutilicedeconcentrado el tubede inyecci6n est_ndar transparente, permiten obtener1,90litrosdemezcla.) Conecteel sistema de inyecci6nProject Pro@ PerfectiVlixTM a la bomba .
Aoreoueoasolina iPRECAUCION! Los combustibles con mezcla de alcohol (gasohol, etanol o metanol) pueden atraer ia humedad y provocar la separaci6n y formaci6n de _cidos durante ei almacenamiento. Los gases_cidos pueden daSarei circuito de combustible y el motor durante el almacenamiento. El combustible debe reunir los siguientes requisites: • • Gasolina sin plomo limpia y nueva. Un minimo de 87 octanes/87 AKI (91 RON). Para use a gran altitud, consulte Gran altitud.
Conectela manouera y el suministrode aoua a la bomba 4. AIflSO NO haga funcionar la bomba si no tiene el suministro conectado y abierto. Alfl$O Hace NO agua de parar de siphon para el abastecimiento de agua. Useagua SOLOfrb (menos que 100°F). • El da_oa la limpiadoraa presidn,resultadode la desatencidn a estaprecaucidn,no ser_cubiertopor la garantb. AVISO Antes de conectar las mangueras, retire y deseche los tapones de transporte de la salida de alta presi6n y de la entrada de agua de b bomba. 1.
COMOUSARSU LIMPIADORAA PRESI6N Para poneren rnarchael lirnpiadora a presi6n Si tiene problemas con el funcionamiento de su m_quina Nmpiadora a presi6n, por favor Namea la Nneade ayuda de la m_quina Nmpiadora a presi6n al 1-800-222-3136, Para darle arranque a su iimpiadora a presi6n movido a motor por primera vez, siga estas instrucciones paso a paso.
AV/SO Antesdearrancarla limpiadoraa presi6n,aseg_resede ponersegafasde seguridadcomose describea continuaci6n. A. ADVERTENCIA El chorro de agua a alta presi6n que este equipo produce, puede atravesar ia piei y A. ADVERTENCIA Riesgo de lesiones oculares. El agua rociada puede salpicar o propulsar objetos. los tejidos subcut_.neos,provocando iesiones de gravedad que podrian dar lugar a la amputaci6n de un miembro.
C6mousar el boquilla de seieclor _i, ADVERTENCIA El chorro de agua a alta presiGnque El boquilla de selector le permite cambiar entre cinco boquillas con patrones de rociado diferentes. Siempre que est_ activado el pestillo de seguridad del gatillo de la pistola rociadora, se pueden cambiar los patrones de rociado con la limpiadora a presiGn en funcionamiento. Los patrones de rocbdo varbn tal como se muestra a continuaciGn. los tejidos este equiposubcut_.
Uso inclina 7. • Para obtener un resultado 6ptimo, mantenga el boquilla de selector a una distancia de entre 20 y 61 cm (8 a 24 pulgadas) de la superficie que se limpia. • Siio aproxima demasiado, especialmentecon una boquilla de patr6n de rociado de alta presi6n, podria daSarla superficie. • NO coloque la boquilla a menos de 15 cm (6 pulgadas) cuando est_ limpiando Ilantas.
Enjuagede la mziquinalimpiadoraa presi6n Limpiezadel tubo de inyecci6nde detergente Si us6 el tubo, debe lavarlo con agua limpia antes de parar el motor. Despu_sde haber aplicado el detergente, refriegue Ja superficie y efljuageJade Jasiguiente manera: 1. 2. 1. En el boquilla de selector, seleccione la boquilla del patr6n de rociado deseada. Consulte C6mo usar el boquilla de selector. Coloque el filtro y la inyecci6n de detergente en un balde Ileno de agua limpia. 2.
INFORMACIONTECNICASOBREEL ESPECIFICACIONES DELPRODUCTO MOTOR Espe.cificaciones de la mziquina limpiadoraa preseon El motor es de uno cilindros, de vAIvulasen cabeza (OHV), refrigerado por aire y de baja emisi6n. Presi6n de saiida m_xima ........................
RECOIViENDACIONES GENERALES Recornendacionesoenerales Plan de rnantenirniento El mantenimiento peri6dico mejorar_ el rendimiento y prolongar_ la vida _til del limpiadora a presidn. Si necesita asistencia, consulte con un distribuidor de Sears o con otro distribuidor cualificado. Siga los intervalosde horas o de calendario, los que sucedan antes. Si opera en condiciones adversas (se_aladas m_s abajo) es necesado un mantenimiento m_s frecuente.
iVlANTENliVllENTO DELA iViAQUINA LllViPIADORA A PRESION 2. SIEMPRE que pare el motor, apunte con la pistola rociadora hacia una direcci6n segura, presione el seguro (bot6n rojo) y apriete el gatillo para descargar la presi6n y evitar el retroceso. Limpie los residuos _i, ADVERTENCIA El chorro de agua a alta presi6n que Limpie a diario, o antes de cada uso, los residuos acumulados en el limpiadora a presi6n. Mantenga limpias las conexiones, los muelles y los mandos.
MANTENIMIENTODELMOTOR Comprobaci6n dei nivel de aceite Compruebe el nivel de aceite antes de cada uso o cada 8 horas de funcionamiento, como minimo. Reiiene si es necesario. _i, ADVERTENCIA Chispear involuntario puede tener "_dh como resultado el fuego o el golpe el6ctrico. 1. Coloque ei limpiadoraa presi6n sobre una superficie niveiada. 2. Retire la varilla de medici6n y limpiela varilia de medici6n. Instaleei varilla de medici6n, apriete firmemente. Quite y verifique nivei dei aceite. 3.
Cambie el aceite cuandoeJmotor siga estafldo caJiefltedespuHs de haber funcionado: 1. Drene eltanque del combustible haciendofuncionar la mAquina limpiadora a presi6n hasta que el tanque est_ vacio. 2. Desconectealambre de bujb y Io mantiene lejos del bujb. 3. Limpie el Areaalrededor de b abertura para Ibnado de aceite, retire la varilla de medici6n. Limpie la varilla de medici6n. 4.
$isterna de refrioeraci6nde aire DESPUESDECADAUSO Con eltiempo, se pueden acumular residuos en las aletas de refrigeraci6n del cilindro y pasar inadvertidos mientras no se desmonte parcialmente el motor. Recomendamos que encargue la limpieza del sistema de refrigeraci6n a un distribuidor autorizado de servicio Sears siguiendo los intervalos recomendados (consulte la secci6n Calendario de Mantenimiento). Es igualmente importante que no se acumulen residuos en el motor.
ALIViACEHAIVllENTO PARAIHVIERHO Cambiode aceite Con el motor todavia caliente, drene el aceite de la caja del cig_Je_al. Vuelva a Ilenarlo con ei grado de aceite recomendado. Vea Cambio de Aceite del Motor en la secci6n Mantenimiento del Motor. AI/ISO Usted deber_, proteger su unidad de las temperaturas de congelamiento. • Si no Io hace, da_ar_ permanentementela bombay la unidad no podr_ funcionar.
Problema La bombapresentalos siguientes problemas: no producepresi6no produceuna presi6nerrada,traqueteo, p_rdidade presi6n,bajo volumende agua. EI detergentenose mezcJacon el rociado. 1. La boquilla del patr6n de rociado para SOAP 1. (jab6n) est_ seieccionada. En el boquilla de selector, seleccione la boquilla del patr6n de rociado de alta presi6n. 2. La entrada de agua est_ bloqueada. 2. Limpie la entrada. 3. Suministro de agua inadecuado. 3. Proporcione fiujo de agua adecuado. 4.
Garantiade controlde ernisionesde California, U.S. EPAy Sears Disposicionesde la garantia contradefectos deJ sistema de control de emisiones de Sears A continuaci6n se detaiian las disposiciones concretas reiativas a la Cobertura de ia garantia contra defectos dei sistema de control de emisiones. Se a_aden a la garantia de motores de Sears para motores no regulados, que figura en el Manual del Operario. Berechosy obliga¢iones de la garantia California Air Resources Board, U.S. EPAy Sears, Roebuck and Co.
Lagaranfia deloscomponentes relacionados conlas emisiones eslasiguiente: Sears.Sears no ser_.responsable de la cobertura de la garantia de fallos de componentes relacionados con el sistema de emisiones cubiertos por ia garanfia provocados por el uso de componentes complementarios o modificados. • Los failos de todo componente cubierto por ia garanfia que no se deba sustituir como parte dei plan de mantenimiento obligatorio detaliado en ei manual del propietario entregado quedar_.
Your Home For expert troubleshooting and home solutions advice: www.managemyhome.com For repair - in your home - of all major brand appliances, lawn and garden equipment, or heating and cooling systems, no matter who made it, no matter who sold it! For the replacement parts, accessories and owner's manuals that you need to do-it-yourself. For Sears professional installation of home appliances and items like garage door openers and water heaters.