Operator's iVlanual ® 3000 PSi MAX 2.7 GPM MAX Model No. 580.752270 WARem Before using this product, read this manual and follow all Safety Rules and Operating Instructions. I_ J7ADVERTENCJA Antes de utilizar el producto, lea este manual y siga todas las Reglas de Seguridad e Instrucciones de Uso. Sears, Roebuck and Co., Hoffman Estates, IL 60179 U.S.A. Visit nut Craftsman website: www.craftsman.cnm Part No.
WARRANTY .......................................... 2 SAFETYRULES...................................... 2-5 FEATURESAND CONTROLS.............................. 6 ASSEMBLY ........................................ 7-10 OPERATION....................................... 11-15 SPECIFICATIONS..................................... MAINTENANCE.................................... 16 STORAGE........................................... 22 TROUBLESHOOTING..................................
WARHJHG WARHJNG The engine exhaustfrom this productcontains chemicalsknownto the State of California to cause cancer,birthdefects, or otherreproductiveharm. _ death. Fireor explosion can cause severe burns or DANGER Contents are harmful or fatal if swallowed. Avoid contact to eyes, skin or clothing. DO NOTtake internally. Avoid breathing the mist or vapor. Overexposureto eyes or skin can cause irritation. Keep stabilizer out of the reach of children. Fuel stabilizer is a hazardous chemical.** .
WARHJHG WARHIHG Starter cord kickback (rapid retraction) can result in bodily injury. Kickback will pull hand and arm _,_.< The high pressure stream of water that this equipment produces can cut through skin and its toward engine faster than you can let go. Broken bones, fractures, bruises, or sprains could result. • NEVERpull starter cord without first relieving spray gun pressure. . When starting engine, pull cord slowly until resistance is felt and then pull rapidly to avoid kickback.
WARHJHG [ NOTICE High pressure spray may damage fragile items including [g ass. Starter hair, and other rotating parts can entangle hands, clothing, or accessories. L * NEVERoperate pressure washer without protective housing or covers. * DO NOTwear loose clothing, jewelry or anything that may be caught in the starter or other rotating parts. * Tie up long hair and remove jewelry. WARNING Risk of eye injury. " _ JSpray can splash back or propel objects.
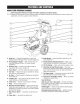
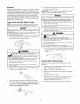
KNOWYOURPRESSUREWASHER _Head Compare the the Operator'sManual rules before pressurewasher. illustrations with and yoursafety pressure washer tooperatingyour familiarize yourself with the locations of various controls and adjustments. Savethis manual for future reference. A - Spray Gun-- Controls the application of water onto cleaning surface with trigger device. Includes trigger lock. N - Bottle Bracket -- Cleaning solution bottle fits in wire form bracket here.
Your pressure washer requires some assembly and is ready for use only after it has been properly serviced with the recommended oil and fuel. 4. 5. If you have any problemswith the assemblyof your pressurewasher, please call the pressurewasher heipline at 1-800-222-3135. 6. 7. Add oil to engine crankcase. Add fuel to fuel tank and Fresh Start fuel cartridge to fuel cap. Connect pressure hose to spray gun and pump. Connectwater supply to pump. 8. Attach nozzleextension to spray gun.
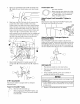
Attach rope guide (A) through handle with plastic knob (B). Tighten by hand. Route engine recoil rope through guide. , Standard Siphon Tube Cleartube with filter: When using the clear siphon tube, dilute 1 part PerfectMixTM ExtremeConcentrate to 16 parts water (4 oz of concentrate makes 1/2 gallon of mix.) Attach Project Pro@ PerfectMix Pump Align hose wrap (C) to the back side of accessory tray. Locate notch with "unlock" icon (D) on hose wrap. Position notch at top with hose wrap in vertical position.
Add FueJ Fuel must meet these requirements: * Clean, fresh, unleadedgasoline. . A minimum of 87 octane/87 AKI (91 RON). High altitude use, see High Altitude. * Gasolinewith up to 10% ethanol (gasohol) or up to 15% MTBE (methyl tertiary butyl ether) is acceptable. HOTJCE Avoid pressure washer damage. Failureto follow Operator's Manual for fuel recommendations voids warranty. DONOTuseunapprovedgasolinesuchas E85. DONOTmix oil in gasoline. DONOTmodifyengineto run on alternatefuels.
HighAltitude 4. At altitudesover5,000 feet (1524 meters),a minimum 85 octane / 85 AKI (89 RON)gasolineis acceptable.To remainemissions compliant,high altitudeadjustmentis required.Operationwithout this adjustmentwill causedecreasedperformance,increasedfuel consumption,and increasedemissions.Seea qualifiedSears dealerfor high altitudeadjustment information.Operationof the engineat altitudesbelow2,500 feet (762 meters)with the high altitudekit is not recommended.
HOWTO USEYOUR PRESSUREWASHER To Start Your Pressure Washer If you haveany problems operating your pressure washer, please call the pressure washer helpline at 1-808-222-3136. To start your engine-powered pressure washer for the first time, follow these instructions step-by-step. This information also applies whenever you start the engine after you have let the pressure washer sit idle for at least a day. Pressure Washer Location PressureWasherClearance 1.
IMPORTANT: Before starting thepressure washer, besure 11. Return recoil starter slowly. DO NOT let rope "snap back" against starter. ¢ou are wearing adequatesafety goggles. 12. When engine starts, slowly move choke lever to "Run" position, as engine warms. If engine falters, move choke lever to "Choke" position, then to "Run" position. WARNING Risk of eye injury. _Spray can splash back or propel objects. Alwayswearsafetygoggleswhenusingthis equipmentor in vicinity of whereequipmentis in use.
How to Stop Your Pressure Washer 1. 2. , Releasespray gun trigger and let engine idle for two minutes. Move throttle to SLOW position, then STOPposition. 3. Insert multi-colored spray tips in spaces provided in accessory tray. 4. Wrap high pressure hose on hose wrap then attach hose wrap to back of accessory tray. 5. Hook provided on back of accessory tray for safely storing safety goggles. WARHIHG .,i_j Backfire, fire or engine damagecould occur.
• Select cyanjetflushPrecisionSpray nozzle for 2-1N-1 Soap System TM quick high flow clean up and long reach cleaning of second story siding and windows. CAUTIOH Chemicals can cause bodily injury, and/or property damage. NEVERusecausticliquidwith pressurewasher. UseONLYpressurewashersafedetergents/soaps. Followall manufacturersinstructions. CJeaningand ApplyingDetergent with the Project Pro@ PerfectMJxTM Siphon • To apply undiluted detergent using the blue PeffectMixTM siphon, follow these steps: 1.
CJeaningand ApplyingDetergent with the Standard Clear Siphon Pressure Washer Rinsing To apply diluted detergent using the standard clear siphon tube, follow these steps: 1. Review use of PrecisionSprayTM nozzles. For Rinsing: 1. Remove low pressure nozzle from nozzle extension. 2. Attach clear siphon hose to barbed fitting on pump. 3. Mix detergent solution as required by job. 4. Place small filter end of clear siphoning tube into container with diluted solution as described above. 2.
EHGJNETECHNICALJNFORMATJOH PRODUCTSPECJFICATJOHS This is a single cylinder, overhead valve (OHV), air cooled engine, it is a low emissions engine. Pressure Washer Specifications Max Outlet Pressure ....................... Max How Rate ............................. In the State of California, Model 120000 engines are certified by the California Air Resources Board to meet emissions standards for 125 hours.
OWHER'SRESPOHSIBILITIES Pump Oil Follow the hourly or calendar intervals, whichever occurs first. More frequent service is required when operating in adverse conditions noted below. DO NOTattempt any oil maintenance on this pump. The pump is pre-lubricated and sealed from the factory, requiring no additional maintenancefor the life of the pump.
Check High Pressure Hose 3. Remove nozzlefrom end of nozzle extension. High pressure hoses can develop leaks from wear, kinking, or abuse. Inspect hose before each use. Checkfor cuts, leaks, abrasions, bulging of cover, or damage or movement of couplings. If any of these conditions exist, replace hose immediately. 4. Use a small paper clip to free any foreign material clogging or restricting nozzle (A).
ENGINEMAINTENANCE Checkingoil level Oil level should be checked prior to each use or at least every 8 hours of operation. Keep oil level maintained. 1. Make sure pressure washer is on a level surface. WARHIHG _-,_J_ _¢ Unintentional sparking can result in fire or electric shock. 2. Remove oil dipstick and wipe dipstick with clean cloth. Replaceand tighten dipstick. Removeand and check oil level. 3. Verify oil is at "Full" mark on dipstick. Replace and tighten dipstick.
ChangingEngineOil To servicethe air cleaner,fellow thesesteps: Changeengine oil after the first 5 hours and every 50 hours thereafter. If you are using your pressure washer under extremely dirty or dusty conditions, or in extremely hot weather, change oil more often. 1. Loosen two screws (A) and lift off cover (B). 2. Carefully remove air cleaner (C) from base (D). 3. Install clean (or new) air cleaner in base. Air cleaner must fit securely in base. 4.
If the engine has been running, the muffler will be very hot. Allow the muffler to cool before servicing the spark arrester. WARHIHG AFTEREACHUSE Water should not remain in the unit for long periods of time. Sediments or minerals can deposit on pump parts and "freeze" pump action. Follow these procedures after every use: s_ Contact with muffler area can result in serious burns. f_ structures or damage fuel tankcombustibles, causing a fire.
WINTERSTORAGE ChangeOil ty While engine is still warm, drain oil from crankcase. Refill with recommended grade. See ChangingEngine Oil. NOTICE ou must protect your unit from freezing temperatures. Failureto do so will permanentlydamageyour pumpand renderyour unit inoperable. Freezedamageis not coveredunderwarranty. Oil Cylinder Bore To protect the unit from freezin9 temperatures: 1. Follow steps 1-4 in the previous section After Each Use. 2.
Problem Pump has followingproblems: failure to producepressure, erratic pressure, chattering, loss of pressure, low water volume. Detergentfails to mix with spray. Cause Correction 1. Low pressure nozzle installed. 1. Replacewith high pressure nozzle. 2. Water inlet is blocked. 2. Clearinlet. 3. Inadequate water supply. 3. Provide adequatewater flow. 4. Inlet hose is kinked or leaking. 4. Straighten inlet hose, patch leak. 5. Clogged inlet hose strainer. 5.
CRAFTSMAH3000 PSi Pressure Washer 580.752270 Main Unit _ ExpJodedView 900 \ 3 --5 1_8 2@ 24
CRAFTSMAH3000 PSI Pressure Washer 580.
EHGIHE, BrJggs& Stratto.
EHGIHE, BrJggs& Stratto.
EHGIHE, Briggs & Stratto.
ENGINE, 8riggs & Stratton, 12S612 - Parts List Item 1 2 3 4 5 7 8 9 10 11 11A 12 13 15 16 20 22 23 24 25 26 27 28 29 32 32A 33 34 35 36 37 40 43 45 46 51 51A 51B 55 58 60 65 78 95 97 104 117 118 121 122 125 127 130 133 134 137 163 187 188 190 192 202 209 222 227 238 240 276 287 300 304 305 306 307 332 Part # 697893 399269 299819S 498983 792381 697230 495786 699833 691125 691781 692937 692232 691137 691680 691457 399781S 691092 790116 222698S 795429 795430 795431 795432 691866 499423 499424 691664 695759 49
Sears, Roebuck and Co., U.S.A. (Sears), the Cafifornia Air Resources Board (CARD) and the United States Environmental Protection Agency (UoSoEPA) Emissions Control System Warranty Statement (Owner's Defect Warranty Rights and Obfigations} The California Air Resources Board (CARD), U.S. EPA and Sears are pleased to explain the Emissions Control System Warranty on your small offroad engine (SORE).
Emission information Certain engines will be certified to meet the United States Environmental Protection Agency (USEPA)Phase 2 emission standards. For phase 2 certified engines, the Emissions Compliance Period referred to on the Emissions Compliance label indicates the number of operating hours for which the engine has been shown to meet Federalemission requirements.
GARANTIA .......................................... REGLASDE SEGURIDAD ............................ 32 MANTENIMIENTO .................................. 32-35 CARACTERiSTICASY CONTROLES....................... 47-51 ALMACENAMIENTO ................................... 52 36 REPARACIONDE DANOSREPUESTOS .................... 53 MONTAJE ........................................ 37-40 GARANTIADEL CONTROLDE EMISIONES ............... 54-55 OPERACION.......................................
ADVERTENCIA ADVERTENCIA El escape del motor de este preducto contiene eiementos quimicos recenocidos en el Estado de California per producir c_ncer,defectos de nacimiento La. gasolina y sus vapores son extremadamente inflamables y explosivos. g otros danes de ripe reproductive. severas e inclusive la muerte.
ADVERTEHCIA _,k,= ADVERTEHCIA El retroceso (repliegue r_.pido) del cable del arrancador El chorro de agua a alta presi6n que este equipo puede producir produce,puedeatravesar lesiones. El retroceso impedir_ que el usuario suelte el cable a tiempo y tirar_, de su mano y brazo hacia el motor. Como resultado, podrian producirse contusiones o esguinces. _ fracturas, • NUNCAtire del cable del arrancador sin eliminar previamente la presi6n de la pistola rociadora.
AVISO ADVERTEHCIA El rociado de alta presi6n puede daffar elementos fr_.giles, incluyendoel vidrio. El arrancador las manos, el ypelo, otrasla piezas ropa, 0que los rotan accesorios. pueden enredar NO dirija la pistola rociadora hacia un cristal cuando utilice la boquilla MAX (punta de alfiler). • NUNCA utilice la limpiadora a presi6n sin sus carcasas o tapas de protecci6n. NUNCA apunte la pistola a plantas.
CONOZCASU MAQUJHASISTEMADE LIMPJEZA !i _!i_!i] Lea el IVlanualdel Operarioy inssistema regias de de poneren marcha su sistema I................. Compare Ins ilustraciones con su de seguridadantes limpieza para familiarizarse con Ins ubicaciones dede loslimpieza. diferentes controles y ajustes. Guarde este manual para referencias futuras.
Su sistema de limpieza requiere de cierto ensamble y estar_ lista para ser usado Onicamentedespu_s de haber depositado el combustible y el aceite recomendado. Si tiene prohlemas conel ensamhle de su m;_quina limpiadera a presiOn,Ilame a la linea de ayuda de la m_quina limpiadora a presiOnal 1-800-222-3136. Saque todo el contenido de la caja de carton, a excepciOnde la limpiadora a presiOn. 2. Abra completamente la caja de carton cortando cada una de sus esquinas de arriba abajo. 3.
5. Fijela guiadela cuerda(A) al asaconel pomodeplAsticonegro (B).Aprietea mane.Pasela cuerdadelarrancadorper elfijador. Tube de inyecci6nest_ndar trunspurente Tube transparente con filtro: / Cuando utiliceel tube de inyecci6ntransparente, diluya 1 partede concentradoper 16 partesde agua. (120 ml de concentradoest_.ndarpermiten obtener 1,90 litros de mezcla.
Agregue Gasolina iPRECAUCION!Los combustibles con mezcla de alcohol (gasohol, EIcombgstihJe dehereunirlossiggientesreqgisitos: etanol o metanol) pueden atraer la humedad y provocar la separaciOny formaciOn de _.cidosdurante el almacenamiento. Los gases_cidos pueden da_ar el circuito de combustible y el motor durante el almacenamiento. o Gasolinasin plomolimpiay nueva. o Un rninirnode 87 octanos/87AKI (91 RON).Parausoa gran altitud,consulteGranaltitud.
Gran altitud 4. En altitudes superiores a 1.524 metros (5.000 pies), se deber_ utilizar gasolina con un minimo de 85 octanos / 85 AKI (89 RON). Para seguir cumpliendo la normativa sobre emisiones, es necesario ajustar la unidad para su uso a gran altitud. De no realizarse este ajuste, el rendimiento se reducir_ y el consumo de combustible y las emisiones aumentar_n. Para obtener mds informaci6n sobre el ajuste para gran altitud, consulte con un distribuidor cualificado de Sears.
COMB USARSU SISTEMA DE LIMPIEZA Para Porter en Marcha eJ Sistema de Limpieza Si tiene problemas con el funcionamiento de su m_.quinalimpiadora a presi6n, por favor Ilamea la lineade ayuda de la m_.quina limpiadora a presi6n al 1-808-222-3136. Para darle arranque a su sistema de limpieza movido a motor por primera vez, siga estas instrucciones paso a paso. Esta informaci6n acerca de la puesta en marcha inicial tambi@ es v_.lida para cuando vaya a darle arranque al motor despu_s de haberlo dejado la m_.
IMPORTANTE: Antesde poneren marchala limpiadoraa presiOn, asegt]rese de Ilevar gafas de protecci6n 13. Si los fuegosde motor,perono contint]acorrer, siempre se_alarel fusil en la direcci6nsegura,presioneel seguro (bot6nrojo)y el disparadordel fusil del rodo del estrujOnpara liberarla presi6nalta.Muevala palancadel ahogadora la posici6n"Ahogado"("Cheke"),y repitelos pasos10 por 12. 14.
C_mo Detener su Sistema de Limpieza 1. 2. 2. Suelte el gatillo de la pistola rociadora y deje funcionar el motor al ralenti durante dos minutos. Coloque la pistola rociadora en el orificio situado a la derecha de la bandeja de accesorios. 3. Mueva el acelerador a la posici6n "Slow" (Lento), posici6n "Stop" (Parada). Inserte las boquilla de colores en los espacios correspondientes de la bandeja de accesorios. 4.
Sistema de inyecci_n "2 en 1" Seleccione la boquilla azul verdoso PrecisionSprayTM de chorro de agua de alto caudal para limpiar revestimientos y ventanas de plantas altas. , PRECAUCI6H JET FLUSH Los productos quimicos pueden provocar lesiones de gravedad /y/o da_os materiales. NUNCAutiliceliquidosc_ustieoscon la limpiadoraa presi6n. UseEXCLUSIVAMENTE detergenteso jabonesespecialespara la limpiadoraa presi6n.Sigatodaslas instruccionesdelfabricante.
Lirnpieza y aplicaci6n de detergente con el sisterna de inyecci6n eet;_ndartransparente Enjuage de la IVl_quina Limpiadora a Presi6n Siga estos pasos para aplicar detergente diluido con el tubo de inyecci6n est_.ndar transparente: Despu6sde haber apiicade el detergente, refriegue la superficie y enjuagela de la siguiente rnanera: 1. Revise el uso de las boquillas PrecisionSprayTM. 2. Conecte la manguera de inyecci6n transparente a la bomba. 3.
JNFORMACI6HTECHICASOBREEL MOTOR ESPECIFJCACJONES DELPRODUCTO El motor es de uno cilindros, de vAIvulasen cabeza (OHV), refrigerado por aire y de baja emisi6n. Especificaciones de la M_quina Limpiadora a Presi6n En el Estado de California, los motores de la 120000 han obtenido la certificaciOn del California Air Resources Board (Consejo de recursos de aire de California) de cumplimiento de la normativa sobre emisiones durante 125 horas.
RESPONSABILIDADES DELPROPIETARJO Romba de Aceite Siga el programa de mantenimiento segOnel nOmerode horas o segOnel calendario, Io que suceda primero. Se requiere de servicio con mayor frecuencia cuando opere la unidad en las condiciones adversas descritas a continuaci6n. NO realice ninguna operaci6n de mantenimiento con el aceite de la bomba. La bomba se suministra prelubricada y sellada en f_.brica,y no requiere lubricaci6n adicional durante su vida Otil.
ADVERTEHCIA Retire la extension para boquillas de la pistola. 5& Usando una manguera de jardin, remueva cualquier desecho adicional, poniendo agua en la extension de la boquilla. Haga _sto de 30 a 60 segundos. produce, puedeatravesar la piel y los tejidos EI chorro de agua a alta presi0n quedeeste equipoque subcutAneos, provocando lesiones gravedad podrian dar lugar a la amputaci0n de un miembro. • NUNCAreparela manguerade altapresiOn.
MANTENIMIENTODELMOTOR Cemprohaci6n del nivel de aceite Cornpruebe el nivel de aceite antes de cada uso o cada 8 horas de funcionamiento, como minimo. Rellene si es necesario. ADVERTENCIA _'_ ¢ 1. Coloque el limpiadora a presi6n sobre una superficie nivelada. Chispear involuntariopuedetener como resultado el 2. Retire la varilla de medici@ y limpie la varilla de medici@. Instale el varilla de medici@, apriete firmemente. Quite y verifique nivel del aceite. fuego o el golpe el_ctrico. 3.
BempJace la BujJa Cambie el aceite cuandoel motorsiga estando caliente despg_s de haber funcionado: 1. Drene el tanque del combustible haciendo funcionar la m_quina limpiadora a presi6n hasta que el tanque est_ vacio. 2. Desconectealambre de bujia y Io mantiene lejos del bujia. 3. Limpie el _rea alrededor de la abertura para Ilenado de aceite, retire la varilla de medici6n. Limpie lavarilla de medici6n. 4.
Si el motor ha estado funcionando, el silenciador estar_ bastante caliente. Deje que el silenciador se enfrie para poder darle servicio al apagachispas. 2. Desconectemanga del fusil del rocio y salida alta de presiOn en la bomba. DesagLieagua de la manga, del fusil, y de la extensi6n de boquilla. Use un harapo para quitar la manga. o Retire la pantalla del apagachispaspara limpieza e inspecci6n. 3. o Remplace la pantalla si est,. da_ada.
ALMACENAMIEHTO PARA JNViERNO Cambiode aceite Con el motor todavia caliente, drene el aceite de la caja del cigiJe_al. Vuelva a Ilenarlo con el grado de aceite recomendado. Vea Cambio de Aceite del Motor en la secci6n Mantenimiento det Motor. AVISO Usted deber_,proteger su unidad de las temperaturas de _elamiento. si no Io hace,daiiar_perrnanenternente la bornbayla unidadno podr_ funcionar. Aceite el Di_metro Interior del Ciiindro .
Problema CaUS8 Soiuci6n EstAusandola boquillade bajapresi6n. 1. Cambie la boquilla a una de las de boquilla de alta presi6n. 2. La entrada de agua estA bloqueada. 2. Limpie la entrada. 3. Suministro de agua inadecuado. 3. Proporcione flujo de agua adecuado. 4. La manguera de entrada estA doblada o presenta fugas. 4. Estire la manguera de entrada, coloque un parche en la fuga. Labombapresentalossiguientes 5.
Sears, Roebuck andCo., U.S.A.(Sears),CaliforniaAir Resources Board(Consejode Recursossobreel Aire de California,CARB,por sus siglas en ingles)y United StatesEnvironmental ProtectionAgency(Agenciade Protecci6n Amhiental de EE.UU., EPA,porsos siglas en ingles). Declaraci6n degarantiadel sistema decontrol de emisiones (derechos y obligacionesdel propietario parala garantiacontradeiectos) California Air Resources Board (CARB), U.S.
InformatiOn sobre emisiones Algunos motores cuentan con la certificaci6n de cumplimiento de la fase 2 de las normas sobre emisiones de la United States Los motores con certificaci6n de cumplimiento de la normativa sobre emisiones del California Air ResourcesBoard (CARB) deben mostrar informaci6nsobre el periodo de durabilidad de las emisiones y el indice de aire. El fabricante del motor ofrece esta informaci6nal consumidor mediante etiquetas de emisiones.
Your Home For expert troubleshooting and home solutions advice: www.managemyhome.com For repair - in your home - of all major brand appliances, lawn and garden equipment, or heating and cooling systems, no matter who made it, no matter who sold it! For the replacement parts, accessories and owner's manuals that you need to do-it-yourself. For Sears professional installation of home appliances and items like garage door openers and water heaters.