
Manual


r
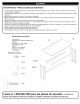
STEP (1):
AA(8) BB(8) CC(8)
\j
EE(4)
Assemble (2) (EE) in each (A). Some adjustments may be
necessary after workbench is in desired position.
\\\\\\\\\\
• Place workbench top, (D) with coated side down. (Use
packaging material to prevent scratches.
Note: The rail (B) with the label should be placed toward the front
of the unit with the label upside down.
• Assemble (2) (A) and (2) (B), as shown, using (8) (AA), (8)
(BB), and (8) (CC). Flanges of (B) should point in. Notches
should be up.
• Finger tighten.
(BE)
............... on top
AA
\
\
CC _\
A
Notches
Front on top
Back _B
Flanges
point in
f
STEP 2:
AA(4)
BB(4)
CC(4)
• Attach remaining (B) in top back set of holes in (2) (A) as
shown, using (4) (AA), (4) (BB), and (4) (CC). Flanges of (B)
should point out.
• Finger tighten.
CC
AA
B
.........Flanges
point out
Front
Back
• Square the unit and wrench tighten all fasteners.
,J