
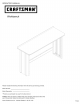
Manual


r
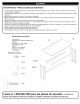
STEP 3:
DD(11 )
• Position flame assembly on workbench top, (D) as desired.
Note: The back of the work bench flame must be at least 1-1/2
inches (38 mm) from the back of the workbench top (D).
• Mark centers of (6) mounting holes.
• Move workbench assembly for access.
• Drill (6) 1/8" pilot holes 1/2" deep in mounting hole locations.
• Reposition workbench assembly on workbench top (D).
• Attach using (6) (DD).
Note: Additional fasteners may be used to attach workbench top
through holes in side support if desired. (Not supplied)
/
1-1/2 inches
38 mm
• Place the workbench in its upright position.
• Position (C) centered against back of workbench top (D), with
flange underneath.
• Mark center of (5) mounting hole locations using the holes in
flange of (C) as a template. Make sure (C) does not move.
• Remove (C) for access.
• Drill (5) 1/8" pilot holes 1/2" deep in mounting hole locations.
• Reposition (C) on workbench top (D).
• Attach using (5) (DD).
Flange
underneath
"C
f
Leveling Foot Adjustment //
/
/
• Adjust leveling foot to /
/
desired position with flat _....
head screwdriver or 7/16 /
open end wrench as shown, i
'\\
f
• Periodically the surfaces should be cleaned with a mild
• detergent and water.
Grease and oil can be removed with most standard cleaning
• fluids. For safety, use a nonflammable cleaning fluid.
Auto wax wilt preserve the unit's luster finish. Apply the wax
to a car. The wax will also help protect the unit against
scratches.