
Instruction Manual


6
STEP 7:
STEP 8:
NN(2)GG(2) EE(2)
PP (2)
G
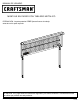
Note: Outlet strip may be mounted on left or right side.
Right side mounting shown.
• Place G in opening in C.
• Attach G using (2) GG, (2) NN and (2) EE.
EE
GG
NN
H
Note: Logo strip may be mounted on left or right side. Left
side mounting shown.
• Place H in opening in C.
• Attach H using (2) PP, making sure they snap into
place.
• Adhesive must adhere to pegboard.
PP
FF
• Drill 1/8" pilot holes in top using holes in E as a template.
• Drill 1/8" pilot holes in top using holes in C as a template.
• Attach using (6) FF.
FF
Front
Back
Reattach top
using existing
hardware.
• Place top on the bench in the desired location.
• Mark centers of mounting holes to be drilled. (If needed)
• Drill 1/8" pilot holes in top. (If needed)
• Reattach top using existing hardware.
• Wrench tighten all fasteners.
STEP 6:
NOTE: To reattach the top, new pilot holes may need to be
marked and drilled.
FF(6)