Operator’s Manual 9 Gallon Wet/Dry Vacuum Model No. 125.12005 CAUTION: Before using this product, read this manual and follow all its Safety Rules and Operating Instructions. Safety Assembly Operation Maintenance Parts Español - página 16 Sears Brands Management Corporation, Hoffman Estates, IL 60179 U.S.A www.craftsman.
Warranty CRAFTSMAN ONE YEAR FULL WARRANTY FOR ONE YEAR from the date of purchase, this product is warranted against defects in material or workmanship. A defective product will be replaced free of charge. For warranty coverage details to obtain free replacement, visit the web page: www. craftsman.com/warranty This warranty does not cover bags, filters, hose or attachments, which are expendable parts that can wear out from normal use within the warranty period.
starting, unplug power cord before changing or cleaning filter. • Do not leave Wet/Dry Vac unattended when plugged in. Unplug from outlet when not in use and before servicing. • Turn off Wet/Dry Vac before unplugging. • Do not put any object into ventilation openings. Do not vacuum with any ventilation openings blocked; keep free of dust, lint, hair or anything that may reduce air flow. • Keep hair, loose clothing, fingers, and all parts of body away from openings and moving parts.
Introduction This Wet/Dry Vac is intended for vacuuming wet and dry materials and may be used as a blower. Read this operator's manual to familiarize yourself with the product features and to understand the specific usage of your new Wet/Dry Vac. Table of Contents Section Page Section Page Warranty ................................................. 2 Maintenance .........................................10 Important Safety Instructions ........... 2 Emptying the Collection Tank ........
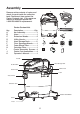
Assembly A Remove entire contents of carton and check for parts inside the collection tank. Check each item against the Carton Contents List. If any parts are missing or damaged please call 1-800-469-4663 for replacement. B C Carton Content List Key A B C D E F G H I J K Description........................Qty. Vac Assembly.........................1 Hose.......................................1 Extension Wands..................2 Utility Nozzle.........................1 Hose Storage Rack...............
Assembly (continued) A Phillps head screw driver is required. 1 2 3 4 5 6a 6b 6c 6d 7 8 9 10 ! WARNING: Do not plug in power 6. Position the hose storage rack as illustrated. Insert one side of the rack into the channel making sure it is secured in place. Squeeze in the other end and insert it into the corresponding channel making sure it is secured. (Fig. 6a - Fig. 6d) 7. Place the power head back on the collection tank, and secure into place using the 2 side latches. (Fig. 7 & Fig. 8) 8.
Operation Vacuuming Dry Materials ! WARNING: Be sure to read, understand and apply all the information in the Important Safety Instructions section at the beginning of this operator's manual. Do not vacuum in areas with flammable gases, vapors, or explosive dusts in the air. Flammable gases or vapors include but are not limited to: lighter fluid, solvent type cleaners, oil-base paints, gasoline, alcohol or aerosol sprays. Explosive dusts include but are not limited to: coal, magnesium, grain or gun powder.
Operation (continued) Vacuuming Liquids ! WARNING: Be sure to read, understand and apply all the information in the Important Safety Instructions section at the beginning of this operator's manual. Do not vacuum in areas with flammable gases, vapors, or explosive dusts in the air. Flammable gases or vapors include but are not limited to: lighter fluid, solvent type cleaners, oil-base paints, gasoline, alcohol or aerosol sprays.
Operation (continued) Blowing Feature ! WARNING: Always wear safety goggles complying with ANSI Z87.1 (or in Canada, CSA Z94.3) before using blower. ! WARNING: Keep bystanders clear from blowing debris. ! WARNING: Wear a dust mask if blowing creates dust that might be inhaled. 1 2 6 7 3 4 This Wet/Dry Vac has blowing capabilities. To use the blower feature follow the instructions listed. 1. Verify that the power cord is disconnected from the outlet. (Fig. 1) 2.
Maintenance Emptying the Collection Tank 1 2 3 4 7. Place power head on collection tank and secure latches. 1. Verify that the power cord is disconnected from the outlet. (Fig. 1) 2. Disconnect the hose from the vacuum. (Fig. 2) 3. Undo the latches and remove the power head from the collection tank. (Fig. 3) Place power head on a soft, clean surface upside down. 4. Clear all dirt or debris from the collection tank and hose into a proper waste container. (Fig. 4) 5. Clean or replace the filters. 6.
Maintenance (continued) IMPORTANT! Clean or change the cartridge filter regularly for best performance. ALWAYS USE CARTRIDGE FILTER FOR DRY VACUUMING. If the machine is used without the cartridge filter, the motor will burn out and the warranty will be voided. Always keep spare filters on-hand. ! WARNING: Always disconnect the plug from the power outlet before removing the power head from the collection tank.
Maintenance (continued) Installing & Cleaning Foam Sleeve Filter 1 2 3 4 Installing Foam Sleeve Filter 1. Verify that the power cord is disconnected from the outlet. (Fig. 1) 2. Remove power head from collection tank. If cartridge filter is installed, remove as shown on page 10 "Removing and Cleaning Cartridge Filter". 3. Carefully slide foam sleeve filter down over the filter cage making sure the whole cage is covered. (Fig. 2 & 3) 4. Place power head on collection tank and secure latches.
Troubleshooting WARNING: TO REDUCE THE RISK OF ELECTRIC SHOCK UNPLUG BEFORE TROUBLESHOOTING. Problem Possible Causes Corrective Action Vacuum will not operate . 1) No power supply. 1) Check power supply – cord, breakers, fuses. 2) Faulty power cord. 2) Unplug and check the power cord. If damaged, have it repaired by a professional. Dust comes out from motor cover. Reduced efficiency and motor/speed vibration. 3) Empty collection tank. 3) Collection tank is full. 4) Switch in the wrong position.
Repair Parts 125.12005 9 Gallon Wet/Dry Vac Always order by part number, not by key number. Always mention the model number when ordering parts. The model number is found on the serial plate located on the vacuum. To order parts, call 1-800-469-4663. WARNING: Servicing of double-insulated wet/dry vacuum. With double-insulated wet/dry vacuum, two systems of insulation are provided instead of grounding. No grounding means is provided on a double-insulated appliance, nor should a means for grounding be added.
Repair Parts (Continued) 9 Gallon Wet/Dry Vac 15
Manual Del Operador Aspiradora Para Materiales Húmedos/Secos De 9 Galones Núm. de modelo 125.12005 Seguridad PRECAUCIÓN: Antes de usar este producto, lea este manual y siga todas las reglas de seguridad e instrucciones de operación. Ensamble Operación Mantenimiento Piezas English- Page 1 Sears Brands Management Corporation, Hoffman Estates, IL 60179 EE.UU. www.craftsman.
Garantía GARANTÍA TOTAL DE UN AÑO DE CRAFTSMAN DURANTE UN AÑO a partir de la fecha de compra, este producto está garantizado contra defectos de material o mano de obra. Un producto defectuoso será reemplazado sin ningún costo. Para detalles sobre la cobertura de la garantía para obtener un reemplazo gratuito, visite la página web: www.craftsman.com/warranty.
• No deje la aspiradora de material húmedo/seco desatendida cuando la conecte. Desconéctela del tomacorriente cuando no está en uso y antes de realizar el servicio. • Apague la aspiradora de material húmedo/seco antes de desconectarla. • No coloque ningún objeto en las aberturas de ventilación. No aspire con ninguna de las aberturas de ventilación bloqueadas; manténgala libre de polvo, pelusa, cabello o cualquier objeto que pudiera reducir el flujo de aire.
Introducción Esta aspiradora de material húmedo/seco está diseñada para aspirar materiales húmedos y secos, además puede usarse como un soplador. Lea este manual del operador para familiarizarse con las características del producto y para entender el uso específico de su nueva aspiradora de material húmedo/seco. Índice Sección Sección Página Página Garantía .................................................... 17 Mantenimiento .........................................
Ensamble A Retire todo el contenido de la caja y verifique si hay partes dentro del tanque de recolección. Verifique cada parte contra la lista de contenido de la caja. Si hay alguna parte faltante o dañada, llame al 1-800-469-4663 para recibir un reemplazo. B C Lista Del Contenido De La Caja Clave A B C D E F G H I J K Descripción ............................. Cantidad Ensamble de la aspiradora.................. 1 Manguera ............................................. 1 Tubos extensores ..............
Ensamble (continuación) Se requiere de un destornillador de cabeza Phillips. 1 2 3 4 5 6a 6b 6c 6d 7 8 9 10 ! ADVERTENCIA: No enchufe el 6. Para su comocidad, el estante para guardar la manguera viene preinstalado. De no estar instalado, ponga el estante para guardar la manguera tal como se indica en la ilustración. Inserte un lado del estante en el canal asegurándose de que quede fijo en su lugar.
Operación Aspiración de Materiales Secos ! ADVERTENCIA: Asegúrese de leer, entender y aplicar toda la información de la sección de instrucciones de seguridad importantes que está al inicio de este manual de operaciones. No aspire en áreas con gases inflamables, vapores o polvos explosivos en el aire. Los gases o vapores inflamables incluyen, entre otros: líquidos encendedores, limpiadores de tipo solvente, pinturas con base de aceite, gasolina, alcohol o aerosoles.
Operación (continuación) Aspiración de Líquidos ! ADVERTENCIA: Asegúrese de leer, entender y aplicar toda la información de la sección de instrucciones de seguridad importantes que está al inicio de este manual de operaciones. No aspire en áreas con gases inflamables, vapores o polvos explosivos en el aire. Los gases o vapores inflamables incluyen, entre otros: líquidos encendedores, limpiadores de tipo solvente, pinturas con base de aceite, gasolina, alcohol o aerosoles.
Operación (continuación) Función de Soplado ! ADVERTENCIA: Siempre use lentes de seguridad que cumplan con la norma ANSI Z87.1 (o en Canadá, CSA Z94.3) antes de usar el soplador. ! ADVERTENCIA: Mantenga a los transeúntes lejos de los desechos voladores. ! ADVERTENCIA: Use una mascarilla anti polvo si el soplado crea polvo que pudiera inhalarse. 1 2 6 7 3 4 Esta aspiradora de material húmedo/seco tiene capacidades de soplado.
Mantenimiento Cómo Vaciar el Tanque de Recolección 1 2 3 1. Verifique que el cable de corriente esté desconectado del tomacorriente. (Fig. 1) 2. Desconecte la manguera de la aspiradora. (Fig. 2) 3. Abra los pasadores y retire la cabeza motriz del tanque de recolección. (Fig. 3) Coloque la cabeza motriz en una superficie suave y limpia en posición invertida. 4. Limpie toda la suciedad o desechos del tanque de recolección y la manguera en un recipiente de desperdicio adecuado. (Fig. 4) 5.
Mantenimiento (continuación) ! ADVERTENCIA: Siempre desconecte IMPORTANTE: Para un mejor desempeño, limpie o cambie el filtro de cartucho con regularidad. SIEMPRE USE EL FILTRO DE CARTUCHO PARA ASPIRAR MATERIAL SECO. Si la máquina se usa sin el filtro de cartucho, el motor se quemará y la garantía se anulará. Siempre tenga filtros de repuesto a la mano. el enchufe del tomacorriente antes de quitar la cabeza motriz del tanque de recolección.
Mantenimiento (continuación) Instalación y Limpieza del Filtro de Manga de Espuma 1 2 3 4 5 Limpieza del filtro de manga de espuma 1. Después de retirar la cabeza motriz en posición invertida, retire con cuidado el filtro de manga de espuma. (Fig. 4) 2. Use una solución de jabón suave y agua para lavar el filtro de manga de espuma y enjuague con agua limpia. (Fig. 5) 3. Deje secar el filtro al aire libre antes de instalarlo y usarlo de nuevo. Instalación del filtro de manga de espuma 1.
Resolución de Problemas ADVERTENCIA: PARA REDUCIR EL RIESGO DE DESCARGAS ELÉCTRICAS, DESCONECTE LA ASPIRADORA ANTES DE RESOLVER UN PROBLEMA. Problema La aspiradora no funciona. Causas posibles Acción correctiva 1) No hay suministro de energía. 1) Revise el suministro de energía cable, disyuntores, fusibles. 2) Cable de corriente defectuoso. 2) Desconecte y revise el cable de corriente. Si está dañado, envíelo a reparar con un profesional. 3) El tanque de recolección está lleno.
Partes de Repuesto 125.12005 Aspiradora De Material Húmedo/Seco De 9 Galones Siempre ordene por número de parte y no por número de clave. Siempre mencione el número del modelo cuando ordene partes. El número de modelo se encuentra en la placa de serie que se encuentra en la aspiradora. Para ordenar partes, llame al 1-800-469-4663. ADVERTENCIA: Cómo dar servicio a una aspiradora de material húmedo/seco de doble aislamiento.
Partes de Repuesto (Continuación) Aspiradora De Materiales Húmedos/Secos De 9 Galones 30