Owner's Manual GRASS CATCHER Model No. 917.249850 CAUTION: • • • • • Read and follow all Safety Rules and Instructions before operating this equipment. Sears, Roebuck and Co., Hoffman Estates, Safety Assembly Operation Customer Responsibilities Repair Parts IL 60179 Visit our Craftsman website:www.sears.
SAFETY RULES Safe Operation Practices for Ride-On Mowers _J_ IMPORTANT: THIS CUTTING MACHINE IS CAPABLE OF AMPUTATING HANDS AND FEET AND THROWING OBJECTS. FAILURE TO OBSERVE THE FOLLOWING SAFETY INSTRUCTIONS COULD RESULT IN SERIOUS INJURY OR DEATH. I. GENERAL OPERATION DO NOT: Read, understand, and follow all instructions in the manual and on the machine before starting. Only allow responsible adults, who are familiar with the instructions, to operate the machine.
SAFETY RULES _lb Safe Operation Practices Be sure the area is clear of other people before mowing. Stop machine if anyone enters the area. Never carry passengers or children even with the blades off. Do not mow in reverse unless absolutely necessary. Always look down and behind before and while backing. Never carry children. They may fall off and be seriously injured or interfere with safe machine operation. Keep children out of the mowing area and under the watchful care of another responsible adult.
KNOW YOUR GRASS CATCHER READ THIS OWNER'S MANUAL AND SAFETY RULES BEFORE ASSEMBLING OR OPERATINGYOU R GRASS CATCH ER. Compare the illustrations with the carton contents to familiarize yourself with the parts before starting the assembly. Study the operating instructions and safety precautions thoroughly to insure proper functioning of your Grass Catcher and to prevent injury to yourself and others. Save this manual for future reference.
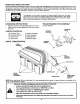
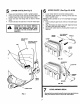
1 1. BAGGER SUPPORT ASSEMBLY (See Figs. 1A & 1B) MOUNTING COVER ASSEMBLY TO SUPPORT ASSEMBLY (See Fig. 2) NOTE: For ease of assembly, you may wish to obtain the assistance of another person for mounting cover assembly to tractor. Remove and discard the upper bolt on both sides of the drawbar. Using the same holes, install the shoulder bolts supplied and tighten securely. REMOVE AND DISCARD UPPER BOLTS ANDINSTALL SHOULDER BO_SSUPPLIED 1. Position cover assembly on ground behind tractor as shown. 2.
CONTAINER 1. 2. ASSEMBLY CONTAINER (See Fig. 3) Place bottom half inside of top half, as shown. Place one foot inside bottom half and lift top half to meet bottom half. (See Fig. 4) 1. Install one container to left side first with warning to outside of unit. Install another container to center position and one in right position. NOTE: Right container should always overlap left container at center supports. 3. Press halves tightly together while lifting top to lock into place as shown.
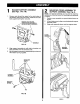
5 1. 2. 3. 4. LOWER CHUTE (See Fig. 5) UPPER Raise and hold deflector shield in upright position. Place slot in lower chute over tab on mower deck and position lower chute over deck opening as shown. Hook rear latch into flange hole on back of mower deck. Hook front latch into tab hole on front of mower deck. CHUTE (See Figs. 6A & 6B) 1. Lower mower deck to its lowest cutting position. 2. Assemble upper chute by inserting curved end into hole in back of cover.
TIPS FOR IMPROVED OPERATION: Avoid cutting wet grass or in the morning while the dew is still heavy, Grass clippings collected under these conditions tend to be sticky and adhere to the walls of the flow path causing clogging. Your bagger is equipped with a full bagger indicator. Movement of the wheel increases as the bags fill.The wheel will be spinning fastest just before the bags fill completely. When the wheel stops, it indicates that the bags are full and the chutes have become clogged.
GENERAL STORAGE RECOMMENDATIONS When gra_ catcher is to be stored for a period of time, clean it th: ,-t::ghly, remove all dirt, grass, leaves, etc. Store in a clean, _;y place. Always observe safety rules when performing any maintenance. Before each use check for loose fasteners. Clean unit thoroughly after each use. CAUTION: Do not leave grass in bagger containers. Empty containers aftereach use and before storing. Failure to do so may result in spontaneous combustion which could develop into a fire.
REPAIR PARTS GRASS CATCHER - - MODEL NUMBER 917.
REPAIR PARTS GRASS CATCHER KEY NO. 2 3 4 5 6 7 8 9 ...= -" 10 11 12 13 14 15 16 18 20 21 22 PART NO. 69180 127533 139851 176741 18021008 130933 87175 19061216 7206J STD541810 STD551110 109808X 2029J 130760 130759 174345 71161010 132796 140809 - - MODEL NUMBER DESCRIPTION Nut, Crownlock #10-24 Screen, Cover Cover Assembly (Includes 3, 37, 38, 39) Chute, Upper Screw, Special #10-14xl/2 Full Bagger Indicator Screw, #10-24 x 1-1/8 Washer 3/16x3/4x16 Ga.
Get it fixed, at your home or ours! Your Home For repair - in your home - of all major brand appliances, lawn and garden equipment, or heating and cooling systems, no matter who made it, no matter who sold it! For the replacement parts, accessories and owner's manuals that you need to do-it-yourself. For Sears professional installation of home apphances and items like garage door openers and water heaters. 1-800-4-MY-HOME (1-800-489-4663) www.sears.com _ Anytime, day or night (U.S.A. and Canada) www.