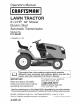
Operator's Manual CRRFrSMRM° LAW TRACTO 21.0 HR* 46" Mower Electric Start Automatic Transmission Model No. 917.28852 917.25441 • EspaSol, p. 33 This product has a low emission engine which operates differently from previously built engines. Before you start the engine, read and understand this Owner's Manual. IMPORTANT: Read and follow all Safety Rules and Instructions before operating this equipment.
Warranty .................................................. Safety Rules ............................................ Product Specifications ............................. Assembly/Pre-Operation ......................... Operation ................................................. Maintenance Schedule .......................... Craftsman Riding Equipment CRAFTSMAN 2 3 6 7 9 16 Maintenance .......................................... 16 Service and Adjustments ....................... 21 Storage .........
_DANGER: This cutting machine is capable of amputating hands and feet and throwing objects. Failure to observe the following safety instructions could result in serious injury or death. _I, WARNING: In orderto prevent accidental starting when setting up, transporting, adjusting or making repairs, always disconnect spark plug wire and place wire where it cannot contact spark plug. • _,WARNING: Do not coast down a hill in neutral, you may lose control of the tractor.
li. SLOPE OPERATION • Slopes are a major factor related to loss of control and tip-over accidents, which can result in severe injury or death. Operation on all slopes requires extra caution. If you cannot back up the slope or if you feel uneasy on it, do not mow it. • Mow up and down slopes, not across. • Watch for holes, ruts, bumps, rocks, or other hidden objects. Uneven terrain could overturn the machine. Tall grass can hide obstacles.
• • • Keep the nozzle in contact with the rim of the fuel tank or container opening at all times until fueling is complete. Do not use a nozzle lock-open device. Iffuel is spilled on clothing, change clothing immediately. Never overfill fuel tank. Replace gas cap and tighten securely. • • • GENERALSERVlCE • • • • • • • • • Never operate machine in a closed area. Keep all nuts and boltstightto Ensurethe equipment is in safe working condition. Nevertamperwithsafetydevices.
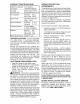
PRODUCT SPECIFICATIONS Gasoline Capacity and Type: 2.50 Gallons Unleaded Regular Oil Type API-SG-SL): SAE 30 (above 32°F) SAE 5W30 (below 32°F ' Oil Capacity: W/Filter: W/O Filter: Spark Champion RC12YC (Gap: .030") Plug: Ground Speed Charging Forward: Reverse: System: Battery: Blade 3 Amps 5 Amps 45-55 Congratulations on making a smart purchase. Your new Craftsman® product is designed and manufactured for years of dependable operation.
Slope Sheet Keys (2) Keys Your new tractor has been assembled unassembled for shipping purposes. TOOLS REQUIRED A socket wrench easier. Standard at the factory (2) 7/16" Pliers Utility wrenches knife TRACTOR TO ADJUST FROM Remove all accessible loose parts and parts cartons from carton. Cut along dotted lines on all four panels of carton. Remove end panels and lay side panels flat. Check for any additional loose parts or cartons and remove. BEFORE REMOVING FROM SKID TO CHECK 1.
TO ROLL Operation TRACTOR section OFF SKID for location (See and Ivf'CHECKLIST function of controls) Before you operate your new tractor, we wish to assure that you receive the best performance and satisfaction from this Quality Product. 1. Raise attachment lift lever to its highest position. 2. Release parking brake by depressing clutch/brake pedal. 3. Place freewheel control in "transmission disengaged position" (See "TO TRANSPORT"in Operation section ofthis manual). 4.
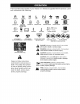
These symbols may appear on your tractor or in literature supplied with the product. Learn and understand their meaning. R REVERSE N H NEUTRAL L HIGH I',,I @ -_ LOW CHOKE FAST SLOW IGNITION ENGINE OFF REVERSE OPERATION SYSTEM (ROS) ENGINE ON ENGINE START _D _ E21 { LIGHTS ON FUEL BATTERY PARKING BRAKE MOWER HEIGHT SWITCH MOWER LIFT j.
KNOW YOUR TRACTOR READ THIS TRACTOR OWNER'S MANUAL AND SAFETY RULES BEFORE OPERATING Compare the illustrations with your tractor to familiarize yourself with the locations various controls and adjustments. Save this manual for future reference. YOUR of 03078 Our tractors conform American to the applicable safety standards National Standards Institute.
The operation of any tractor can result in foreign objects thrown into the eyes, which can result in severe eye damage. Always wear safety glasses or eye shields while operating your tractor or performing any adjustments or repairs. We recommend standard safety glasses or a wide vision safety mask worn over spectacles. HOW TO USE YOUR TRACTOR NOTE: TO SET PARKING BRAKE tween half and full speed (fast) position, before stopping, maycause engineto "backfire".
TO MOVE FORWARD BACKWARD AND TO ADJUST GAUGE Gauge wheels are properly adjusted when they are slightly off the ground when mower is at the desired cutting height in operating position. Gauge wheels then keep the deck in proper position to help prevent scalping in most terrain conditions. The direction and speed of movement is controlled by the motion control lever. (J) NOTE: Adjust gauge a flat level surface. 1. Start tractor 2. 3. neutral position. Release parking brake.
REVERSE OPERATION SYSTEM IMPORTANT: (ROS) _,WARNING" Backing up with the attachment clutch engaged while mowing is strongly discouraged. Turning the ROS "ON", to allow reverse operation with the attachment clutch engaged, should only be done when the operator decides it is necessary to reposition the machine with the attachment engaged. Do not mow in reverse unless absolutely necessary.
BEFORE STARTING CHECK ENGINE THE ENGINE 3. WARM WEATHER (50°F/10°C GASOLINE lever in neutral STARTING and above) 7. When engine starts, move the throttle control to the fast position. • The attachments and ground drive can now be used. Ifthe engine does not accept the load, restart the engine and allow it to warm up for one minute using the choke as described above. of filler neck. Do not overfill. Usefresh, clean, regular unleaded gasoline with a minimum of 87 octane.
PURGE TRANSMISSION MOWING A o Tire chains cannot be used when the mower housing is attached to tractor. o Mower should be properly leveled for best mowing performance. See "TO LEVEL MOWER HOUSING" in the Service and Adjustments section of this manual. • The left hand side of mower should be used for trimming. Drive so that clippings are discharged onto the area that has already been cut. Have the cut area to the right ofthe tractor.
MAINTENANCE SCHEDULE BEFORE EACH USE EVERY EVERY EVERY EVERY EVERY BEFORE 8 HOURS 25 HOURS 50 HOURS 100 HOURS SEASON STORAGE m Check Brake Check Tire Pressure T Check Operator A Check for Loose C ChecWReplace T Lubrication 0 Check Battery R Clean Battery Clean Debris Check Transaxle u Operation Mower Check V-Belts Check Engine Presence Mower I[_ _ Blades _3 _f Level _4 and Terminals Off Steering _ Plate _5 Cooling Levelness _#' Oil Level Engine if
TRACTOR Alwaysobservesafetyruleswhenperforming any maintenance. BRAKE OPERATION If tractor requires more than five (5) feet to stop at highest speed in highest gear on a level, dry concrete or paved surface, then brake must be serviced. (See "TO CHECK BRAKE" in the Service and Adjustments section of this manual).
BATTERY ENGINE Your tractor has a battery charging system which is sufficient for normal use. However, periodic charging of the battery with an automotive charger w[[[ extend its life. • Keep battery and terminals dean. • Keep battery bolts tight. • Keep small vent holes open. • Recharge at 6-10 amperes for 1 hour. NOTE: The original equipment battery on your tractor is maintenance free. Do not attempt to open or remove caps or covers. Adding or checking [eve[ of electrolyte is not necessary.
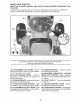
. 7. ENGINE Refill engine with oil through oil fill dipstick tube. Pour slowly. Do not overfill. For approximate capacity see "PRODUCT SPECIFICATIONS" section of this manual. SYSTEM Debris may clog the engine's air cooling system. Remove blower housing and clean area shown to prevent overheating and engine damage. Use gauge on oil fill cap/dipstick for checking level. For accurate reading, tighten dipstick cap securely onto the tube before removing dipstick. Keep oil at "FULL' line on dipstick.
CLEANING • Clean engine, battery, seat, finish, etc. of all foreign matter. Clean debris from steering plate. Debris can restrict clutch/brake pedal shaft movement, causing belt slip and loss of drive. • Nozzle Ada Washout Port _k CAUTION: Avoid all pinch points and movable parts Clutch/brake pedal Clean top side IMPORTANT: Tug hose ensuring tion is secure.
WARNING: ORTO SERVICE ADJUSTMENTS: AVOID SERIOUS INJURY, BEFORE PERFORMING 1. Depress clutch/brake pedal fully and set parking brake. 2. Place motion control lever in neutral position. 3. Place attachment clutch in "DISENGAGED" position. 4. Turn ignition key to "STOP" and remove key. 5. Ensure the blades and all moving parts have completely stopped. 6. Disconnect spark plug wire from spark plug and place wire where come in contact with plug. TO REMOVE MOWER 1. Place 2. GAGED" position.
3. ATTACH MOWER SIDE SUSPENSION 4. ARMS (A) TO CHASSIS - Position hole in arm over pin (B) on outside of tractor chassis and secure with retainer spring. Repeat on opposite side of tractor. 7. 8. . . Hook end of clutch cable spring (Q) hole in idler arm (R). 9. Push clutch cable housing guide (P) bracket, slide collar (L) onto guide secure with retainer spring (K). 10. Install belt onto engine pulley (M) and keepers (G).
TO LEVEL FRONT=TO=BACK MOWER Make sure tires are properly inflated to the PSI shown on tires. Iftires are over or under IMPORTANT: to-side. inflated, it may affect the appearance of your lawn and lead you to think the mower is not adjusted properly. VISUAL 1. 2. SIDE-TO-SIDE ADJUSTMENT Each full turn of adjustment mower height about 3/16". Deck must be level nut will B 3. Test your adjustment by mowing some uncut grass and visually checking the appearance.
TO REPLACE BELT MOWER BLADE DRIVE BELT INSTALLATION 1. The mower blade drive belt may be replaced without tools. Park the tractor on level surface. Engage parking brake. 2. 3. 1. Remove mowerfrom tractor (See"TO REMOVE MOWER"inthissection of manual). 2. Work belt off both mandrel pulleys and idler pulleys. 3. Pull belt away from mower. BELT INSTALLATION 1. 2. 3. pulley (E). Pull belt toward rear of tractor.
TO REMOVE WHEEL FOR REPAIRS NOTE: 1. 2. Block up axle securely. Remove axle cover, retaining ring and washers to allow wheel removal (rear wheels have a square key - Do not lose). 3. Repair tire and reassemble. NOTE: On rear wheels only: align grooves in rear wheel hub and axle. Insert square key. 4. Replace washers and snap retaining ring securely in axle groove. 5. Replace axle cover. NOTE: To seal tire punctures and prevent flat tires due to slow leaks, purchase and usetire sealant from Sears.
REPLACING BATTERY TO REPLACE FUSE n_a sWARNING: Do not short battery termiby allowing a wrench or any other object to contact both terminals at the same time. Replace with 20 amp automotive-type in fuse. The fuse holder is located the dash. Before connecting battery, remove metal bracelets, wristwatch bands, rings, etc. Positive terminal must be connected first to TO REMOVE 1. 2. 3. prevent sparking from accidental grounding. 1. Lift seat pan to raised position. Seat .
ENGINE Immediately prepare your tractor for storage at the end of the season or if the tractor will FUEL SYSTEM not be used for 30 days or more. _WARNING: Never store the tractor IMPORTANT: It is important to prevent gum deposits from forming in essential fuel system parts such as carburetor, fuel hose, ortank during storage. Also, alcohol blended fuels (called gasohol or using ethanol or methanol) can attract moisture which leads to separation and formation of acids during storage.
TROUBLESHOOTING See appropriate section in manual PROBLEM Will not start Hard to start Engine will not turn over CHART: unless directed to Sears service center CAUSE CORRECTION 1 Out of fuel. 1 Fill fuel tank. 2 Engine 2 See "TO START ENGINE" Operation section. 3 Engine flooded. 3 Wait several minutes attempting to start. 4 Bad spark plug. 4 Replace spark plug. 5 Dirty air filter. 5 Clean/replace 6 Dirty fuel filter. 6 Replace fuel filter. 7 Water in fuel.
TROUBLESHOOTING CHART: See appropriate section in manual unless directed to Sears service center PROBLEM CAUSE Engine clicks but will not start Loss of power Excessive vibration CORRECTION 1 Weak or dead battery. 1 Recharge 2 Corroded 2 Clean battery terminals. 3 Loose or damaged 3 Check all wiring. 4 Faulty solenoid 4 Check/replace 1 Cutting too much grass/too 1 Raise cutting height/reducespeed 2 Throttle 2 Adjust throttle 3 Build-up of grass, leaves and trash under mower.
TROUBLESHOOTING CHART: See appropriate section in manual unless directed to Sears service center PROBLEM Mower blades will not rotate Poor grass discharge CAUSE CORRECTION 1 Obstruction in clutch mechanism. 1 Remove obstruction. 2 Worn/damaged 2 Replace mower 3 Frozen idler pulley. 3 Replace idler pulley. 4 Frozen blade mandrel. 4 Contact a Sears or other qualified service center. 1 Engine speed too slow. 1 Place throttle position. 2 Travel speed too fast.
TROUBLESHOOTING CHART: See appropriate section in manual unless directed to Sears service center PROBLEM CAUSE Loss of drive CORRECTION 1 Freewheel control in "DISENGAGED" position. 1 Place freewheel control in "ENGAGED" position. 2 Debris on steering equipped). 2 See "CLEANING" in the maintenance section. 3 Motion drive belt worn, damaged, or broken. 3 Replace 4 Air trapped in transmission shipment or servicing. 4 Purge transmission. 5 Axle key missing.
SUGGESTED GUIDE FOR SIGHTING SLOPES FOR SAFE OPERATION ONLY RIDE UP AND DOWN HILL, NOT ACROSS HILL Po 15 DEGREES MAX. & 1. FoJdthis page aJong dotted line indicated above. 2. Hold page before you so that its Jeff edge is vertically paraiJel to a tree trunk or other upright structure. 3. Sight across the fold in the direction of hill slope you want to measure. 4. Compare the angle of the fold with the slope of the hill.