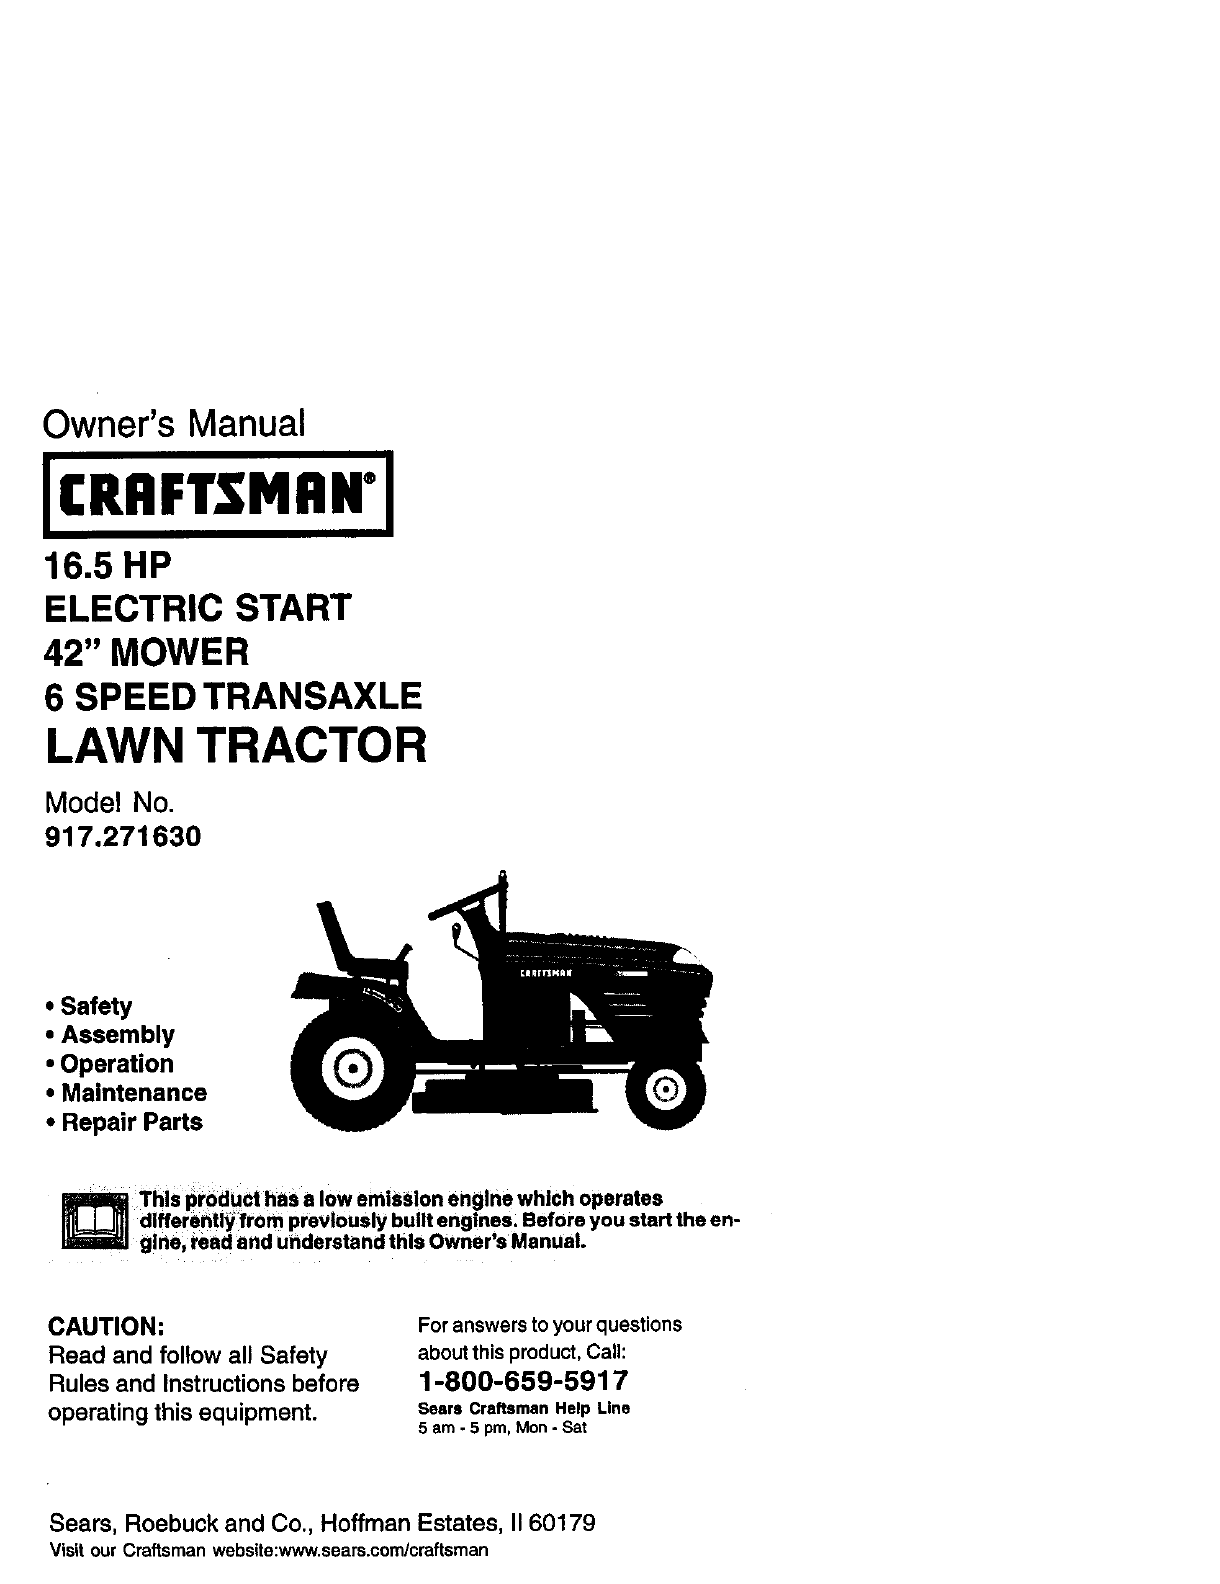
Owner's Manual 16.5 HP ELECTRIC START 42" MOWER 6 SPEED TRANSAXLE LAWN TRACTOR Model No. 917.271630 • Safety • Assembly • Operation • Maintenance • Repair Parts Thls product has a low emission engine which operates dlfferehtiy_from previously built engines, Before you start the engine;read and understand this Owner's Manual. CAUTION: Read and follow all Safety Rules and Instructions before operating this equipment. Sears, Roebuck and Co.
Maintenance ....................................... 17 Service and Adjustments .................... 21 StoraQe ...............................................27 Troubleshooting .................................28 32 ..................... Back Cover Warran_ ............................................... 2 Safety Nules ......................................... 3 Product Specifications .......................... 6 Assembly .............................................. 8 Operation ...........................
IMPORTANT Ths cuttingmach nes capabe of amputatinghandsand feet and throwingobjects.Failureto observethe followingsafety instructions could resultin sedousinjuryor death. I. GENERAL OPERATION II, SLOPE OPERATION Slopes are a majorfactor relatedto loss-of• Read, understand,and follow all control and tipover accidents, which can instructionsin the manualand on the result in severe injuryor death. All slopes machinebefore starting. requireextracaution.
lit.CHILDREN Tragicaccidents can occurif the operator • Never run a machine inside a closed area. is not alert to the presenceof children. • Keep nuts and bolts, especiallyblade Childrenare often attractedto the attachmentbolts,tightand keep machine and the mowing activi!y. Never equipmentin good condition. assume that childrenwill remain where • Never tamper with safely devices. you last saw them. Check 1heirproper operationreguiody.
• Use slow speed. Choose a low gear so that you wJllnot have to stopor shift while on the slope. • Avoidstartingor stoppingon a slope. If tires lose traction,disengagethe blades and proceed slowlystraight down the slope. • If machinestops while going uphill, disengageblades, shift into reverse and back downslowly. • Do not turnon slopes unlessnecessary, and then, tum slowlyand gradually downhill,if possible. _Look for this symbolto pointout importantsafety precautions.
PRODUCT SPECIFICATIONS GASOLINE CAPACITY ANDTYPE: 1.25 UNLEADED REGULAR OILTYPE 'API-SF- SJ): SAE 30 (ABOVE 32°F SAE 5W-30 (BELOW 32°F) 3.0 PINTS OIL CAPACITY: CONGRATULATIONS on yourpurchase of a new tractor. It has been designed, engineered and manufactured to give you the best possibledependabilityand performance. Should you experience any problemyou cannot easily remedy,please contacta Sears or otherqualifiedservice center.
Steering Wheel (1) Hex Bolt 3/8-16 x 1 Steering Wheel insert ® @ (1) Hex Bolt 5/16-18 x 1-1/4 IIIIIIII11 (1) Large FlatWasher (1) Locknut 5/16-18_ /_i/ /_]_:/" //_l!_i _,LS/_ SteeringWheel Adapter (1) Lockwasher3/8 H Steering Boot Steedng Extension Shaft Seat _(1) Washer 17/32 x 1-3/16 x 12 Gauge _(1) Knob Keys (2) Keys Video Cassette Slope Sheet 7 M
Yournewtractorhasbeenassembled atthefactory withexception ofthosepartsleft unassemblad for shippingpurposes.To ensuresafe and properoperationof your tractorall parts and hardware you assemble mustbe tightenedsecurely.Use the correcttoolsas necessaryto insurepropertightness.Review the videocassette before you begin. TOOLS REQUIRED FOR ASSEMBLY _ Insert A socketwrenchset will make assembly _------3/8 Hex Bolt easier. Standardwrench sizes you need _,_-..._3/8 Lock Washer are listedbelow.
INSTALL SEAT Adjustseat beforetightening adjustment knob. 1. Remove adjustmentknoband flat washer securingseat to cardboard packingand set aside for assemblyof seat to tractor. 2. Pivot seat upwardand remove from the cardboardpacking.Remove the cardboardpacking and discard. 3. Placeseat on seat pen so head of shoulderbolt is positionedover large slottedhole in pan. 4. Push downon seat to engage shoulderbolt in slotand pull seat towardsrear of tractor. 5.
INSTALL MULCHER PLATE (If previously removed) 1. Raise and hold deflectorshield in upright position. 2. Place front of muloher plate over front of mower deck opening and slide into place, as shown. 3. Hook front latch into hole on front of mower deck. 4. Hook rear latch into hole on back of mower deck. Mulcher Plate Deflector CHECK FOR PROPER POSITION OF ALL BELTS See the figuresthat are shownfor replacingmotion and mower blade drive belts in the Serviceand Adjustments sectionofthis manual.
These symbolsmay appear on your tractoror in literaturesuppliedwith the product, Learn and understandtheir meaning.
KNOWYOURTRACTOR READ THIS OWNER'S MANUAL AND SAFETY RULES BEFORE OPERATING YOUR TRACTOR Compare the illustrationswith yourtractorto familiarizeyourselfwith the locationsof variouscontrolsand adjustments. Save this manualfor futurereference. Light Switch Attachment Clutch Ignition Switch Lift Ammeter Plunger Throttle/Choke Control Attachment Lift Lever Clutch/Brake Pedal Height Brake Lever Gearshift Lever Our tractors conform to the safety standards of the American National Standards Institute.
The operationof any tractorcan result in foreign objects throwninto the eyes, whichcan resultin severe eye damage. Always wear safety glassesor eye shieldswhile operatingyourtractoror performingany adjustmentsor repairs. We recommenda wide visionsafety mask over spectaclesor standardsafety glasses. HOWTO USEYOURTRACTOR TO SET PARKING BRAKE Yourtractoris equippedwith an operator presencesensing switch.
• The average lawn should be cut to approximately 2-1/2 inches during the ecol season and to over 3 inches during hot months. For healthier and better looking lawns, mow often and after moderate growth. • For best cutting performance, grass over 6 inches in height should be mowed twice. Make the first cut relatively high; the second to desired TO"_i_ _FIAT E MOWER Your tractor is equipped with an operator presence sensing switch.
ADD GASOLINE • Fillfuel tank. Use fresh, clean, regular unleaded gasolinewith a minimumof 87 octane. (Use of leaded gasoline will increase carbon and lead oxide depositsand reducevalve life). Do not mix oil with gasoline. Purchasefuel in quantities that can be used within 30 days to assure fuel freshness. IMPORTANT: When operatingin temperaturesbelow32°F(0°C), use fresh, clean winter grade gasolineto help insure good cold weather starting.
MOWINGTIPS • Mower shouldbe propedyleveledfor I_estmowingperformance. See "TO LEVEL MOWER HOUSING" in the Service and AdjustmentssecUonof this manual. • The left hand side of mower shouldbe used for trimming. • Drive so that clippingsare discharged ontothe area that has been cut. Have the cutarea to the right of the tractor. This will resultin a more even distribution of clippingsand more uniform cutting.
MAINTENANCE SCHEDULE FILL iN DA_ES AS YOU COMPLETE REGULAR SERVtCE SERVICE CheCk Brske Operation I_ I_ Check1"IrePressu{e CheckOperatorPresenceand IntedeckSystems if t_ li_ Check for Loose Fasteners V# Shsrpen/Replsce 1_7 Mower Blades DATES I_ 11_4 I.
TRACTOR Always observe safety rules when performing any maintenance. BRAKE OPERATION if tractor requires more than six (6) feet stopping distance at high speed in highest gear, then brake must be adjusted. (See "TO ADJUST BRAKE" in the Service and Adjustments section of this manual). TIRES • Maintain proper air pressure in all tires (See =PRODUCT SPECIFICATIONS" section of this manual). • Keep tires tree ot gasoline, oil, or insect control Ghemioals which can harm rubber.
BATTERY Yourtractorhas a battery chargingsystem whichis sufficientfor normaluse. However periodicchargingof the battery with _n automotivechargerwil extend ts re. Keep battery and terminalsclean. Keep batteryboltstight, Keep small vent holesopen. Rechargeat 6-10 amperes for 1 hour. NOTE: The originalequipmentbattery on yourtractoris maintenance free. Do not attempt to open or remove capsor covers, Addingor checkinglevel of electrolyteis not necessary.
Closed _ndked_ OilDrain Valve ,_'_ DrainTubs Position_ Cap CLEAN AIR SCREEN Air screen must be keptfree of dirt and chaff to prevent enginedamage from overheating. Clean with a wire brushor compressedair to remove dirt and stubbomdried gum fibers. ENGINE COOLING FINS Remove any dust, dirt or oil from engine cooling fins to prevent engine damage from overheating. 1. Remove screws from blower housing and lift housing and dipstick tube assembly off engine. 2. Cover oil fill opening to prevent entry of dirt.
3. Be sure there are no fuel line leaks and clamps are properly positioned. 4." Immediately wipe up any spilled gasoline. ClamP_clamp Fuel Rtter CLEANING of all gasoline,oil, etc. and wheels free i Keep finished surfaces Protectpainted surfaces with automotive type wax. We do not recommendusing a garden hose to clean yourtractorunlessthe electricalsystem,muffler,air filter and carburetorare coveredto keep water out. Water in engine can resultin a shortened engine life.
TOLEVEL MOWER HOUSING Adjustthemower whiletractorisparked on level groundor driveway. Make sure tires are propertyinflated (See "PRODUCT SPECIFICATIONS"sectionof this manual). II tires are over or underinflated,you will not properly adjust your mower. SIDE-TO-SIDE ADJUSTMENT Raise mower to its highestposition. At the midpointof bothsides of mower, measure heightfrom bottomedge of mower to ground. Distance"A" on both sides of mowershouldbe the same or within 1/4" of each other.
TO REPLACE MOWER BLADE DRIVE BELT Tl_e mowerblade drive belt may be replacedwithouttools. Parkthe tractoron level surface. Engage parkingbrake. BELTREMOVAL1. Remove mowerfrom tractor(See "TO REMOVE MOWER" in this sectionof this manual). 2. Work belt off bothmandrel pulleysand idler pulleys. 3. Pull belt away from mower. BELTINSTALLATION4. Installnew belt in reverse order of removal. 5. Make sure belt is in all pulley grooves and inside all belt guides. 6.
TRANSAXLE GEAR SHIFT LEVER NEUTRAL ADJUSTMENT The transaxleshouldbe in neutralwhen the gear shiftlever is in neutral(N) (lock gate) position.The adjustmentis presetat the factory; however,if adjustmentis needed, proceed as follows: 1. Make sure transaxleis in neutral (N). NOTE: When the tractorrear wheels movefreely, the transaxlais in neutral. 2, Loosenadjustmentboltin front of the right rear wheel. 3. Positionthe gear shift lever in the neutral (N) position. 4. Tighten adjustmentbolt securely.
PositiveTerminal NegativeTerminal Nut Positive (Red) Cable Negative (Black) Cable TO REPLACE HEADLIGHT BULB 1. Raise hood. 2. Pull bulb holder out of the hole in the backside of the grill. 3. Replace bulb in holder and push bulb holder securely back into the hole in the backside of the grill. 4. Close hood. INTERLOCKS AND RELAYS Loose or damaged wiring may cause your tractor to run poorly, stop running, or prevent it from starting. • Check wiring.
ENGINE Maintenance, repair, or replacement of the emission control devices end systems, which are being done at the customersexpense, may be performed by any non-road engine repair establishmentor individual.Warrenty repairs must be performed by an authonzed engine menufacturer's sennce outlet. TO ADJUST THROTTLE CONTROL CABLE The throttlecontrol has been preset at the factory and adjustmentshould not be necessa_ Check adjustmentas described below before looseningcable.
Immediatelyprepare your tractorfor storageat the end of the seasonor if the tractorwillnot be usedfor 30 days or more, CAUTION: Never store the tractor with gasolinein the tank inside a building where fumes may reach an open flame or spark. Allowthe engine to cool before storingin any enclosure. TRACTOR Remove mower fromtractorfor winter storage. When moweris to be storedfor a periodof time, clean it thoroughly, removeall dirt,grease, leaves, etc. Store in a clean,dry area. t.
TROUBLESHOOTING PROBLEM Will not start Hard to start CHART CAUSE CORRECTION 1. Fillfuel tank. 2. See "TO START ENGINE" in Operationsection. 3. Wait several minutes beforeattemptingto start. 4. Bad spark plug. 4. Replace spark plug. 5. Dirty air filter. 5. Clean/replaceair filter. 6. Dirty fuel filter. 6. Replacefuel filter. 7 Water in fuel. 7• Drain fuel tank and carburetor,refilltank with fresh gasolineand replace fuel filter. 8. Loose or damaged wiring. 8. Check all wiring. 9.
TROUBLESHOOTING CHART I_ROBLEM Loss of power CAUSE CORRECTION 1. Cutting too much grass/too 2. 3, 4. 5. 6. fast. Throttlein "CHOKE" position. Build-upof grass, leaves and trash under mower. Dirty air filter. Low oil level/dirtyoil. Faultyspark plug, 1. Set in "Higher Cut" position/ reduce speed. 2. Adjust throttle control. 3. Clean underside of mower housing. 4, Clean/replace air filter. 5, Check oil level/change oil. 6. Clean and regap or change spark plug. 7. Dirtyfuel filter.
TROUBLESHOOTING PROBLEM Mowerbladeawlll not rotate CHART CAUSE CORRECTION 1, Obstructionin clutch mechanism. 2, Worn/damaged mower drive belt. 3. Frozen idler pulley. 4. Frozen blade mandrel 1, Remove obstruction. 2. Replacemower drive belt. 3. Replace idler pulley. 4. Replace blade mandrel, Poor grass discharge 1. Engine speed too slow, 1. Place throttle control in "FAST" position. 2. Travelspeed too fast. 2. Shift to slower speed. 3. Wet grass. 3. Allow grass to dry before mowing. 4.
TRACTOR - - MODEL NUMBER 917.271630 SCHEMATIC AMMETER (OPTIONAL) db, IGNITION UNIT [OPTIONAL)_=UEL/ cN_a $_poc _ GAP SPARK PLUG f2 PLUGS ON TWI_ CYL, ENGINES) J _STEMOu1_JT e_ i ......... FUEL(IFSHUT-OFF SO EQUIPPED) SOLENOID J_ _ M_c_p_ -L_ SYSTE OR_GE S_PAC e _P._ , _swx;s_c m_.e_ RN _1_3 SYSTE]4 D_.
TRACTOR - - MODEL NUMBER 917.
TRACTOR - - MODEL NUMBER 917.271630 ; "ELECTRICAL KEY PART NO. NO. DESCRIPTION 1 2 8 16 21 22 24 25 26 27 28 29 3O 33 40 41 42 43 45 52 Batter'j 12 VOLT 25 AMP Bolt Hex Hd 1/4-20unc x 3/4 Case Battery Switch, Interlock Push-In Ha mess Asm Light W/4152J Bulb Light #1156 Cable Batter,/6 Ga 11" red Cable Battee/6 Ga w/16 wire red Fuse 20AMP Nut, Keps Hex 1/4-20 UNC Cable Ground 6 Ga 12" black Switch Plunger NC Gray Switch Ign Key Ign Molded Craftsman Harness Ign Bolt BIk.
TRACTOR -- MODELNUMBER 917.
TRACTOR - - MODEL NUMBER 917.271630 CHASSIS AND ENCLOSURES KEY PART NO. NO.
TRACTOR - - MODEL NUMBER 917.
TRACTOR - - MODELNUMBER 917.271630 GROUND DRIVE KEY NO. PART NO. 1 ....
TRACTOR - - MODEL NUMBER 917.271630 STI:ERING ASSEMBLY _13 H "'"222)':-:2'-2::'" _41 .
TRACTOR - - MODEL NUMBER 917.271630 STEERING ASSEMBLY KEY PART NO, NO. DESCRIPTION 1 2 3 4 5 6 7 8 9 10 11 13 15 17 18 19 22 23 25 26 27 28 29 30 32 36 37 38 39 40 41 42 43 44 46 47 51 54 62 63 65 66 67 68 79 80 82 85 SteedngWheel FrontAxle Assembly SpindleAssembly,L.H. SplodleAssembly,R.H.
TRACTOR - - MODEL NUMBER 917.
TRACTOR - - MODEL NUMBER 917.271630 ENGINE KEY PART NO.
TRACTOR - - MODEL NUMBER 917.271630 SEAT ASSEMBLY KEY PART NO. NO.
TRACTOR - - MODEL NUMBER 917.271630 DECALS 4 10 2 2O 13 14-- KEY NO, PART NO, DESCRIPTION 1 2 3 4 5 5 7 8 9 19 156368 177258 171696 171697 170945 133644 177253 172331 163204 156439 Decal, Open Instr. Decal,Roplcrnnt Decal,HoodRh Decal,Hood Lh Decal,Hp En_ine Decal,Maini CustomerSears Dom Decal,HoodSide DecalMower Decal,FenderCraftsrnan Decal,FenderDanger WHEELS &TIRES 2_ S,S 4,10 KEY PART NO. NO.
TRACTOR o- MODELNUMBER 917.
TRACTOR - - MODEL NUMBER 917.271630 LIFT ASSEMBLY KEY PART NO. NO. DESCRIPTION 1 2 3 4 5 6 7 8 11 12 13 15 16 17 18 19 20 31 32 Washer Asm InnerSpdngW/Plunger ShaftAsm. Lift RH PinGroove E Ring #5133-62 Washer 21/32 x I x 21 Ga. BearingNylong GripHandleFluted ButtonPlungerResd LinkAsm Lift L.H. LinkAsm Lift R.H. RetainerSpring LinkFnont NutJam Hex 1/2-13 Uric TrunnionBIkZinc NutLockw/wsh1/2.13 Unc ArmSuspensionMower RetainerSpdng Beadng, Pvt. Lift.
TRACTOR - - MODEL NUMBER 917.271630 MOWER DECK 157 __0 ,j _" IS 40 _'37 144 15405 4O 37 145 106"_ 102 103 105 lo3_ \/_ Jr.
TRACTOR - - MODEL NUMBER 917.271630 MOWER DECK KEY NO.
TRACTOR - - MODEL NUMBER 917,271630 DANA TRANSAXLE - - MODEL NUMBER D4360-140 20 21 22 24 25 26 31 27 32 48 49 48
TRACTOR - - MODEL NUMBER 917.271630 DANA TRANSAXLE - - MODEL NUMBER D4360-140 KEY PART NO. NO.
TRACTOR - - MODEL NUMBER 917_71630 BRIGGS& STRATrONENGINE-MODELNUMBER310707,TYPENUMBER0137-E1 REQUIRESSPECIALTOOLS TO INSTALL. SEE REPAIR ,_ST.UO,,ON _..u.
TRACTOR - - MODEL NUMBER 917.271630 BRIGGS & STRATI'ON ENGINE-MODEL NUMBER 875[ 467_ 310707,TYPE NUMBER 0137-E1 711_ 971 996_ 240_ 1_ _176_'_u34_1_ 616t I 1019 LABEL KIT I 108A _'_ jv .
TRACTOR - - MODEL NUMBER 917.
TRACTOR - - MODEL NUMBER 917_1630 BBIGGS&STRA1TONENGINE-MODELNUMBER310707,TYPENUMBER0137-E1 977 CARBURETOR GASKET 121 CARBURETOR OVERHAUL KIT SET lO4_ 1270 276@ 9e>® 95 634A.._ 634_._ 1_ 1095 VALVE GASKET SET 1170 231_42_ _ .
TRACTOR - - MODEL NUMBER 917.271630 B'RIGGS& STRA'n'ONENGINE-MODELNUMBER310707,TYPENUMBER0137-E1 KEY NO. PART NO.
TRACTOR -- MODEL NUMBER 917.271630 BRIGGS&STRATrONENGINE-MODELNUMBER310707,TYPENUMBER0137-E1 KEY NO. PART NO.
SERVICE NOTES
SERVICE NOTES 57
SERVICENOTES 58
SUGGESTED GUIDE FOR SIGHTING SIGHTING GUIDE _" SLOPES FOR SAFE OPERATION ONLY RIDE UP AND DOWN HILL, NOT ACROSS HILL ° ra°y°urTrct°rupand oeosop no I w greater than 15°), never across the face. Make turns gradually to prevent Upping or loss of control. Exercise extreme caution when changing direction on slopes.
Get it fixed, at your home or oursJ For repair of major brand appliances in your own home... no matter who made it no matter who sold it! 1-800-4-MY-HOME s. Anytime, day or night (1-800-469-4663) www.sesrs.com To bring in products such as vacuums, lawn equipment and electronics for repair, call for the location of your nearest Sears Parts & Repair Center. 1-800-488-1222 _ime dayor night www.sesrs.