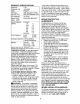
Owner's Manual JCRIIFTSMIIN'J LAWN TRACTOR 160 HP, 42" Mower Electric Start 6 Speed Transaxle Model No. 917.273350 [_ differently from built engines. Beforeoperates you start the This product haspreviously a low emission engine which engine, read and understand this Owner's Manual.
Warranty ................................................. 2 Safety Rules ........................................... 3 Product Specifications ............................ 6 Assembly/P re-Operation ........................ 8 Operation .............................................. 11 Maintenance Schedule ......................... 17 Maintenance ......................................... 17 Service and Adjustments ...................... 21 Storage .................................................
IMPORTANT: This cutting machine is capable of amputating hands and feet and throwing objects. Failure to observe the following safety instructions could result in serious injury or death. Be aware of the mower discharge direction and do not point it at anyone. Do not operate the mower without either the entire grass catcher or the guard in place. Slow down before turning. Never leave a running machine unattended. Always turn off blades, set parking brake, stop engine, and remove keys before dismounting.
DO: • Never carry children. They may fall off and be seriously injured or interfere with safe machine operation. • Never allow children to operate the machine. • Use extra care when approaching blind corners, shrubs, trees, or other objects that may obscure vision. • Mow up and down slopes, not across. • Remove obstacles such as rocks, tree limbs, etc. • Watch for holes, ruts, or bumps. Uneven terrain could overturn the machine. Tall grass can hide obstacles. • Use slow speed.
• Be sure the area is clear of other people before mowing. Stop machine Jf anyone enters the area. • Never carry passengers or children even with the blades off. • Do not mow JRreverse unless absolutely necessary. Always look down and behind before and while backing. • Never carry children. They may fall off and be seriously injured or interfere with safe machine operation. • Keep children out of the mowing area and under the watchful care of another responsible adult.
In the state of California the above is required by law (Section 4442 of the California Public Resources Code). Other states may have similar laws. Federal laws apply on federal lands. A spark arrester for the muffler is available through your nearest Sears service center (See REPAIR PARTS section of this manual). PRODUCT SPECIFICATIONS Capacity Type: and 1.25 Unleaded Regular Oil Type API-SF-SJ): Oil Capacity: SAE 30 (above 32°F) SAE 5W-30(below 32°F Spark Plug: (Gap: .
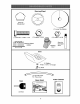
Steering Wheel @ Steering Wheel Insert @ (1) Hex Bolt 1/4-28 x 1-1/4 F__ (1) Locknut 1/2-20 (1) Large Flat Washer @ (1) Locknut Steering Extension Shaft Steering Wheel Adapter I I I 1/4-28 I Seat @ _(1) (1) Washer 17/32 x 1-3/16 x 12 Gauge Knob For Future Use Keys Slope Sheet Video Cassette (2) Keys "t 7
Your new tractor has been assembled at the factory with the exception of those parts left unassembled for shipping purposes. To ensure safe and proper operation of your tractor all parts and hardware you assemble must be tightened securely. Use the correct tools as necessary to insure proper tightness. Review the video cassette before you begin. TOOLS REQUIRED ASSEMBLY FOR _ A socket wrench set will make assembly easier. Standard wrench sizes you need are listed below.
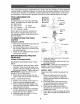
5. Pivot seat and pan forward and assemble adjustment knob and flat washer loosely. Do not tighten. 6. Lower seat into operating position and sit in seat. 7. Slide seat until a comfortable position is reached which allows you to press clutch/brake pedal all the way down. 8. Get off seat without moving its adjusted position. 9. Raise seat and tighten adjustment knob securely. NOTE: You may now roll or drive your tractor off the skid.
CHECKTIRE PRESSURE ,/CHECKLIST The tires on your tractor were overinflated at the factory for shipping purposes. Correct tire pressure is important for best cutting performance. • Reduce tire pressure to PSI shown in "PRODUCT SPECIFICATIONS" section of this manual. Before you operate and enjoy your new tractor, we wish to assure that you receive the best performance and satisfaction from this Quality Product. Please review the following checklist: ,/All assembly instructions have been completed.
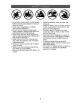
These symbols may appear on your tractor or in literature supplied with the product. Learn and understand their meaning.
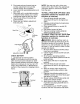
KNOW YOUR TRACTOR READ THIS OWNER'S MANUAL AND SAFETY RULES BEFORE OPERATING YOUR TRACTOR Compare the illustrations with your tractor to familiarize yourself with the locations of various controls and adjustments. Save this manual for future reference.
The operation of any tractor can result in foreign objects thrown into the eyes, which can result in severe eye damage. Always wear safety glasses or eye shields while operating your tractor or performing any adjustments or repairs. We recommend a wide vision safety mask over spectacles or standard safety glasses. HOW TO USE YOUR TRACTOR TO SET PARKING BRAKE Your tractor is equipped with an operator presence sensing switch.
• The average lawn should be cut to approximately 2-1/2 inches during the cool season and to over 3 inches during hot months. For healthier and better looking lawns, mow often and after moderate growth. • For best cutting performance, grass over 6 inches in height should be mowed twice. Make the first cut relatively high; the second to desired height. TO OPERATE • If slowing is necessary, move throttle control lever to slower position.
ADD GASOLINE • Fill fuel tank to bottom of filler neck. Do not overfill. Use fresh, clean, regular unleaded gasoline with a minimum of 87 octane. (Use of leaded gasoline wilt increase carbon and lead oxide deposits and reduce valve life). Do not mix oil with gasoline. Purchase fuel in quantities that can be used within 30 days to assure fuel freshness. . _,CAUTION: Wipe off any spilled oil or fuel. Do not store, spill or use gasoline near an open flame.
MOWING TIPS • If grass is extremely tall, it should be mowed twice to reduce load and possible fire hazard from dried clippings. Make first cut relatively high; the second to the desired height. • Do not mow grass when it is wet. Wet grass will plug mower and leave undesirable clumps. Allow grass to dry before mowing. • Always operate engine at full throttle when mowing to assure better mowing performance and proper discharge of material.
MAINTENANCE SCHEDULE ___,o_o_ FILL IN DATES _,_ AS R EGU YOU LABCOMPLETE SERVICE T a Check Operator Presence Interlock Systems Check for Loose q4,_ ,_0 ,_£'_ e4.'_ ,_,4._ _" _0 £4._ _q._ DATES I_' Fasteners V # Lubrication 0 Check Battery Level Sharpen/Replace Mower Blades Clean Battery and Terminals _5 V # Chart Check Transaxle _ and T R _._ J__CE " ,_.0_ ,_.
TRACTOR Always observe safety rules when performing any maintenance. BRAKE OPERATION IMPORTANT: To ensure proper assembly, center hole in blade must align with star on mandrel assembly. 4. Reassemble blade bolt, lock washer and flat washer in exact order as shown. If tractor requires more than six (6) feet stopping distance at high speed in highest gear, then brake must be adjusted. (See "TO ADJUST BRAKE" in the Service and Adjustments section of this manual). TIRES 5.
BATTERY NOTE: Although multi-viscosity oils (5W30, 10W30 etc.) improve starting in cold weather, the oils will result in increased oil consumption when used above 32°R Check your engine oil level more frequently to avoid possible engine damage from running tow on oil. Change the oil after every 25 hours of operation or at least once a year if the tractor is not used for 25 hours in one year. Check the crankcase oil level before starting the engine and after each eight (8) hours of operation.
ENGINEOIL FILTER Replacethe engine oil filter everyseason or every other oil change if the tractor is used more than 100 hours in one year. CLEAN AIR SCREEN Air screen must be kept free of dirt and chaff to prevent engine damage from overheating. Clean with a wire brush or compressed air to remove dirt and stubborn dried gum fibers. AIR FILTER Your engine will not run properly using a dirty air filter. Replace pre-cleaner after every 25 hours of operation or every season.
CLEANING We do not recommend using a garden hose or pressure washer to clean your tractor unless the engine and transmission are covered to keep water out. Water in engine or transmission will shorten the useful life of your tractor. Use compressed air or a leaf blower to remove grass, leaves and trash from tractor and mower. • Clean engine, battery, seat, finish, etc. of all foreign matter. • Keep finished surfaces and wheels free of all gasoline, oil, etc.
2. Slide mowerunder tractor with deflector shield to right side of tractor. 3. Lower lift leverto its lowestposition. 4. Connectfront links to mowerdeck and securewith retainersprings. 5. Connectsuspensionarms to rear deck bracketsand secure with retainer springs. 6. Connectanti-swaybar to chassis bracketand securewith retainerspring. 7. Push clutch cable housingguide into bracket,slide collar onto guide and securewith large retainer spring. 8.
TO REPLACE BELT MOWER BLADE DRIVE 2. Measure distance between brake operating arm and nut "A" on brake rod. 3. If distance is other than 1-1/2", loosen jam nut and turn nut "A" until distance becomes 1-1/2". Retighten jam nut against nut "A". 4. Road test tractor for proper stopping distance as stated above. Readjust if necessary. If stopping distance is still greater than five (5) feet in highest gear, further maintenance is necessary.
FRONT WHEEL TOE-IN/CAMBER The front wheel toe-in and camber are not adjustable on your tractor. If damage has occurred to affect the front wheel toe-in or camber, contact a Sears or other qualified service center. 5. Make sure belt is in all pulley grooves and inside all belt guides and keepers. 6. Install mower (See "TO INSTALL MOWER" in this section of manual).
2. Connectone end of the BLACKcable to the NEGATIVE(-) terminal (C) of fully chargedbattery. 3. Connectthe other end of the BLACK cable (D) to good chassisground, awayfrom fuel tank and battery. TO REMOVECABLES,REVERSE ORDER1. BLACKcable first from chassisand then from the fully charged battery. 2. RED cable last from both batteries. Terminal Cover Hex Bolt (Red) Cable TO REPLACE REPLACING Negative (Black) Cable HEADLIGHT BULB 1. Raise hood. 2.
ENGINE IMPORTANT: Damage to the needle valve and the seat in carburetor may result if screw is turned in too tight. Maintenance, repair, or replacement of the emission control devices and systems, which are being done at the customers expense, may be performed by any non-road engine repair establishment or individual. Warranty repairs must be performed by an authorized engine manufacturer's service outlet. PRELIMINARY SETTING 1.
Immediately prepare your tractor for storage at the end of the season or if the tractor will not be used for 30 days or more. _,WARNING: Never store the tractor with gasoline in the tank inside a building where fumes may reach an open flame or spark. Allow the engine to coot before storing in any enclosure. blended fuels (called gasohol or using ethanol or methanol) can attract moisture which leads to separation and formation of acids during storage.
TROUBLESHOOTING CHART: See appropriate section in manual unless directed to Sears service center PROBLEM CAUSE Will not start CORRECTION 1. Out of fuel. 2. Engine not "CHOKED" properly. 3. Engine flooded. 10. Engine valves out of adjustment. 1. Fill fuel tank. 2. See "TO START ENGINE" in Operation section. 3. Wait several minutes before attempting to start. 4. Replace spark plug. 5. Clean/replace air filter. 6. Replace fuel filter. 7.
TROUBLESHOOTING CHART: See appropriate section in manual unless directed to Sears service center PROBLEM Loss of power CAUSE CORRECTION Cutting too much grass/too fast. Throttle in "CHOKE" position. 3. Build-up of grass, leaves and trash under mower. Dirty air filter. 5. Low oil level/dirty oil. 6. Faulty spark plug. 1. Raise cutting height/reduce speed. 12. Adjust throttle control. 3. Clean underside of mower housing. 14. Clean/replace air filter. I 15. Check oil level/change oil. I 16.
TROUBLESHOOTING CHART: See appropriate section in manual unless directed to Sears service center PROBLEM Mower blades will I not rotate Poor grass Id scharge CAUSE CORRECTION 1. Obstruction in clutch mechanism. 2. Worn/damaged mower drive belt. 3. Frozen idler pulley. 4. Frozen blade mandrel. 1. Remove obstruction. 1. Engine speed too slow. 1. Place throttle control in "FAST" position. 2. Shift to slower speed. 3. Allow grass to dry before mowing. 4. Level mower deck. 5.
TRACTOR - - MODEL NUMBER 917.
TRACTOR - - MODEL NUMBER 917.
TRACTOR - - MODEL NUMBER 917.273350 ELECTRICAL KEY PART NO. NO. DESCRIPTION 1 2 8 16 21 22 24 25 26 27 28 29 30 33 40 41 42 43 45 52 90 Battery Bolt He;< Hd I/4-20 unc x 3/4 Box Battery Fender Switch, Interlock Harness Asm Light Wi4152j Bulb Light #1 I56 Cable Battery 6 Ga. 11" red Cable Battery 6 Ga. w/I6 wire red Fuse 20 AMP Nut, Keps Hex I/4-20 unc Cable Ground 6 Ga. 12" black Switch Plunger Nc Gray Switch Ign Key Ign Molded Craftsman Harness Ign Bolt BIk.
TRACTOR - - MODEL CHASSIS AND ENCLOSURES NUMBER 917.273350 28 166 208 208 37 209 208 74 2_ F 209 chassis_Laser 34 _/t.
TRACTOR - - MODEL CHASSIS AND ENCLOSURES KEY PART NO. NO. 1 2 5 9 10 1I 13 14 17 16 26 28 29 30 3I 37 38 39 60 64 74 142 143 144 145 166 206 207 208 209 212 NOTE: 174619 176554 155272 166337X013 STD533710 174996 172105X010 17490608 185682X558 184921 STD541437 188636 174332X599 174738X558 139976 17490508 175710 174714 72140606 154798 73680600 175702 186689 175582 156524 189747 170165 17670508 17670608 17000612 175143 5479J NUMBER 917.
TRACTOR - - MODEL NUMBER 917.
TRACTOR - - MODEL NUMBER 917.273350 GROUND DRIVE KEY PART NO. NO.
STEERING TRACTOR ASSEMBLY - - MODEL NUMBER J J 47 58 38 917.
STEERING TRACTOR ASSEMBLY - - MODEL NUMBER 917.273350 KEY PART NO. NO. DESCRIPTION 1 2 3 4 5 6 7 8 9 10 11 12 13 15 17 26 28 29 30 32 36 37 38 39 40 41 42 43 44 46 47 51 54 65 67 68 71 82 85 88 91 95 Steering Wheel Axle Assembly STMP Dropped STL Spindle Aasembly_ LH. Spindle Aasembly_ R.H. Bearing, Race, Thrust, Hardened Washer 25/32 ;< 1-5/8 ;< 16 Ga. Washer 27/32 ;< 1-1/4 ;< 16 Ga. Ring Klip Bearing, Steering Column Dra.
TRACTOR - - MODEL NUMBER 917.273350 ENGINE 72 13 4 38 14 33 31 33 29 \ OPTIONAL EQUIPMENT Spark Arrester 23 I engine-bs, lcyl KEY NO. PART NO. 1 2 170545 17720408 4 13 14 23 29 3I 32 3,3 137352 165291 148456 169837 137180 184900 140527 123487X DESCRIPTION Control, Throttle Screw, Hex Head, Thread Cutting I/4-20 × 5/8 Engine, (See Breakdown) Hriggs Model No.
/ / _'5 _,_q71912 N07"_, - "."_ls_o _#Ot rtOu/rjel: .,tt, l _r _Olt ,_h¢ _ _?la,2._ 1 ^" us(l_r,-, ".
TRACTOR - - MODEL NUMBER 917.273350 DECALS 6 7 I4 I4 3 1I 16 13 KEY NO. PART NO. DESCRIPTION 1 2 3 4 6 7 9 16 1I 156366 189244 171704 179126 133644 189263 163204 149516 156439 Decal Fender Opr. Inst. Decal, HP Engine Decal, Hood Decal, Deck Decal, Customer Maintenance Decal, Replacemect Decal, Fender Decal, Battery. DngriPsn Eng Decal, Danger Fender EngiSpan WHEELS 2_ KEY NO. PART NO.
TRACTOR - - MODEL NUMBER 917.273350 LIFT ASSEMBLY 7 5 3 13 2 6 6 5 13 19 2O 20 13 19 15 32 / KEY NO. PART NO. DESCRIPTION 1 2 3 4 5 6 7 8 1I 12 13 15 159460 15947I 105767X 12000002 19211621 1201&3X 12563IX 122365X 139865 139866 STD624008 173288 Lift Lever inner Wire Assembly Shaft Assem bly_Lift Pin, Groove F-Ring Washer 21/32 x I ×21 Ga. Bearing, Nylon Grip, Handle, Fluted Button, Plunger, Red Link, Lift, L.H. Link, Lift, R.H. Retainer Spring Link, Front lift-rh, 1piece_3 KEY NO.
TRACTOR - - MODEL NUMBER 917.
TRACTOR - - MODEL NUMBER 917.273350 MOWER DECK KEY NO. PART NO. 1 2 3 165892 STD533107 138017 4 5 6 8 9 10 1I -- 13 14 15 18 18 19 20 2I 23 24 25 28 27 28 29 30 3I 32 33 34 38 DESCRIPTION Mower Deck Assembly, 42' Bolt Bracket Assembly, Sway Bar, Front 165460 Bracket Sway Bar 38/42 _ eek STD824008 Retainer Spring 178024 Bar Sway Deck 850857 Bolt, Hex 3/8-24 x 1.25 Gr.
TRACTOR - - MODEL NUMBER DANA TRANSAXLE - - MODEL NUMBER D4360-140 917.
DANA TRANSAXLE KEY NO, PART NO, 1 2 3 4 5 170981 2274J 134400 105904X 160940 6 7 8 9 10 1I 12 13 138235 108727X 148266 148269 2225J 134793 148268 120415X 14 15 18 17 18 19 20 2I 22 23 24 25 28 27 28 29 30 3I 32 33 34 35 142674 170983 170988 105909X 105910X 180942 160943 148267 138236 73810500 142676 2244J 105918X 12047OX 110070X 142677 142681 124644X 108980X 120408X 134796 105925X 38 2228J 37 170987 38 39 174255 124639X TRACTOR -- MODEL NUMBER - - MODEL NUMBER D4360-140 DESCRIPTION Housing U
TRACTOR -- MODEL NUMBER 917,273350 BRIGGS ENGINE-MODEL NUMBER 31C707,TYPE NUMBER 0230-E1 2_ 27 _=_ 434 584_ 9_ 307 1264_ 358 ENGFNE GASKET SET 3@ 24 0 868 12 943 O 741 @ 758_ 20@ 0170 1022 51 691 842 O 524 4J 1019 LABEL KFT 1058 OWNER'S MANUAL [ 1036 EMFSSION LABEL 12 ] 150 20 48 1270
TRACTOR - - MODEL NUMBER 917.
TRACTOR -- MODEL NUMBER 917,273350 BRIGGS ENGINE-MODEL NUMBER 31C707,TYPE NUMBER 0230-E1 108A _ 231 634A_-_ e,, 118 1091 I 121 CARBURETOR OVERHAUL KIT 1266AO 987_ 51 104 € _ 105 127_ 137 276(_ 231_ 1266 0 1266 0 93_ 166 8 1_2 g 95e 117_ 977 CARBURETOR GASKET SET 50 6170 63_...
TRACTOR - - MODEL NUMBER 917,273350 BRIGGS ENGINE-MODEL NUMBER 31C707,TYPE NUMBER 0230-E1 305A t_ 1265 643 _9_ 729 801 697 *" 803_ 579.
TRACTOR -- MODEL NUMBER 917,273350 BRIGGS ENGINE-MODEL NUMBER 31C707,TYPE NUMBER 0230-E1 KEY NO, PART NO, 1 2 3 4 5 7 9 10 1I 12 13 15 16 20 22 23 24 25 697174 399265 391086 697106 698147 692410 697109 697157 697113 697110 690360 690946 697127 690947 692125 693557 222698 697159 697160 DESCRIPTION • -+ • • + 697162 697163 26 27 28 29 32 3,3 34 35 36 37 40 43 45 46 48 697164 697165 69717I 697172 697100 697099 697126 692852 495856 495857 691279 691279 697352 69I 752 691968 690564 697687 697761 50 5
TRACTOR - - MODEL NUMBER 917,273350 BRIGGS ENGINE-MODEL NUMBER 31C707,TYPE NUMBER 0230-E1 KEY NO, PART NO, 383 404 43I 445 482 474 503 505 5I O 510A 513 523 524 525 544 544#, 552 562 579 584 60I 614 618 617 634 89838 69I 69I 697122 698083 69126I 696459 691532 69125I 693699 497606 692024 697088 691032 697184 692034 390837 697144 69I 119 691029 697112 95162 691620 692012 692138 690801 O, O 634A 690802 O 635 643 654 69I 697 718 729 74I 757 758 759 783 783A 789 797 80I 8OIA 802 802A 803 803#.
SUGGESTED GUIDE FOR SIGHTING SLOPES FOR SAFE OPERATION 1. Fold this page along dotted line indicated above. 2. Hold page before you so that its left edge is vertically parallel to a tree trunk or other upright structure. 3. Sight across the fold in the direction of hill slope you want to measure. 4. Compare the angle of the fold with the slope of the hill.
Get it fixed,, at,your home or ours! Your Home For repair - in your home - of all major brand apphances, lawn and garden equipment, or heating and coohng systems, no matter who made it, no matter who sold it! For the replacement parts, accessories and owner's manuals that you need to doqt-yourself. For Sears professional installation of home apphances and _tems hke garage door openers and water heaters.