Owner's Manual CRRFTSMIIN° LAWN TRACTOR 18.5 HP, 42" Mower Electric Start Automatic Transmission Model No. 917.275640 differently from built engines. Before operates you start the This product haspreviously a low emission engine which engine, read and understand this Owner's Manual, IMPORTANT: For answers to your questions Read and follow all Safety Rules and Instructions before about this product, Call: operating this equipment.
Warranty................................................ 2 Safety Rules..........................................3 ProductSpecifications...........................6 AssemblyPre-Operation........................7 Operation............................................. 10 Maintenance .......................................17 MaintenanceSchedule........................17 Serviceand Adjustments.....................22 Storage................................................ 28 Troubleshooting.....................
IMPORTANT:This cuttingmachine is capableof amputatinghands and feet andthrowing objects.Failureto observe the followingsafetyinstructionscould result in serious injury or death. • _IWARNING: Inorder to preventaccidentalstarting when setting up, transporting,adjustingor making repairs, alwaysdisconnectspark plug wire and place wire where it cannot contactspark plug. • _I_WARNING: Do not coast down a hill in neutral, you may lose control of the tractor.
II, SLOPE OPERATION Slopes are a major factor related to loss of control and tip-over accidents, which can result in severe injury or death. Operation on all slopes requires extra caution. If you cannot back up the slope or if you feel uneasy on it, do not mow it. • Mow up and down slopes, not across. • Watch for holes, ruts, bumps, rocks, or other hidden objects. Uneven terrain could overturn the machine. Tall grass can hide obstacles.
• • • • Removegas-poweredequipmentfrom the truck or trailerand refuelit on the ground.If this is not possible,then refuelsuch equipmentwith a portable container,ratherthan from a gasoline dispensernozzle. Keepthe nozzle in contact with the rim of the fuel tank or containeropening at all times until fueling is complete.Do not use a nozzle lock-opendevice. If fuel is spilled on clothing,change clothingimmediately. Neveroverfill fuel tank.Replacegas cap and tighten securely.
PRODUCT SPECIFICATIONS In the state of California Gasoline Capacity and Type: 4.0 Gallons Unleaded Regular Oil Type 'API-SG-SL): SAE 30 (above 32°F) SAE 5W-30(Below 32°F Oil Capacity: W/Filter: 3.5 Pints W/O Filter: 3.0 Pints Spark Plug: (GAP: .030") Champion Ground (MPH): Speed RC12YC Forward: Reverse: 5.5 2.4 Tire Pressure: Front: Rear: Charging System: 9 Amps Battery: Amp/Hr: Min. CCA: Case Size: Blade Bolt Torque: 27-35 14 PSI 10 PSI @ 3600RPM 28 230 U1R Ft. Lbs.
(1) Oil Drain Tube For Future Use Slope Keys Sheet (2) Keys Your new tractor has been assembled at the factory. When right or left hand is mentioned in this manual, it means when you are in the operating position (seated behind the steering wheel). TO REMOVE TRACTOR FROM CARTON UNPACK CARTON 1. Cut along dotted lines on all four panels of carton. Remove end panels and lay side panels flat. 2. Remove protective materials from tractor hood and grille.
NOTE: You may now roll or drive your tractor off the skid. Follow the appropriate instruction below to remove the tractor from the skid. TO ROLL TRACTOR Operation function 1. 2. section of OFF for SKID location (See and controls) Press lift lever plunger and raise attachment lift lever to its highest sition. po- 3. Release parking brake by depressing clutch/brake pedal. Place freewheel control in "trans- 4.
,/CHECKLIST Before you operate your new tractor, we wish to assure that you receive the best performance and satisfaction from this Quality Product. Please review the following checklist: ,/All assembly instructions have been completed. ,/No remaining loose parts in carton. ,/Battery is properly prepared and charged. (Minimum 1 hour at 6 amps). ,/" Seat is adjusted comfortably and tightened securely. ,/" All tires are properly inflated. (For shipping purposes, the tires were overinflated at the factory).
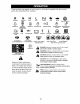
These symbols may appear on your tractor Learn and understand their meaning. R N REVERSE NEUTRAL or in literature H HIGH supplied with the product.
KNOW YOUR TRACTOR READ THIS OWNER'S MANUAL AND SAFETY RULES BEFORE OPERATING YOUR TRACTOR Compare the illustrations with your tractor to familiarize yourself with the locations of various controls and adjustments. Save this manual for future reference. ROS "ON" Position Ignition Switch Attachment Clutch Switch Ammeter Lift Lever Plunger Throttle/Choke Control Lift Lever Clutch/Brake Pedal Light Switch ," . . .- .
The operationof any tractorcan result in foreign objectsthrowninto the eyes,which can result in severeeye damage. Alwayswear safetyglasses or eye shieldswhile operatingyour tractoror performingany adjustments or repairs. We recommendstandardsafety glassesor a wide vision safety maskworn over spectacles. HOW TO USE YOUR TRACTOR TO SET PARKING BRAKE Your tractor is equipped with an operator presence sensing switch.
TO ADJUST GAUGE WHEELS Gauge wheels are properly adjusted when they are slightly off the ground when mower is at the desired cutting height in operating position. Gauge wheels then keep the deck in proper position to help prevent scalping in most terrain conditions. NOTE: Adjust gauge wheels with tractor on a flat level surface. Attachment Clutch Switch Pull Out To "Engage" // ,,::_S'_... Low Position Push in to "Disengage" 1.
TO OPERATE ON HILLS TOWING MENTS _WARNING: Do not drive up or down hills with slopes greater than 15 ° and do not drive across any slope. Use the slope guide at the back of this manual. • Choose the slowest speed before starting up or down hills. • Avoid stopping or changing speed on hills. • If slowing is necessary, move throttle control lever to slower position. • If stopping is absolutely necessary, push clutch/brake pedal quickly to brake position and engage parking brake.
CAUTION: Alcohol blended fuels (called gasohol or using ethanol or methanol) can attract moisture which leads to separation and formation of acids during storage. Acidic gas can damage the fuel system of an engine while in storage. To avoid engine problems, the fuel system should be emptied before storage of 30 days or longer. Drain the gas tank, start the engine and let it run until the fuel lines and carburetor are empty. Use fresh fuel next season. See Storage Instructions for additional information.
PURGE TRANSMISSION MOWING _iCAUTION: Never engage or disengage freewheel lever while the engine is running. To ensure proper operation and performance, it is recommended that the transmission be purged before operating tractor for the first time. This procedure will remove any trapped air inside the transmission which may have developed during shipping of your tractor.
F,LL,NOATES AS YOU COMPLETE REGULAR SERVICE Check T R A /__.
TRACTOR Always observe safety rules when forming any maintenance. BRAKE OPERATION • When the engine is running with the ignition switch in the ROS "ON" position and the attachment clutch engaged, any attempt by the operator to shift into reverse should NOT shut off the engine. per- If tractor requires more than five (5) feet to stop at highest speed in highest gear on a level, dry concrete or paved surface, then brake must be checked and adjusted.
5/8" Bolt or p V-BELTS Check V-belts for deterioration and wear after 100 hours of operation and replace if necessary. The belts are not adjustable. Replace belts if they begin to slip from wear. Blade Center Hole BATTERY ENGINE Your tractor has a battery charging system which is sufficient for normal use. How- LUBRICATION ever, periodic charging of the battery with an automotive charger will extend its life. • Keep battery and terminals clean. • Keep battery bolts tight.
3. 4. 5. 6. 7. 8. Unlock drain valve by pushing inward slightly and turning counterclockwise. To open, pull out on the drain valve. After oil has drained completely, close and lock the drain valve by pushing inward and turning clockwise until the pin is in the locked position as shown. Remove the drain tube and replace the cap onto the end of the drain valve. Refill engine with oil through oil fill dipstick tube. Pour slowly. Do not overfill.
IN-LINE FUEL FILTER The fuel filter should be replaced once each season. If fuel filter becomes clogged, obstructing fuel flow to carburetor, replacement is required. 1. With engine cool, remove filter and plug fuel line sections. 2. Place new fuel filter in position in fuel line with arrow pointing towards carburetor. 3. Be sure there are no fuel line leaks and clamps are properly positioned. 4. Immediately wipe up any spilled gasoline.
& WARNING: TO AVOID SERIOUS VICE OR ADJUSTMENTS: 1. 2. 3. 4. 5. 6. INJURY, TO REMOVE 3. 4. 5. 6. 7. ANY SER- IMPORTANT: If an attachment other than the mower deck is to be mounted on the tractor, remove the front links. TO INSTALL MOWER MOWER will be easier right side of tractor. 1. Place attachment 2. PERFORMING Depress clutch/brake pedal fully and set parking brake. Place motion control lever in neutral (N) position. Place attachment clutch in "DISENGAGED" position.
TO LEVEL MOWER Check adjustment on right side of tractor. Measure distance "D" directly in front of and behind the mandrel at bottom edge of mower housing as shown. • Before making any necessary adjustments, check that both front links are equal in length. • If links are not equal in length, adjust one link to same length as other link. • To lower front of mower loosen nut "E" on both front links an equal number of turns.
TO REPLACE BELT MOWER BLADE DRIVE TO ADJUST 1. Depress clutch/brake pedal all the way down and engage parking brake. 2. Measure distance between brake operating arm and nut "A" on brake rod. 3. If distance is other than 1-9/16", loosen jam nut and turn nut "A" until distance becomes 1-9/16". Retighten jam nut against nut "A". 4. Engage transmission by placing freewheel control in "transmission The mower blade drive belt may be replaced without tools. Park the tractor on level surface.
3. 4. 5. 6. 7. 8. Pull belt toward front of tractor and roll belt around electric clutch and onto engine pulley. Install belt through stationary idler and clutching idler. Reinstall clutch Iocator and tighten nut securely. Reconnect clutch harness. Make sure belt is in all pulley grooves and inside all belt guides and keepers. Install mower (See "TO INSTALL MOWER" in this section of manual). Electric --....
TO START BATTERY ENGINE WITH A WEAK 3. _WARNING: Lead-acid batteries generate explosive gases. Keep sparks, flame and smoking materials away from batteries. Always wear eye protection when around batteries. 4. 5. 6. If your battery is too weak to start the engine, it should be recharged. (See "BATTERY" in the MAINTENANCE section of 7. this manual). If "jumper cables" are used for emergency starting, follow this procedure: IMPORTANT: Your tractor is equipped with a 12 volt system.
Hood Headlight Wire Connector ENGINE Maintenance, repair, or replacement of the emission control devices and systems, which are being done at the customers expense, may be performed by any non-road engine repair establishment or individual. Warranty repairs must be performed by an authorized engine manufacturer's service outlet. TO ADJUST THROTTLE CABLE CONTROL The throttle control has been preset at the factory and adjustment should not be necessary.
Immediately prepare your tractor for storage at the end of the season or if the tractor will not be used for 30 days or more. AI:_WARNING: Never store the tractor with gasoline in the tank inside a building where fumes may reach an open flame or spark. Allow the engine to cool before storing in any enclosure. Also, alcohol blended fuels (called gasohol or using ethanol or methanol) can attract moisture which leads to separation and formation of acids during storage.
TROUBLESHOOTING CHART: See appropriate section in manual unless directed to Sears service center PROBLEM Will not start CAUSE CORRECTION 1. Out of fuel. 2. 3. Engine not "CHOKED" properly. Engine flooded. 1. Fill fuel tank. 2. See "TO START 4. 5. 6. 7. Bad spark plug. Dirty air filter. Dirty fuel filter. Water in fuel. 8. 9. Loose or damaged wiring. Carburetor out of adjustment. 1. Dirty air filter. 2. Bad spark plug. 3. Weak or dead battery. 4. Dirty fuel filter. 5. Stale or dirty fuel. 6. 7.
TROUBLESHOOTING See appropriate PROBLEM Loss of power (cont.) CHART: section in manual Faulty spark plug. 6. 7. 8. Dirty fuel filter. Stale or dirty fuel. 7. 8. 9. Water in fuel. 9. plug wire loose. 10. Dirty engine air screen/fins. Dirty/clogged muffler. Loose or damaged wiring. Carburetor out of adjustment. 11. 12. 13. 14. 15. Engine valves adjustment. Engine continues to run when operator leaves seat with attachment clutch engaged Poor cut - uneven 1. Worn, bent or loose blade.
TROUBLESHOOTING CHART: See appropriate section in manual unless directed to Sears service center PROBLEM Mower blades will not rotate CAUSE 1. 3. 4. Obstruction in clutch mechanism. Worn/damaged mower belt. Frozen idler pulley. Frozen blade mandrel. 1. Engine 2. 3. Travel speed Wet grass. 4. 5. Mower deck not level. Low/uneven tire air pressure. 4. 5. 6. Worn, bent or loose blade. 6. 7. Buildup of grass, leaves and trash under mower. Mower drive belt worn. Blades improperly installed. 7.
TRACTOR - - MODEL NUMBER 917.275640 SCHEMATIC BATTERY SOLENOID O IGNITION UNIT GAP /_I!SPARK (2 PLUGS PLUGS ON TWIN FUELSHUT-OFF SOLENOID _/ METER CYL. O ENGINES) _-J (OPTIONAL) CHARGING SYSTEM OUTPUT 9 AMP DO @ 3600 RPM _4 REGULATOR 28 VOLTS AC @ 3600 RPM (REGULATOR DISCONNECTED) I O_11 R[iLTERNATO _J_JL_OL_jI ............................................................................................................................................................................
TRACTOR - - MODEL NUMBER 917.275640 ELECTRICAL 22 41 I /I I 8O 4O 26 25 \ \ \ / / / / 52 29 11 ,\.
TRACTOR - - MODEL NUMBER 917.275640 ELECTRICAL KEY NO. PART NO.
TRACTOR CHASSIS AND ENCLOSURES - - MODEL NUMBER 917,275640 78 31 209_ 278 54 209 /_. 54 155 ..........
TRACTOR CHASSIS AND ENCLOSURES - - MODEL NUMBER 917,275640 KEY PART NO. NO.
TRACTOR - - MODEL NUMBER 917.275640 GROUND DRIVE 151 51 53 3O 55 16 \_ 84 73 dfive-hTdro.
TRACTOR - - MODEL NUMBER 917.275640 GROUND DRIVE KEY NO. 1 PART NO.
TRACTOR STEERING ASSEMBLY - - MODEL NUMBER 917,275640 67 67 / J 46 13 46 .
TRACTOR STEERING ASSEMBLY - - MODEL NUMBER 917.275640 KEY PART NO. NO. DESCRIPTION 1 2 3 4 5 6 8 10 11 12 13 15 17 26 28 29 30 32 36 37 38 39 40 186094X428 184706 169840 169839 6266H 121748X 12000029 175121 STD551137 73940800 136518 145212 177883 126847X 19131416 17000612 76020412 130465 155105 152927 186095X428 19182411 73540600 Wheel Steering Axle Asm Spindle Asm LH Spindle Asm RH Bearing Race Thrust Harden Washer 25/32 x 1-5/8 x 16 Ga.
TRACTOR - - MODEL NUMBER 917,275640 ENGINE 2 72 1 / 62 / 13 4 78 38 14 32 > 3 /3 3337 29 23 OPTIONAL Spark EQUIPMENT Arrester engine-bs.lcyl KEY NO. PART NO.
TRACTOR - - MODEL NUMBER 917,275640 SEAT ASSEMBLY 18 \/J I 8 j7 i i i i / / \ \ "25 \ \\ 11 13 \ seat \ 17 It.knob 12 2 NO. PART NO. DESCRIPTION 1 2 3 4 5 6 7 8 9 10 11 12 188719 140551 STD523710 19131610 145006 STD541437 124181X 17000616 19131614 182493 166369 174648 Seat Bracket Pivot Seat Bolt Fin Hex 3/8-16 unc x 1 Washer 13/32 x 1 x 10 Ga Clip Push-In Nut Hex w/ins 3/8-16 unc Spring Seat Cprsn Screw 3/8-16 x 1-1/2 Washer 13/32 x 1 x 14 Ga.
TRACTOR - - MODEL NUMBER 917,275640 DECALS 11 16 7 9 3 13 21 21 4 11 10 20 6 15 14 KEY NO. PART NO. 1 2 3 4 5 6 7 8 9 10 11 12 13 187407 138047 186242 186243 186572 146046 193654 179128 193872 156439 189088 172331 133644 WHEELS KEY PART NO. NO.
TRACTOR - - MODEL NUMBER 917,275640 LIFT ASSEMBLY 3 13 2 5 4 13 19 20 18 20 19 15 13 32 KEY NO. PART NO. DESCRIPTION 1 2 3 4 5 6 7 11 12 13 179504 159476 188822 12000002 19211621 120183X 175830 139865 139866 4939M Plunger Assembly Shaft Assembly, Lift Pin Groove E-Ring Washer 21/32 x 1 x 21 Ga. Bearing Nylon Grip Handle Fluted Link Lift L.H. Link Lift R.H. Retainer Spring lift-rh. 1piece3 KEY NO. PART NO.
TRACTOR - - MODEL NUMBER 917,275640 MOWER DECK 68 148 34 \ 21 23 24 25 119 26 118_ 28 27 29 18 _117 _116 21 42 D elec-t-path 46 silt 1
TRACTOR - - MODEL NUMBER 917.275640 MOWER DECK KEY NO. PART NO. DESCRIPTION KEY NO. PART NO. 1 2 165892 STD533107 Mower Bolt 40 44 73900600 140088 3 4 5 6 8 9 10 138017 165460 STD624008 178024 850857 STD551137 140296 Bracket Asm Sway Bar Front Bracket Sway Bar 38/42" Retainer Spring Bar Sway Deck Bolt Hex 3/8-24 x 1.25 Gr.
-r ..< 0 -I 120_ 128 z 7 !3 93- I I r--t m_ , _ oo m, r- , zN c _o 88 w_ m m _r_z ..._c 4_ O0 _83 _w "_m 19 ",4 ",4 93 L108 69 7 [125 6 SEALANT 57 20W50 127- SEAL OiL AND - 78.
TRACTOR - - MODEL NUMBER 917.275640 HYDRO TRANSAXLE - - MODEL NUMBER 314-0510-20 KEY NO. PART NO.
TRACTOR - - MODEL NUMBER 917.275640 BRIGGS ENGINE-MODEL NUMBER 31P777, TYPE NUMBER 0348-E1 43 7 684_ 7 146 _' I 126 1 lO36_ 11 __.
TRACTOR - - MODEL NUMBER 917.275640 BRIGGS ENGINE-MODEL NUMBER 31P777, TYPE NUMBER 0348-E1 1095 VALVE GASKET SET 868 _ 238 1022 @ g5 1022 6170 1034 914 1091 127 O 6o1 947 276@ 1127.
TRACTOR - - MODEL NUMBER 917.275640 BRIGGS ENGINE-MODEL NUMBER 31P777, TYPE NUMBER 0348-E1 KEY NO. PART NO. DESCRIPTION KEY NO. PART NO.
TRACTOR - - MODEL NUMBER 917.275640 BRIGGS ENGINE-MODEL NUMBER 31P777, TYPE NUMBER 0348-E1 KEY NO. PART NO. DESCRIPTION KEY NO. PART NO.
SUGGESTED GUIDE FOR SIGHTING SLOPES FOR SAFE OPERATION ONLY RIDE UP AND DOWN HILL, NOT ACROSS HILL O1 O1 15 DEGREES MAX. _b down the face of slopes, never across the face. Do not mow ARNING: To avoid serious injury, operate tractor and slopes greater than 15 degrees. Make turns your gradually to up prevent tipping or loss of control. Exercise extreme caution when changing direction on slopes. I,Fold thispage along dotted lineindicatedabove. 2.
Your Home For repair - in your home - of all major brand appliances, lawn and garden equipment, or heating and cooling systems, no matter who made it, no matter who sold it! For the replacement parts, accessories and owner's manuals that you need to do-it-yourself. ................ For Sears professional installation of home appliances and items like garage door openers and water heaters. 1-800-4-MY-HOME ® (1-800-469-4663) Anytime, day or night (U.S.A. and Canada) www.sears.com www.sear_.