Operator's Manual CRRFT MRH° LAWN TFIACTO 17.5 HR* 30" Mower Electric Start 6-Speed Transaxle Model No. 917.28035 • EspaSol, pg. 33 This product has a low emission engine which operates differently from previously built engines. Before you start the engine, read and understand this Owner's Manual. IMPORTANT: Read and follow all Safety Rules and Instructions before operating this equipment.
Warranty .................................................. 2 Safety Rules ............................................ 3 Product Specifications ............................. 6 Assembly/Pre-Operation ......................... 8 Operation ............................................... 11 Maintenance Schedule .......................... 17 Maintenance .......................................... 17 Service and Adjustments ....................... 21 Storage ..................................................
_,DANGER: This cutting machine is capable of amputating hands throwing objects. Failure to observe the following safety instructions in serious injury or death. _I_IWARNING: In order to prevent accidental starting when setting up, transporting, adjusting or making repairs, always disconnect spark plug wire and place wire where it cannot contact spark plug. • _WARNING: Do not coast down a hill in neutral, you may lose control of the tractor.
Ii. SLOPE OPERATION Slopes are a major factor related to loss of control and tip-over accidents, which can result in severe injury or death. Operation on all slopes requires extra caution. If you cannot back up the slope or ifyou feel uneasy on it, do not mow it. • Mow up and down slopes, not across. • Watch for holes, ruts, bumps, rocks, or other hidden objects. Uneven terrain could overturn the machine. Tall grass can hide obstacles.
• • • Keep the nozzle in contact with the rim of the fuel tank or container opening at all times until fueling is complete. Do not use a nozzle lock-open device. Iffuel is spilled on clothing, change clothing immediately. Never overfill fuel tank. Replace gas cap and tighten securely. GENERAL SERVICE • • • Never area. • Keep all nuts and bolts tightto be sure the equipment is in safe working condition. Nevertamperwithsafetydevices. Check their proper operation regularly.
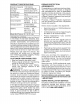
PRODUCT Gasoline Capacity and Type: 1.50 Gallons Unleaded Regular Oil Type API-SG-SL): SAE 30 (above 32°F) SAE 5W30 (below 32°F ' Oil Capacity: 48 oz. Spark Champion RC12YC (Gap: .030") Plug: Ground Speed Charging System: Battery: Blade REPAIR PROTECTION AGREEMENTS SPECIFICATIONS Forward: Reverse: 3 Amps 5 Amps 0- 5.2 0- 2.9 Battery Headlights Amp/Hr: Min. CCA: Case size: Bolt Torque: Congratulations on making a smart purchase.
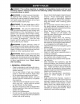
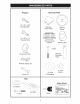
Bagger Steering / / Wheel \ / \ / I 1/4 x 20 x 1.25" Carriage 1/4x20x Shoulder Bolts Steering Wheel Insert Steering Wheel 1.
Your new tractor has been assembled at the factory with the exception of those parts left unassembled for shipping purposes. To ensure safe and proper operation of your tractor all parts and hardware you assemble must be tightened securely. Use the correct tools as necessary to ensure proper tightness. TOOLS REQUIRED FOR ASSEMBLY 2. Place tabs of steering boot over tab slots in dash and push down to secure. A socket wrench set will make assembly easier. Standard wrench sizes are listed.
TO ASSEMBLY Tape "_ Wiring harness 5. Raise seat and tighten 6. Remove 7. Lower seat into operating position and sit on seat. Press brake pedal all the way down. If operating position is not comfortable, adjust seat. 1. Unfold 2. Feed front bagger frame (1) up through fabric loops at each side of bagger. 3. Snap bottom offrontbaggerframe snap feature at front of bagger 4. Slidebaggerfabricloop(2) segmentsatthe ends of bag onto top bagger frame tubing. 5. Uninstall two (1\4"-20 x 1.
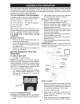
CHECK DECK LEVELNESS For best should be MOWER" section of cutting results, mower housing properly leveled. See "TO LEVEL in the Service and Adjustments this manual. CHECK FOR PROPER POSITION OF ALL BELTS See the figures that are shown for replacing motion and mower blade drive belts in the Service and Adjustments section of this manual. Verify that the belts are routed correctly.
These symbols may appear on your tractor or in literature suppliedwith the product.
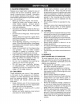
KNOW YOUR TRACTOR READ THIS OWNER'S MANUAL AND SAFETY TRACTOR RULES BEFORE OPERATING YOUR Compare the illustrations with your tractor to familiarize yourself with the locations of various controls and adjustments. Save this manual for future reference. Our tractors conform American to the applicable safety standards National Standards Institute. (F) IGNITION SWITCH-Used and stopping the engine.
The operation of any tractor can result in foreign objects thrown into the eyes, which can result in severe eye damage. Always wear safety glasses or eye shields while operating your tractor or performing any adjustments or repairs. We recommend standard safety glasses or a wide vision safety mask worn over spectacles. • Never use choke to stop engine. IMPORTANT: Leaving the ignition switch in any position other than "STOP" will cause the battery to discharge and go dead.
TO ADJUST MOWER CUTTING The position of the attachment determines the cutting height. HEIGHT REVERSE OPERATION SYSTEM (ROS) Your tractor is equipped with a Reverse Operation System (ROS). Any attempt by the operator to travel in the reverse direction with the attachment clutch engaged will shut off the engine unless ignition key is placed in the ROS "ON" position. _, WARNING: Backing up with the attachment clutch engaged while mowing is strongly discouraged.
TO OPERATE ON HILLS CAUTION: Alcohol blended fuels (called gasohol or using ethanol or methanol) can attract moisture which leads to separation and formation of acids during storage. Acidic gas can damage the fuel system of an engine while in storage. To avoid engine problems, the fuel system should be emptied before storage of 30 days or longer. Drain the gas tank, start the engine and let it run until the fuel lines and carburetor are empty. Use fresh fuel next season.
NOTE: If at a high altitude (above 3000 feet) or in cold temperatures (below32° F) the carburetor fuel mixture may need to be adjustedfor best engine performance (see "TOADJUSTCARBURETOR"intheService and Adjustments section of this manual). MAX 1/3" • MOWING TiPS • • • • • • • Tire chains cannot be used when the mower housing is attached to tractor. Mowershould be properlyleveled for best mowing performance. See "TO LEVEL MOWER HOUSING" in the Service and Adjustments section of this manual.
MAINTENANCE SCHEDULE Check Brake BEFORE EACH USE Operation Check Operator A Check for Loose C Check/Replace T Lubrication 0 Check Battery R Clean Battery Clean Debris Presence i EVERY EVERY EVERY BEFORE 25 HOURS 50 HOURS 100 HOURS SEASON STORAGE t/ t/ & ROS Systems t,,' i/ Fasteners Mower i,," i/4 t/ Level and Terminals Off Steering Mower t/ i/ Plate i/ Cooling t/ Levelness i/ Check V-Belts Check tf Blades Chart Check Transaxle Check EVERY 8 HOURS _ Chec
TRACTOR CHECK SYSTEM Always observe safety rules when performing any maintenance. BRAKE OPERATION If tractor requires more than five (5) feet to stop at highest speed in highest gear on a level, dry concrete or paved surface, then brake must be serviced. (See "TO CHECK BRAKE" in the Service and Adjustments section of this manual). TIRES • Maintain proper air pressure in all tires (See the sides of tires for proper PSI). • Keep tires free of gasoline, oil, or insect control chemicals which can harm rubber.
BATTERY TO CHANGE Your tractor has a battery charging system which is sufficient for normal use. However, periodic charging of the battery with an automotive charger will extend its life. • Keep battery and terminals clean. • Keep battery bolts tight. • Keep small vent holes open. • Recharge at 6-10 amperes for 1 hour. NOTE: The original battery on your tractor is maintenance free. Do not attempt to open or remove caps or covers. Adding or checking ieve( of electrolyte is not necessary.
AiR FILTER CLEANING Your engine will not run properly using a dirty air filter. Service air cleaner more often under dusty conditions. See engine manual. • CLEAN AIR SCREEN _ CAUTION: Avoid able parts • Air screen must be kept free of dirt and chaff to prevent engine damage from overheating. Clean with a wire brush or compressed air to remove dirt and stubborn dried gum fibers, ENGINE COOLING Clean engine, battery, seat, finish, etc. of all foreign matter. Clean debrisfrom steering plate.
& 1. 2. 3. 4. 5. 6. WARNING: TO AVOID SERIOUS ADJUSTMENTS: iNJURY, BEFORE PERFORMING ANY SERVICE OR Depress clutch/brake pedal fully and set parking brake. Place gearshift lever in neutral position. Place attachment clutch in "DISENGAGED" position. Turn ignition key to "STOP" and remove key. Make sure the blades and all moving parts have completely stopped. Disconnect spark plug wire from spark plug and place wire where it cannot come in contact with plug. TO REMOVE MOWER 1.
3. ATTACH 4. ARMS (A) TO CHASSiS-Position hole in arm over pin (B) on outside of tractor chassis and secure with retainer spring. Repeat on opposite side of tractor. 5. SIDE SUSPENSION 7. spring. ATTACH FRONT left side of tractor. LINK Insert assembly through front front suspension bracket IMPORTANT: Check belt for proper routing in all mower pulley grooves. 11.Raise attachment lift lever to highest position. 12.
TO LEVEL MOWER Make sure tires are properly inflated to the PSI shown on tires. If tires are over or under inflated, it may affect the appearance of your lawn and lead you to think the mower is not adjusted properly. VISUAL SIDE-TO-SIDE FRONT-TO-BACK IMPORTANT: side. ADJUSTMENT Each full turn of adjustment mower height about 3/16".
TO REPLACE MOWER BLADE DRIVE BELT TO REPLACE The mower blade drive belt may be replaced without tools. Park the tractor on level surface. Engage parking brake. BELT REMOVAL 1. Remove mower. (See "TO REMOVE MOWER" in this section of manual.) 2. Work belt off mandrel pulley and idler pulleys, 3. Pull belt away from mower. 1. 2. 3. DRIVE BELT Park the tractor on level surface. Engage parking brake. For assistance, there is a belt installation guide decal on bottom side of left footrest.
TRANSAXLE GEAR SHIFT LEVER NEUTRAL ADJUSTMENT TO ADJUST STEERING ALIGNMENT The transaxle If steering wheel crossbars are not horizontal (left to right) when wheels are positioned straightforward, remove steering wheel and reassemble per instructions in the Assembly section of this manual. should be in neutral when the gear shift lever is in neutral (N) (lock gate) position. The adjustment is preset at the factory; however, if adjustment is needed, proceed as follows: 1.
REPLACING BATTERY TO REMOVE n_asWARNING: Do not short battery termiby allowing a wrench or any other object to contact both terminals at the same time. Before connecting battery, remove metal bracelets, wristwatch bands, rings, etc. Positive terminal must be connected first to prevent sparking from accidental grounding. 1. Lift seat pan to raised position. 2. Disconnect BLACK battery cable first then RED battery cable and carefully remove battery from tractor. 3.
Immediately prepare your tractor for storage at the end of the season or if the tractor will • Empty the fuel tank by starting the engine and letting it run until the fuel lines and carburetor are empty. • Never use engine or carburetor cleaner products in the fuel tank or permanent damage may occur. • Use fresh fuel next season. not be used for 30 days or more. _,WARNING: Never store the tractor with gasoline in the tank inside a building where fumes may reach an open flame or spark.
TROUBLESHOOTING See appropriate CHART: section in manual PROBLEM Will not start Hard to start Engine will not turn over unless directed CAUSE to Sears service center CORRECTION 1 Out of fuel. 1 Fill fuel tank. 2 Engine not "CHOKED" properly. 2 See "TO START ENGINE" in Operation section. 3 Engineflooded. 3 Wait several minutes before attempting to start. 4 Bad spark plug. 4 Replace spark plug. 5 Dirty air filter. 5 Clean/replace air filter. 6 Dirty fuel filter.
TROUBLESHOOTING See appropriate CHART: section unless directed CAUSE PROBLEM Engine clicks will not start in manual but Loss of power Excessive vibration to Sears service center CORRECTION 1 Weak or dead battery. 1 Recharge or replace battery. 2 Corroded battery terminals. 2 Clean battery terminals. 3 Loose or damaged wiring. 3 Check all wiring. 4 Faulty solenoid or starter. 4 Check/replace solenoid or starter. 1 Cutting too much grass/too fast.
TROUBLESHOOTING See appropriate CHART: section PROBLEM in manual unless directed CAUSE to Sears service center CORRECTION Poor cut-uneven 1 Worn, bent or loose blade. 1 Replace blade. Tighten blade bolt. cutting 2 Mower deck not level. 2 Level mower deck. 3 Buildup of grass, leaves, and trash under mower. 3 Clean underside of mower housing. 4 Bent blade mandrel. 4 Contact a Sears or other qualified service center.
TROUBLESHOOTING See appropriate CHART: section in manual unless directed to Sears service center PROBLEM CAUSE Loss of drive Debris on steering plate (if equipped). 1 See"CLEANING" in the maintenance section. 2 Motion drive belt worn, damaged, or broken. 2 Replace motion drive belt. 3 Axle key missing. 3 Install axle key at rear wheel. See "TO REMOVE WHEEL" in the Service and Adjustments section.
SUGGESTED GUIDE FOR SIGHTING SLOPES FOR SAFE OPERATION ONLY RIDE UP AND DOWN HILL, NOT ACROSS HILL 15 DEGREES MAX. _ down the face of slopes, never across the face. Do not mow ARNING: To avoid serious injury, operate your tractor and slopes greater than 15 degrees. Make turns gradually to up prevent tipping or loss of control. Exercise extreme caution when changing direction on slopes. 1. Fold this page along dotted line indicated above. 2.
Garanfia.......................................................... 33 ProgramadeMantenimiento .......................... 48 ReglasdeSeguridad...................................... 34 Servicioy Ajustes........................................... 52 ............................................. 58 Especificaciones delProducto ........................ 37 Almacenamiento de Problemas........................... 59 Montaje/PreOperaci6n ................................... 39 Identificaci6n Operaci6n ................
_PELIGRO: Esta Maquina cortadora es capaz de amputar las manosy objetos, si no se observan las instrucciones de seguridad siguientes lesiones graves o la muerte. , los pies y de lanzar se pueden producir No maneje la maquina si no tiene la trampa para c6sped completa, la canaleta de descarga u otros dispositivos de seguridad en su lugar yen funcionamiento. , Ralentizar antes de girar. , Nunca dejar una maquina encendida sin vigilancia.
, Escogeruna velocidadde marchabaja de modoquenoseanecesariopararseo cambiar estandoen unapendiente. , Nocortarlahierbamojada.Lasruedaspueden perdertracci6n. Ponersiempreuna marchacuandose esta enpendientes. Noponeren puntomuertoe ir cuestaabajo. , Evitararrancar,pararseo giraren unapendiente.Si lasruedaspierdentracci6n,desconectar las cuchillasy procederdespaciocuesta abajoenla pendiente. , Mantenertodo los movimientosen las pendienteslentosy gradual.
, Mantenerla maquinalibre de hierba,hojas u otros residuosacumulados.Limpiarlas salpicaduras de aceiteo carburantey quitar cualquiercosamojadaconcarburante.Dejar quela maquinase enfrieantesde guardarla. , Sisegolpeaunobjetoajeno,hayquepararse e inspeccionar lam_quina.Reparar,si esnecesario,antesdevolvera poneren marcha. , NuncahacerningOnajusteo reparaci6ncon el motorenfunci6n.
ESPECIFICACIONESDEL PRODUCTO Capacidady Tipo degasolina: TipodeAceite: (API-SG-SL) Capacidadde Aceite: Bujia: Velocidad de Recorrido (MPH): ACUERDOS DE PROTECClON LA REPARACI()N 1.5Galones(5,68L) RegularSinPlomo SAE30(Sobre32°F/0°C) SAE5W30 (Debajo32°F/0°0) Congratulaciones por su buena compra. Su nuevo producto Craftsman® estA disefiado y fabricado para funcionar de modo fiable por muchos afios. Pero como todos los productos, puede necesitar alguna reparaci6n de tanto en tanto.
Contenedor Volante i i i de direcci6n \ l ,f'f 1/4 x 20 x 1.25" Perno cabeza redondo Inserto del volante de direcci6n Volante de direcci6n i. -", / 1/4x 20x I 1.
Su tractor nuevo ha sido montado en la fabrica con la excepci6n de aquellas partes que no se han montado pot razones de envio. Para asegurarse que su tractor funcione en forma adecuada y segura todas las partes y los articulos de ferreteria que se monten tienen que set apretados en forma segura. Use las herramientas correctas, segt3n sea necesario, para asegurarse de que est6n apretados en forma segura. INSTALACION HERRAMIENTAS NECESARIAS PARA EL MONTAJE Un juego de Ilaves de tubo facilitar_ el montaje.
5. Levanteel asientoyaprietelapernodeajuste enformasegura. Remuevay desechesedelcinta. PARA 1. . J m 2. Interruptor ,_ Cojin ,. 3. / Ranura6o _ l] Base / m_J del / asientc 4. 5. Cinta 6. Arnes de alambrado . Baje el asiento a la posici6n de operaci6n y si6ntese en el asiento. Presione el pedal del freno completamente hasta abajo. Si la posici6n de operaci6n no esta c6moda, ajuste el asiento. Ranurado MONTAR EL CONTENEDOR Desdoble la bolsa y ponga el lado derecho hacia arriba.
REVISION DE LA POSICION DE TODAS LAS CORREAS ADECUADA Vea las figuras que aparecen para cambiar las correas de impulsi6n de la cuchilla de la segadora y de movimiento en la secci6n de Servicio y Ajustes de este manual. Verifique que las correas s_gan su paso correcto. REVISION DEL SISTEMA DE FRENOS Una vez que usted haya aprendido a manejar su tractor, verifique que el freno funcione correctamente. Vet "PARA VERIFICAR SI FUNCIONA BIEN EL FRENO" en el capitulo de servicio y ajustes de este manual.
Estossimbolospuedenaparecersobresutractoro en la literaturaproporcionada conel producto. Aprenday comprendasussignificados. IXl L MARCHA ATR._.S MOTOR APAGADO NEUTRO SISTEMA FUNCIONAMIENTO ATRAS LUCES ENSENDIDAS ACCESORIO ALTO DEL MOTOR ENCENDIDO ESTRANGULACION MOTOR EN MARCHA R._.
FAMIMARICESE CON SU TRACTOR LEA ESTEMANUAL DEL DUEllO Y LAS REGLAS DE SEGURIDAD ANTES DE OPERAR SU TRACTOR Compare las ilustraciones con su tractor para familiarizarse con las ubicaciones controles y ajustes. Guarde este manual para referencia en el futuro. de los diversos Nuestros tractores cumplen con los estandares de seguridad del American National Standard Institute.
La operacion de cualquier tractor puede hacer que salten objetos extrahos dentro de sus ojos, Io que puede producir dahos graves en estos. Siempre use anteojos de seguridad o protecciones para los ojos mientras opere su tractor o cuando haga ajustes o reparaciones. Recomendamos gafas de seguridad o una mascara de vision amplia de seguridad usada sobre las gafas.
PARAAJUSTARLA ALTURADECORTEDE LA SEGADORA Laposici6n delapalancaelevadora(A)determina a qu6alturasecortaraelc6sped. , Coloquela palancaelevadoraenla ranurade la alturadeseada. La gamade la alturade cortees de aproximadamente1 a 4 pulgadas.Lasalturasse miden desdeel sueloa la puntade la cuchillacuando el motornoestafuncionando.Estasalturasson aproximadas y puedenvariardependiendo delas condicionesdelsuelo,de la alturadelc6spedy deltipodelcespedquese estasegando.
PARA OPERAR de un motor durante el almacenamiento. Para evitar los problemas con el motor, se debe vaciar el sistema de combustible antes de guardarlo por un periodo de 30 dias o m&s. Vacie el estanque de combustible, haga arrancar el motor y h&galo funcionar hasta que las lineas del combustible y et carburador queden vacios. La pr6xima temporada use combustible nuevo. Yea las Instrucciones para el Almacenamiento para m&s informaci6n.
AVlSO:Si se encuentraa muchaaltura(sobre 3000pies)o enclimafrio(pordebajode32°F0°C), la mezcladel combustibledelcarburadordebe serajustadaparaelmejorrendimiento delmotor. (Vea"PARAAJUSTAR ELCARBURADOR" enla secci6nde Servicioy Ajustesde este manual). CONSEJOSPARA SEGAR , , , , , , , No se pueden usar las cadenas para las Ilantas cuando la caja de la segadora estgt adjunta al tractor. La segadora debe estar nivelada en forma adecuada para obtener el mejor rendimiento al segar.
PROGRAMA DE MANTENIMIENTO T Revisar la operaci6n Revisar la presi6n de las Ilantas del freno ANTES DE CADA USO CADA CADA CADA CADA CADA 8 HORAS 25 HORAS 50 HORAS 100 HORAS TEMPORADA _ _ R v_iifi_z ia commande de pi_sence d'op6rateur et le sistema d ROS j_ Revisar C Afilar/cambiar T Tabla de lubricaci6n _ 0 Revisar el nivel _4 R Limpiar la bateria y los terminales Revisar el enfriamiento Limpie las cuchillas los residuos sueltos if _ de la segadora de la placa _
TRACTOR V¢:RIFIE_ZSISTEMA FUNCIONAMIENTOATRA, Siempre observe las reglas de seguridad cuando de mantenimiento. (ROS) , Cuando el motor esta en marcha con el interruptor de Ilave en posici6n de motor "ON" y el embrague del accesorio conectado, cualquier tentativa del operador de viajar marcha atras, apagara el motor.
, Vuelvaa cargarde6-10amperespor1 hora. AVlSO: La bateria del equipooriginal de su tractorno becesitaservicio.No intenteabriro removerlastapaso cubiertas.No esnecesario afiadiro verificarel niveldelelectr61ito. PARALIMPIARLABATE RiAYLOSTERMINALES La corrosi6ny la mugrede la bateday de los terminalespuedenproducir"escapes"de potenciaen la bateda. 1. Desconecteel cablede la batedaNEGRO primeroy luegoel cabledela bateriaROJO y remuevala bateriadeltractor. 2. Enjuaguela bateria con agua corrientey s6quela. 3.
LIMPIEZADELA REJILLADEAIRE La rejillade airedebemantenerse sin mugre y pajaparaevitarel dafioal motordebidoal sobrecalentamiento. Limpielaconuncepillode alambreo conairecomprimido pararemoverla mugrey lasfibrasdegomasecas,pegadas. LIMPIEZA , , Limpie los desechos de la placa guia. Los desechos pueden limitar el movimiento del eje del pedal del freno/embrague, Io que hara que patine la correa y que se pierda la tracci6n. _,PRECAUCION: Evite todos los puntos de enganche y las piezas m6viles.
,_ ADVERTENCIA:PARA EVITAR LESIONES SERIAS, ANTES DE DAR CUALQUIER SERVICIO O DE HACER AJUSTES: 1. Presione el pedal del embrague/freno completamente y aplique el freno de estacionamiento. 2. Ponga la palanca de cambios en la posici6n de neutro (N). 3. Ponga el embrague del accesorio en la posici6n desenganchado (DISENGAGED). 4. Ponga la Ilave de ignici6n en la posici6n de apagado (STOP) y remu6vala. 5. Asegt3rese que las cuchillas y que todas las partes movibles se hayan detenido completamente 6.
3. FIJE LOS BRAZOS DE SUSPENSION LATERALESDE LA CORTADORA (A) AL CHASlS-Ubique el orificiodelbrazoencima de la clavija(B)quehayen la parteexterior delchasisdeltractor,y fijeloconunaresorte de contenci6n. 4. Realiceel mismoprocedimiento en el otto ladodeltractor. . Introduzca el otto extremo de la pieza de uni6n (E) en el orificio que se encuentra en la barra anterior de la cortadora (H), y fijelo por medio de una arandela y un resorte de contenci6n (J). 8. . .
PARANIVELARLA SEGADORA Asegt3rese dequelosneumaticos est6ninfladosa laPSiqueseindicaenestos.Siestandemasiado infladoso pocoinflados,elc6spednolequedara biencortado,IocualpodraIlevarloa pensarque la SEGADORA no est&bienregulada. REGULACION VISUALDE LADOA LADO 1. Sitodoslosneumaticos est&ncorrectamente infiadosy el c6spedparecehaberquedado cortadodesparejo,determinequ6ladode la cortadoraestacortandomasal ras. 2.
PARA CAMBIAR LA CUCHILLA DEL SEGADORA La correade impulsi6nde la cuchillasegadora sepuedecambiarsinherramientas. Estacioneel tractor en una superficie nivelada. Enganche freno de estacionamiento. REMOCION DE LA CORREA- el 1. Remueva la segadora del tractor (Vea "PARA REMOVER LA SEGADORA' de esta secci6n de este manual). 2. Haga salir la correa de las poleas del mandril y de las poleas de guia. 3. Tire la correa alejandola de la segadora. INSTALACION DE LA CORREA 1. 2. 3.
REGULACK)NDE LA PALANCA DE VELOCIDADES NEUTRO DEL CAMBIO MECANICO CON DIFERENCIAL Y TRACCION ANTERIOR El cambio mec_nico con diferencial y tracci6n anterior tiene que estar en posici6n neutro cuando la relativa palanca esta en posici6n (cierre metalico. La regulaci6n ya esta predefinida por la Casa constructora, pero si es necesario efectuar m_ts regulaciones, proceder de la siguiente manera: 1. Asegurarse que el cambio mec_.nico con diferencial y tracci6n anterior este en posici6n neutro.
REEMPLAZARLA BATERIA PARA CAMBIAR EL FUSIBLE C&mbielo por un fusible tipo enchufable de 30 amps, tipo automotriz. El sujetador del fusible esta ubicado detras del tablero. _IADVERTENCiA: No haga cortocircuito con los terminales de la bateria al permitir que una Ilave de tuerca o cualquier otro objeto entre en contacto con ambos terminales a la misma vez. Antes de instalar la bateda remueva las pulseras de metal, los relojes de pulsera de metal, los anillos, etc.
Inmediatamente preparesu tractorparael almacenamiento al final de la temporadao si el tractorno seva a usarpot30 diaso mas. _,DVERTENOIA: Nuncaalmaceneel tractor congasolinaenel estanquedentrodeunedificio en dondelosgasespuedenalcanzarunallama expuestao unachispa.Permitaqueel motorse enfdeantesdealmacenarlo encualquierrecinto privado. TRACTOR Cuandoel tractorse va a almacenarporcierto periodode tiempo,limpielacuidadosamente, quitetoda la mugre,la grasa,las hojas,etc. Guardelaen unaarealimpiay seca. 1.
IDENTIFICACION Yea la seccion PROBLEMA No arranca apropiada El motor la vuelta no El motor suena pero no arranca Perdida de fuerza en el manual a menos que este dirigido CAUSA 1. 2. a un centro de servicio Sears. CORRECCI(3N 1. 2. 3. Sin combustible. Motor sin la"ESTRANGULACI()N" (CHOKE) adecuada. Motor ahogado. 4. 5. 6. Bujia mala. Filtro de aire sucio. Filtro de combustible 4. 5. 6. Cambie la bujia. Limpie/cambie el filtro de aire. Cambie el filtro de combustible. 7.
IDENTIFICACION Yea la seccion PROBLEMA Perdida de fuerza DE PROBLEMAS: apropiada en el manual a menos que este dirigido CAUSA 9. CORRECCI()N Agua en el combustible. 9. (sigue) Vibraci6n e×cesiva a un centro de servicio Sears. 10. 11. 12. 13. Alambrado de la bujia suelto. Rejilla!aletas de aire del motor sucias. Silenciador sucio/taponado. Alambrado suelto 0 dar_ado. 14. Carburador desajustado. 10. 11. 12. 13. 14. 15. Valvulas del motor desajustadas. 15. 1. Cuchilla desgastada, 2.
IDENTIFiCACION Yea la seccion PROBLEMA Las iuz (ces) de lantera(s) no funcionando La bateria no carga Perdida de impulsion DE PROBLEMAS: apropiada en el manual a menos que este dirigido CAUSA a un centro de servicio Sears. CORRECCK)N 1. El interruptor esta'_PAGADO"(OFF). 1. "ENCIEND_' 2. Bombilla(s) 0 lampara(s) quemada(s). 2. Cambie la bombilla(s) o lampara(s). 3. 4. Interruptor de la luz fallado. Alambrado suelto 0 daSado. 3. Revise/cambie 5. Fusible quemado. 4. 5.
GUiA SUGERIDA PARA IVIEDIR LAS PENDIENTES CON LA VISTA PARA UNA OPERACION SEGURA SOLAMENTE ANDE CUESTA ARRIBA O CUESTA ABAJO Y NO ATRAVIESE EL CERRO O3 _O 15GRADOS MAX. _ DVERTENCIA: Para evitar daSos graves, haga funcionar su tractor arriba y abajo de ias pendientes, nunca transversalmente con respecto alas pendientes. No cortar pendientes mayores de 15 grados. Haga los virajes gradualmente para evitar voicarse o ia perdida de control Tenga rnucho cuidado cuando cambie de direccion en las pendientes.
o Find this and at[ your other product manuals online. o Get answers from our team of home experts. o Get a personalized maintenance plan for your home. Your Home For repair - in your home - of all major brand appliances, lawn and garden equipment, or heating and cooling systems, no matter who made it, no matter who sold it! For the replacement parts, accessories and owner's manuals that you need to do-it-yourself.