Operator's Manual J RN° LAWN TRACTO 26.0 HP,* 54" Mower Electric Start Automatic Transmission Model No. 917.28863 • EspaSol, p. 37 This product has a low emission engine which operates differently from previously built engines. Before you start the engine, read and understand this manual. IMPORTANT: Read and follow all Safety Rules and Instructions before operating this equipment.
Warranty .................................................. Safety Rules ............................................ Product Specifications ............................. Assembly/Pre-Operation ......................... Operation ............................................... Maintenance Schedule .......................... Craftsman Riding Equipment CRAFTSMAN 2 3 6 7 13 21 Maintenance .......................................... 21 Service and Adjustments ....................... 26 Storage ..........
_DANGER: This cutting machine is capable of amputating hands and feet and throwing objects. Failure to observe the following safety instructions could result in serious injury or death. _I, WARNING: In orderto prevent accidental starting when setting up, transporting, adjusting or making repairs, always disconnect spark plug wire and place wire where it cannot contact spark plug. • _,WARNING: Do not coast down a hill in neutral, you may lose control of the tractor.
li. SLOPE OPERATION • Slopes are a major factor related to loss of control and tip-over accidents, which can result in severe injury or death. Operation on all slopes requires extra caution. If you cannot back up the slope or if you feel uneasy on it, do not mow it. • Mow up and down slopes, not across. • Watch for holes, ruts, bumps, rocks, or other hidden objects. Uneven terrain could overturn the machine. Tall grass can hide obstacles.
• • • • Remove gas-powered equipment from the truck or trailer and refuel it on the • ground. If this is not possible, then refuel such equipment with a portable container, rather than from a gasoline dispenser nozzle. • Keep the nozzle in contact with the rim of the fuel tank or container opening at all times until fueling is complete. Do not use a nozzle lock-open device. Iffuelis spilled on clothing, change clothing immediately. Never overfill fueltank. Replace gas cap and tighten securely.
PRODUCT SPECIFICATIONS Gasoline Capacity and type: XX Gallons/XX L Regular Unleaded Oil Type: (API: SG-SL) SAE 10W30 (above32°F/0°C) SAE 5W30 (below 32°F/0°0) Oil Capacity: W/Filter: XX Oz./X.XX In the state of California the above is required by law (Section 4442 of the California Public Resources Code). Other states may have similar laws. Federal laws apply on federal lands. A spark arrester for the muffler is available through your nearest Sears service center (See REPAIR PARTS manual).
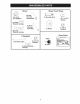
Mower (_ Mower Front Wheel © (2) Rear _ Lift Link Assemblies (5) O.D.1-3/16 Washers \_ (i) 1-i/40.D. Washer (1) Front Lift Link (5) Large Retainer Springs Assembly (1) Wheel _ (1) 3/8-16 Locknut Slope Sheet G if Equipped (1) Anti=Sway Bar _ Keys 1',I (1) 3/40.D.
Your new tractor has been assembled at the factory with exception of those parts left unassembled for shipping purposes. To ensure safe and proper operation of your tractor all parts and hardware you assemble must be tightened securely. Use the correct tools as necessary to ensure proper tightness. TOOLS REQUIRED A socket wrench easier. Standard FOR ASSEMBLY .
_,CAUTION: Lift lever is spring loaded. Have a tight grip on lift lever, lower it slowly and engage in lowest position. Lift lever is located on left side of fender. 3. TURN STEERING WHEEL POSITION MOWER LEFT AND • Turn steering wheel to the left as far as it will go and position mower on right side of tractor with deflector shield (Q) to the right. Front ( ,) iEngine 2. ASSEMBLE FRONT GAUGE WHEEL (W) TO FRONT OF MOWER "--'J Back 1il Q. Deflector Shield i< t H. W, X, Y, Z, 4.
• Pivot the integrated washer end of antisway bar (S) towards mower deck bracket on right side of mower. Insert integrated washer end of bar into hole in rear mower bracket (D). Move mower as needed to insert integrated washer end of bar into rear mower bracket (D). Secure with small washer and small • retainer spring as shown. A. MowerSideSuspensionArms Q. DeflectorShield 5.
9 INSTALL PULLEY BELT ON ENGINE CLUTCH (M) • Disengage belt tension locking bracket (L). • Install belt onto engine rod clutch (K) pulley from (M). C. Rear Lift Link(s) D. Right Side Rear Mower Bracket 'U. Hole 8 ATTACH • Turn steering wheel straight forward. • From front front Move • FRONT LINK (E) to position M,Engine Clutch Pulley wheels IMPORTANT: Check in all mower pulley mandrel covers.
CHECK TIRE PRESSURE _'CHECKLIST The tires on your tractor were overinflated at the factory for shipping purposes. Correct tire pressure is important for best cutting performance. • Reduce tire pressure to PSI shown on tires. CHECK Before you operate your new tractor, we wish to assure that you receive the best performance and satisfaction from this Quality Product. Please review the following checklist: _" All assembly instructions have completed.
These symbols may appear on your tractor or in literature supplied with the product. Learn and understand their meaning.
KNOW YOUR TRACTOR READ TOR THIS MANUAL AND SAFETY RULES BEFORE OPERATING YOUR TRAC= Compare the illustrations with your tractor to familiarize yourself with the locations various controls and adjustments. Save this manual for future reference. Our tractors conform American to the applicable safety standards National Standards Institute. (A) ATTACHMENT LIFT LEVER - Used to raise and lower the mower or other attachments mounted to your tractor. (H) LIGHT SWITCH on and off.
The operation of any tractor can result in foreign objects thrown into the eyes, which can result in severe eye damage. Always wear safety glasses or eye shields while operating your tractor or performing any adjustments or repairs. We recommend standard safety glasses or a wide vision safety mask worn over spectacles. HOW TO USE YOUR TRACTOR TO SET PARKING NOTE: Failure to move throttle control between half and full speed (fast) position, before stopping, may cause engine to "backfire".
TO MOVE FORWARD AND BACKWARD The cutting height range is approximately 1" to 4". The heights are measured from the ground to the blade tip with the engine not running. These heights are approximate and may vary depending upon soil conditions, height of grass and types of grass being mowed. • The average lawn should be cut to approximately 2-1/2" during the cool season and to over 3" during hot months. For healthier and better looking lawns, mow often and after moderate growth.
TO STOP MOWER • Disengage BLADES = attachment CAUTION: clutch Do not operate TO OPERATE control. _L, WARNING: Do not drive up or down hills with slopes greater than 15 ° and do not drive across any slope. Use the slope guide provided at the back of this manual. • Choose the slowest speed before starting up or down hills. • Avoid stopping orchanging speed on hills. • If stopping is absolutely necessary, push brake pedal quickly to brake position and engage parking brake.
SERVICE REMINDER/HOUR METER Service reminder shows the total number of hours the engine has run and flashes to indicate that the engine or mower needs servicing. When service is required, the service reminder will flash for two hours. To service engine and mower, see the Maintenance section of this manual. NOTE: Service reminder runs when the CAUTION: Alcohol blended fuels (called gasohol or using ethanol or methanol) can attract moisture which leads to separation and formation of acids during storage.
COLD WEATHER and below) 6. STARTING PURGE (50°F(10°C) _I, CAUTION: Never engage or disengage freewheel lever while the engine is running. When engine starts, leave throttle control in choke position until engine warms up and begins to run roughly. Once rough running begins, immediately move the throttle control to the fast position.
MOWING • Tire TIPS chains cannot be used when the mower housing is attached to tractor. • Mower should be properly leveled for best mowing performance. See "TO LEVEL MOWER HOUSING" in the Service and Adjustments section of this manual. • The left hand side of mower should be used for trimming. • Drive sothat clippings are discharged onto the area that has already been cut. Have the cut area to the right of the tractor.
MAINTENANCE SCHEDULE BEFORE EVERY EVERY EVERY EVERY EVERY BEFORE EACH USE 8 HOURS 25 HOURS 50 HOURS 100 HOURS SEASON STORAGE romp Check Brake Check Tire Operation Pressure aT Check Operator A Check for Loose Presence C ChecWReplace T Lubrication 0 Check Battery R Clean Battery Clean Debris & ROS Systems Fasteners Mower Blades v" v'4 v" Chart Level and Terminals Off Steering Check Transaxle Check Mower Check V-Belts Check Engine i/ iv' Plate v' Cooling v'
TRACTOR Always forming BRAKE observe safety rules when any maintenance. OPERATION CHECK REVERSE SYSTEM per- • Maintain proper air pressure in all tires (See PSI on tires). • Keep tires free of gasoline, oil, or insect control chemicals which can harm rubber. For best results SYSTEM BLADE 1. (ROS) must be REMOVAL Raise mower to highest access to blades. position to allow 3. Install newbladewith stamped"THISSIDE UP" facing deck and mandrel assembly.
NOTE: The original equipment battery on your tractor is maintenance free. Do not attempt to open or remove caps or covers. Adding or checking level of electrolyte is not necessary. NOTE: Although multi-viscosity oils (5W30, 10W30 etc.) improve starting in cold weather, they will result in increased oil consumption when used above 32°R Check your engine oil level more frequently to avoid possible engine damage from running low on oil.
ENGINEOiL FILTER Replacethe engineoil filter every season or every other oil change if the tractor is used more than 100 hours in one year. CLEAN AIR SCREEN Air screen must be kept free of dirt and chaff to prevent engine damage from overheating. Clean with a wire brush or compressed airto remove dirt and stubborn dried gum fibers. CLEAN AIR INTAKE/COOLING AREAS To ensure proper cooling, make sure the grass screen, cooling fins, and other external surfaces of the engine are kept clean at all times.
CLEANING • Clean engine, battery, seat, finish, etc. of all foreign matter. Clean debris from steering plate. Debris can restrict clutch/brake pedal shaft movement, causing belt slip and loss of drive. • Nozzle Ada Washout Port A CAUTION: Avoid all pinch points and movable parts Clutch/brake pedal Clean top IMPORTANT: tion is secure. 6. While sitting in the operator's position on the tractor, re-start the engine and place the throttle lever in the Fast "_" position. .
& WARNING: TO AVOID SERIOUS ADJUSTMENTS: iNJURY, BEFORE PERFORMING ANY SERVICE OR 1. Depress clutch/brake pedal fully and set parking brake. 3. Place attachment clutch in "DISENGAGED" position. 4. Turn ignition key to "STOP" and remove key. 5. Make sure the blades and all moving parts have completely stopped. 6. Disconnect spark plug wire from spark plug and place wire where it cannot in contact with plug. TO REMOVE MOWER come 7.
TO LEVEL MOWER 4. Make sure tires are properly inflated to the PSI shown on tires. Iftires are over or under inflated, it may affect the appearance of your lawn and lead you to think the mower is not adjusted properly. VISUAL SIDE-TO-SIDE If adjustment is necessary, and 3 in Visual Adjustment above. 5. Recheck measurements, adjust if necessary until both sides are equal. FRONT-TO-BACK ADJUSTMENT IMPORTANT: Deck must be level sideto-side. ADJUSTMENT 1.
TO REPLACE MOWER DRIVE BELT BELT REMOVAL- MOWER DRIVE BELT REMOVAL 1. 1. 2. Remove mower (See "TO REMOVE MOWER" in this section of manual). NOTE: Observe entire motion drive belt Park tractor on a level surface. Engage parking brake. Lower attachment lift lever to its lowest and position of a!l belt guides and keepers. 2. Disconnect clutch wire harness (A). 3. Remove anti-rotation link (B) on right side of tractor. position. Disengage belt tension rod (K) from lock bracket (L).
TO CHECK BRAKE TO START TERY If tractor requires more than five (5) feet to stop at highest speed in highest gear on a level, dry concrete or paved surface, then brake must be serviced. you try to manually push the tractor forward. If the rear wheels rotate, then the brake needs to be serviced. Contact a Sears or TO ATTACH JUMPER center. FRONT WHEEL TOE-IN/CAMBER Your new tractor front wheel toe-in WHEEL FOR CABLES Connect one endofthe RED cable to the 2.
REPLACING BATTERY TO REMOVE SEMBLY _iWARNING: Do not short battery terminals by allowing a wrench or any other object to contact both terminals at the same time. Before connecting battery, remove metal bracelets, wristwatch bands, rings, etc. Positive terminal must be connected first to prevent , sparking from accidental Lift hood to raised Remove 3. Disconnect BLACK battery cable then RED battery cable and carefully remove battery from tractor. . AS- 1. Raise hood. 2. 3.
ENGINE Immediately prepare your tractor for storage at the end of the season or if the tractor will FUEL SYSTEM not be used for 30 days or more. WARNING: Never store the tractor IMPORTANT: It is important to prevent gum deposits from forming in essential fuel system parts such as carburetor, fuel hose, ortank during storage. Also, alcohol blended fuels (called gasohol or using ethanol or methanol) can attract moisture which leads to separation and formation of acids during storage.
TROUBLESHOOTING See appropriate section in manual PROBLEM unless directed to Sears service center CAUSE Will not start Hard to start Engine will not turn over Engine clicks will not start CHART: but CORRECTION 1 Out of fuel. 1 Fill fuel tank. 2 Engine 2 See "TO START ENGINE" Operation section. 3 Engine flooded. 3 Wait several minutes attempting to start. 4 Bad spark plug. 4 Replace spark plug. 5 Dirty air filter. 5 Clean/replace 6 Dirty fuel filter. 6 Replace fuel filter.
TROUBLESHOOTING CHART: See appropriate section in manual unless directed to Sears service center CAUSE PROBLEM Loss of power Excessive vibration 1 Cutting too much grass/too 1 Raise cutting height/reducespeed, 2 Throttle in "CHOKE" 2 Adjust throttle 3 Build-up of grass, leaves and trash under mower. 3 Clean underside housing. 4 Dirty air filter. 4 Clean/replace 5 Low oil level/dirty 5 Check oil level/change 6 Faulty spark plug.
TROUBLESHOOTING CHART: See appropriate section in manual unless directed to Sears service center PROBLEM Poor grass discharge CAUSE CORRECTION 1 Engine speed too slow. 1 Place throttle position. 2 Travel speed too fast. 2 Shift to slower speed. 3 Wet grass. 3 Allow grass to dry before 4 Mower deck not level. 4 Level mower deck. 5 Low/uneven 5 Check tires for proper PSI. 6 Worn, bent or loose blade. 6 Replace/sharpen blade bolt. 7 Buildup of grass, leaves and trash under mower.
TROUBLESHOOTING CHART: See appropriate section in manual unless directed to Sears service center 35
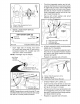
SUGGESTED GUIDE FOR SIGHTING SLOPES FOR SAFE OPERATION I/v_- ONLY RIDE UP AND DOWN HILL, NOT ACROSS HILL 03 15 DEGREES MAX. _b down the face of slopes, never across the face. Do not mow ARNING: To avoid serious injury, operate your tractor and slopes greater than 15 degrees. Make turns gradually to up prevent tipping or loss of control. Exercise extreme caution when changing direction on slopes. 1. Fold this page along dotted line indicated above. 2.
Garantia .......................................................... Reglas de Seguridad ...................................... Especificaciones del Producto ........................ Montaje/Pre Operaci6n ................................... Operaci6n ....................................................... Mantenimiento ................................................ 37 38 41 42 48 56 Programa de Mantenimiento .......................... Servicio y Ajustes ...........................................
_PELIGRO: Esta Maquina cortadora es capaz de arnputar las rnanosy los pies y de lanzar objetos, si no se observan las instrucciones de seguridad siguientes se pueden producir lesiones graves o la rnuerte. • No maneje la m&quina si no tiene la trampa _DVERTENCIA: Siempre desconecte el alampara cesped completa, la canaleta de descarga bre de la bujia y p6ngalo donde no pueda entrar u otros dispositivos de seguridad en su lugar en contacto con la bujia, para evitar el arranque yen funcionamiento.
• Escogeruna velocidadde marchabaja de modoquenoseanecesariopararseo cambiar estandoen unapendiente. • Nocortarlahierbamojada.Lasruedaspueden perdertracci6n. Ponersiempreuna marchacuandose esta en pendientes. Noponerenpuntomuertoe ir cuestaabajo. • Evitararrancar, pararseo girarenunapendiente.Si lasruedaspierdentracci6n,desconectar lascuchillasy procederdespaciocuestaabajo en la pendiente. • Mantenertodo los movimientosen las pendienteslentosy gradual.
OPERAClONES DE SERVIClO GENERALES • Nunca hacer funcionar la m&quina en un &rea cerrada. • Si se golpea un objeto ajeno, hay que pararse e inspeccionar la m&quina. Reparar, si es necesario, antes de volver a poner en marcha. • Nunca hacer ningOn ajuste o reparaci6n con el motor en funci6n. • Mantener todas las tuercas y pernos apretados para asegurarse de que trabaja en condiciones seguras. • Nunca modificar los dispositivos de seguridad. Controlar su correcto funcionamiento regularmente.
ESPECIFICACIONES DEL PRODUCTO Capacidad y Tipo de Gasolina: XX Galones/×X L Regular Sin Plomo Tipo de Aceite (API: SG-SL): SAE 10W30 (sobre 32°F/0°C) SAE 5W30 (deabajo 32 °F/0°C) Capacidad de Aceite: Con Filtro: Sin Filtro: Bujia Champion XXXX (Abertura: .030"/0.76 mm) Velocidad de Recarrido (Mph/Kph): Marcha Adelante: Atr&s: Sistema de Carga: X Amps Bateria X Amps Luces Bateria: Amp/Hr: XX Min. CCA: XXX Modelo Tamar_o: U1R Torsi6n del Perno de la Cuchilla: 45-55 Ft. Lbs.
© Segadora Rueda Delantera De La Segadora (2) Conjunto Perno (s) I-3/I 6" Arandela traseros (1) Abrazadera peque_o (1) 1-1/4" Arandela .....
Su tractor nuevo ha sido montado en la f&brica con la excepci6n de aquellas partes que no se han montado por razones de envio. Para asegurarse que su tractor funcione en forma adecuada y segura todas las partes y los articulos de ferreteria que se monten tienen que ser apretados en forma segura. Use las herramientas correctas, segOn sea necesafio, para asegurarse de que esten apretados en forma segura. HERRAMIENTAS NECESARIAS PARA EL MONTAJE Un juego de Ilaves de tubo facilitara el montaje.
_, PRECAUCl6N: Lapalancadelevantamiento 3. est&accionadapor resorte.Sostengalafirmemente apretada,b&jelalentamentey eng&nchela en la posici6n m&sbaja.Lapalancadelevantamiento se " encuentraenel ladoizquierdode la defensa. PalancaDe Levantamiento GIREELVOLANTEHACIALAIZQU!ERDA Y UBIQUELA CORTADORA DE CESPED ENSU LUGAR Gire el volante completamentehacia la izquierday ubiquela cortadorade cesped enel ladoderechodeltractorconel blindaje deflector(Q)a la derecha. ParteDelantera Motor 2.
Brazos De Suspensi6n Cortadora De Cesped Q. Blindaje Deflector A, 5. Haga oscilar el extremo con la arandela integrada de la barra antibalanceo (S) hacia la escuadra de la plataforma de la cortadora de cesped en el lado derecho de la cortadora. Inserte el extremo con la arandela integrada de la barra en el agujero de la escuadra trasera de la cortadora de cesped (D).
Levante la esquina trasera de la cortadora de cesped y ubique la ranura en el conjunto de eslabonessobre lachavetaen laescuadratrasera de la cortadora (D); asegure con una arandela grande y un resorte de retenci6n grande. • Muevase hasta el lado izquierdo de la cortadora e inserte un resorte de retenci6n grande (G) atraves del agujero del eslab6n delantero (E) detras de la escuadra de suspensi6n delantera (F). Repita en el lado opuesto del tractor.
,/LISTA REVISION DE LA PRESION DE LAS LLANTAS Las Ilantas en su unidad fueron infladas demasiado en la f&brica pot razones de envio. La presi6n de las Ilantas correctas es importante para obtener el mejor rendimiento en el corte. * Reduzca la presi6n de los neumaticos a la PSI que se indica en estos. DE REVISION Antes de operar y de disfrutar de su tractor nuevo, le deseamos que reciba el mejor rendimiento y la mayor satisfaccion de este producto de calidad.
Estos simbolos pueden aparecer sobre su tractor o en la literatura proporcionada Aprenda y comprenda sus significados. R MARCHA ATR,_S H ALTO BAJO L MOTOR MOTOR ENCENDIDO EN MARCHA - 6 MOTOR APAGADO N NEUTRO SISTEMA FUNCIONAMIENTO ATRAS (ROS) LUCES ENSENDIDAS con el producto.
FAMILIARICESE CON SU TRACTOR LEA ESTE MANUAL Y LAS REGLAS DE SEGURIDAD ANTES DE OPERAR SU TRACTOR Compare las ilustraciones con su tractor para familiarizarse con las ubicaciones controles y ajustes. Guarde este manual para referencia en el futuro. de los diversos Nuestros tractores cumplen con los est&ndares de seguridad del American National Standard Institute.
SEGURIDAD La operaci6n de cualquier tractor puede hacer que salten objetos extraflos dentro de sus ojos, Io que puede producir daflos graves en estos. Siempre use anteojos de seguridad o protecciones para los ojos mientras opere su tractor o cuando haga ajustes o reparaciones. Recomendamos gafas de seguridad o una m&scara de visi6n amplia de seguridad usada sobre las gafas.
MOVERSE HACIA ADELANTE Y HACIA ATRA$ La direcci6n y la velocidad de movimientos est_.n controlados por los pedales de marcha adelante y atr&s. 1. Poner en marcha el tractor y quitar el freno de mano. 2. Apretar lentamente el pedal marcha adelante (K) y atras (L) para iniciar el movimiento. Mas se aprieta el pedal y mayor es la velocidad. La gama de la altura de corte es de aproximadamente 1 a 4 pulgadas. Las alturas se miden desde el suelo a la punta de la cuchilla cuando el motor no est& funcionando.
PARA OPERAR LA SEGADORA Su tractor viene equipada con un interruptor sensor que exige la presencia del operador. Si el motor esta funcionando y el embrague del accesorio ester enganchado y el operador trata de bajarse del asiento, se apagar_, el motor. Tiene que mantenerse sentado completa y centralmente en el asiento para impedir que el motor vacile o se apague cuando se opere su equipo en terreno disparejo, aspero o en cerros. 1. Elija a que altura cortara el cesped por medio de la palanca elevadora. 2.
PARA TRANSPORTAR Cuando empuje o arrastre su tractor asegOrese de desenganchar la transmisi6n poniendo el control de la rueda libre en la posici6n de marcha de rueda libre. El control de marcha de rueda libre esta situado en la barra de tracci6n trasera del tractor. 1. Levante la palanca de levantamiento del accesorio a su posici6n m&s alta. 2. Tire del mando de la rueda libre hacia afuera y hacia abajo hasta que se coloque en la guia y sueltalo de manera que se mantenga en la posici6n de desenganchada.
PARA HACER ARRANCAR EL MOTOR CALENTAMIENTO AUTOMATICA AI hacer arrancar el motor por la primera vez o si se ha acabado el combustible del motor, se necesitar& tiempo para e! arranque extra para mover el combustible desde el estanque hasta el motor. 1. AsegOrese que el control de rueda libre este en la posici6n enganchada. 2. Sientase en el sill6n en la posici6n de operaci6n, suelte el pedal del freno y ponga el freno de estacionamiento.
PURGAR LA TRANSMISION CONSEJOS PARA SEGAR • No se pueden usar las cadenas para las Ilantas cuando la caja de la segadora est& adjunta al tractor. • La segadora debe estar nivelada en forma adecuada para obtener el mejor rendimiento al segar. Vea "PARA NIVELAR LA CAJA DE LA SEGADORA' en la secci6n de Servicio y Ajustes de este manual. • El lado izquierdo de la segadora se debe usar para recorte. • Maneje de modo que los recortes se descarguen en el &rea que ya ha sido cortada.
DE ANTES DE CADA CADA CADA CADA CADA MANTENIMIENTO PROGRAMA CADA USO 8 HORAS 25 HORAS 50 HORAS t00 HORAS TEMPORADA Revisar la operaci6n del freno _ Revisar la presi6n de las Ilantas T _ a Verifi6z la commande de presence d'oe@ateur et le sistema d ROS j_ Revi .... C Afilar/cambiar T Tabla de lubricaci6n 0 Revisar el nivel R Limpiar la baterfa y los terminales i hay sujetad .......
Cuando el motor esta en marcha con el interruptor de Ilave del sistema de funcionamiento atras (ROS) en la posici6n "ON" y el embrague del accesorio conectado, cualquier tentativa del operador de viajar marcha atras, NO apagara el motor. CUIDADO DE LA CUCHILLA Para obtener resultados 6ptimos, las cuchillas de la cortadora deben estar afiladas. Reemplace las ,_chillas que este_n gastadas, dobladas o dafladas. PRECAUClON: Usar solamente la hojas de repuesto aprobada por el fabricante de su cortacesped.
PARA LIMPIAR NALES LA BATERiA Y LOS TERMI- AVlSO: A pesar de que los aceites de multiviscosidad (5W30, 10W30, etc.) mejoran el arranque en clima frio, estos aceites de multiviscosidad van a aumentar el consumo de aceite cuando se usan en temperaturas sobre 32 ° F (0 ° C). Revise el nivel del aceite del motor m&s a menudo, para evitar un posible daflo en el motor, debido a que no tiene suficiente aceite.
, , Vuelva a Ilenar el motor con aceite a traves del tubo de la varilla indicadora de nivel para relleno del aceite. Vacielo lentamente. No Io Ilene demasiado. Para la capacidad aproximada vea las "Especificaciones del Producto" secci6n de este manual. LIMPIEZA DE LA REJILLA DE AIRE La rejilla de aire debe mantenerse sin mugre y paja para evitar el daflo al motor debido al sobrecalentamiento.
MMPIEZA . • Limpie todo material extraho del motor, la bateria, el asiento, el pulido, etc. • Limpie los desechos de la placa guia. Los desechos pueden limitar el movimiento del eje del pedal del freno/embrague, Io que har& que patine la correa y que se pierda la tracci6n. _PRECAUCI6N' Evite todos los puntos de enganche y las piezas m6viles. . Enrosque el adaptador de la boquilla (empaquetado con el manual del operador del tractor) en el extremo de la manguera del jardin.
1. 2. 3. 4. 5. 6. ADVERTENCIA:PARA EVITAR LESIONES SERIAS, ANTES DE DAR CUALQUIER SERVI. CIO O DE HACER AJUSTES: Presione el pedal del embrague/freno completamente y aplique el freno de estacionamiento. Ponga la palanca de control de movimiento en la posici6n de neutro. Ponga el embrague del accesorio en la posici6n desenganchado (DISENGAGED). Ponga la Ilave de ignici6n en la posici6n de apagado (STOP) y remuevala. AsegOrese que las cuchillas y que todas las partes movibles se hayan detenido completamente.
PARA NIVELAR LA SEGADORA Aseg@ese de que los neum&ticos esten inflados a la PSi que se indica en estos. Si est&n demasiado inflados o poco inflados, el cesped no le quedar& bien cortado, Io cual podr& Ilevarlo a pensar que la SEGADORA no est& bien regulada. REGULACION VISUAL DE LADO A LADO 1. Si todos los neum&ticos est&n correctamente inflados y el cesped parece haber quedado cortado desparejo, determine que lado de la cortadora est& cortando m&s al ras.
PARA REEMPLAZAR LA CORREA DE LA CUCHILLA DE LA SEGADORA DESMONTAJE DE LA CORREA DE LA SEGADORA NOTE: Observe toda la correa de impulsi6n de movimiento y la posici6n de todas las guias y guardacorreas. 2. Desconecte el arnes del cable del embrague (A). 3. Quite la pieza de uni6n anti-rotaci6n (B) que est& del lado derecho del tractor. 4. Retire la correa del pi56n estacionario (C) y del pi56n del embrague (D). 5. Retire la correa del pi56n central (E). 6.
PARA HACER ARRANCAR EL MOTOR CON UNA BATERiA BAJA _DVERTENCiA: Las baterias de &cido-plomo generan gases explosivos. Mantenga las chispas, las llamas y los materiales para fumar alejados de las baterias. Siempre use una protecci6n para los ojos alrededor de las baterias. Si su bateria est& demasiado baja como para hacer arrancar el motor tiene que volverse a cargar. (Vea "Bateria" en la secci6n de Mantenimiento de este manual).
REEMPLAZAR PARA CAMBIAR EL FUSIBLE C&mbielo pot un fusible tipo enchufable de 30 amps, tipo automotriz. El sujetador del fusible est& ubicado detr&s del tablero. LA BATERIA _:_IADVERTENCIA: No haga cortocircuito con los terminales de la bateria al permitir que una Ilave de tuerca o cualquier otto objeto entre en contacto con ambos terminales a la misma vez. Antes de instalar la bateria remueva las pulseras de metal, los relojes de pulsera de metal, los anillos, etc.
Inmediatamente prepare su tractor para el almacenamiento a! final de la temporada o si el tractor no se va a usar por 30 dias o m&s. AI_ADVERTENClA: Nunca almacene el tractor duce a la separaci6n y a la formaci6n de acudos durante elalmacenamiento. La gasolina acidica puede daflar el sistema de combustible de un motor durante el periodo de almacenamiento. • Vaciar el dep6sito del carburante poniendo en marcha el motor y dejandolo funcionar hasta que el carburante termine el carburador este vacio.
CAUSA PROBLEMA No arranca 1. 2. 3. 4. 5. 6. Bujia mata. Filtro de aire sucio. Filtro de combustible 7. Agua en el combustible. 7. 8. Atambrado suetto 0 daSado. 8, Revise todo et alambrado. Carburador 9. Vea "PARA AJUSTAR EL CARBURADOR" en la secci6n de Servicio y Ajustes. 9. 10. Dificil de arrancar El motor no la vuelta CORRECCION Sin combustible. Motor sin la"ESTRANGULACION" (CHOKE) adecuada. Motor ahogado. 2, 3. 4. 5. sucio. 6, desajustado. V&Ivutas del motor desajustadas. 10.
PROBLEMA P_rdida de CAUSA 9. CORRECCl6N Agua en el combustible. 9. fuerza (sigue) 10. 13. Alambrado de la bujia suetto. Rejitla/atetas de aire det motor sucias. Silenciador sucio/taponado. Atambrado suetto o daSado. 14. Carburador desajustado. 10. 11. 12. 13. 14. 15. VAlvutas del motor desajustadas. 15. 11. 12. Vibraci6n excesiva 1. Cuchitla desgastada, 2. Mandril de la cuchitla doblado. 2. 3. Parte(s) suelta(s)/da_ada(s). 3.
PROBLEMA de lantera(s) no funciona= ndo La bateria no carga P_rdida de CAUSA 2. Bombilla(s) 0 IAmpara(s) quemada(s). 2. Oambie la bombilla(s) o I_.mpara(s). 3. Interruptor de la luz fallado. 3. Revise/cambie 4. Atambrado suetto 0 daSado. 4. Revise el alambrado y las conexiones. 5. Fusible quemado. 5. Cambie el fusible. 1. 2. Elemento(s) de la bateria malo(s). Malas conexiones de cables. 3. 4. Regutador fallado (si equipado). Atternador faltado. 1.
GUJA SUGERIDA PARA IViEDIR LAS PENDIENTES CON LA VISTA PARA UNA OPERACI6N SEGURA SOLAMENTE ANDE CUESTA ARRIBA O CUESTA ABAJO Y NO ATRAVIESE EL CERRO _t,== p.. 15 GRADOS MAX. 1 _ y abajo de las pendientes, nunca transversalmente con respecto alas | ADVERTENCIA: Para evitar dafios graves, haga funcionar su tractor arriba| pendientes. No cortar pendientes mayores de 15 grados. Haga los | virajes gradualmente para evitar volcarse o la p6rdida de control.
o Find tMs and a[[ your other product manuals on[ine. o Get answers from our team of home experts. o Get a personalized maintenance plan for your home. o Find information and too[s to help with home projects. Your Home For repair - in your home - of all major brand appliances, lawn and garden equipment, or heating and cooling systems, no matter who made it, no matter who sold it! For the replacement parts, accessories and owner's manuals that you need to do-it-yourself.