Owner's Manual ICRIIFTSMRN'I ROTARY LAWN MOWER 5.5 Horsepower Power-propelled 21" Multi-cut Model No. 917.378520 CAUTION: Read and follow all Safety Rules and Instructions before operating this equipment Sears, Roebuck and Co., Hoffman Estates, IL 60179 U.S.A. Visit our Craftsman website:www.sears.
Warranty ............................................... 2 Safety Rules ...................................... 2-4 Assembly / Pre-Operation .................... 5 Operation ......................................... 6-10 Maintenance Schedule ...................... 11 Maintenance ................................. 11-14 LIMITED TWO YEAR WARRANTY Product Specifications ........................ 12 Service and Adjustments .............. 14-15 Storage .........................................
I.GENERAL OPERATION • Read, understand, and follow all instructions on the machine and in the manual(s) before starting. Be thoroughly familiar with the controls and the proper use of the machine before starting. • Do not put hands or feet near or under rotating parts. Keep clear of the discharge opening at all times. • Only allow responsible individuals, who are familiar with the instructions, to operate the machine. • Clear the area of objects such as rocks, toys, wire, bones, sticks, etc.
• Never run a machine inside a closed area. • Never make adjustments or repairs with the engine (motor) running. Disconnect the spark plug wire, and keep the wire away from the plug to prevent accidental starting. • Keep nuts and bolts, especially blade attachment bolts, tight and keep equipment in good condition. • Never tamper with safety devices. Check their proper operation regularly. • Keep machine free of grass, leaves, or other debris build-up. Clean oil or fuel spillage.
Read these instructions and this manual HOW TO SET UPYOUR MOWER in its entirety before you attempt to assemble or operate your new lawn TO UNFOLD mower. IMPORTANT: in sembled at the factory with the exception of those parts left unassembled for shipping purposes. All parts such as nuts, washers, bolts, etc., necessary to complete the assembly have been placed in the parts bag. To ensure safe and proper operation of your lawn mower, all parts and hardware you assemble must be tightened securely.
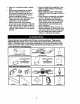
KNOWYOUR LAWN MOWER READ THIS OWNER'S MANUALAND ALL SAFETY RULES BEFORE OPERATING YOUR LAWN MOWER. Compare the illustrationswith your lawn mower to familiarize yourself with the location of various controls and adjustments. Save this manual for future reference. These symbols may appear on your lawn mower or in literature product, Learn and understand their meaning.
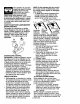
mowercan result in foreign objectsthrowninto the The operationof any lawn eyes, which can resultin severe eye damage. Always wear safety glasses or eye shields while operating your lawn mower or performing any adjustments or repairs. We recommend standard safety glasses or a wide vision safety mask worn over spectacles. HOWTO ENGINE USEYOUR CONTROL LAWN ,_ FAST CHOKE ,'" | ENGINE "';-.
_CAUTION: Do not run your lawn mower without rear door closed, clipping deflector or approved grass catcher in place. Never attempt to operate the lawn mower with the rear door removed or prepped open. LOWER WHEELS FOR HIGH CUT RAISE WHEELS FOR LOW CUT Lever TO CONVERT MOWER Your lawn mower was shipped ready to be used as a mulcher. To convert to bagging or discharging: REAR BAGGING • Lift rear door of the lawn mower and place the grass catcher frame hooks onto the door pivot pins.
TO EMPTY GRASS CATCHER ADD GASOLINE • Fill fuel tank to bottom of tank filler neck. Do not overfill. Use fresh, clean, regular unleaded gasoline with a minimum of 87 octane. Do not mix oil with gasoline. Purchase fuel in quantities that can be used within 30 _kdays to assure fuel freshness. CAUTION: Wipe off any spilled oil or fuel. Do not store, spill or use gasoline near an open flame.
TO START ENGINE NOTE: Due to protective coatings on the engine, a small amount of smoke may be present during the initial use of the product and should be considered normal. 1. Be sure fuel valve is in the ON position. 2. To start a cold engine, move handle mounted throttle/choke control lever to CHOKE position. 3. Hold operator presence control bar down to the handle and pull starter handle quickly. Do not allow starter rope to snap back. 4.
M.,.TE.A.CESC.EOULE F,LL,. O.TES AS YOU COMPLETE RE USERV.CE R I_ J_.,"_._O_ERVICE Check for Loose Fasteners Clean/Inspect Grass Catcher I,/ (if Equipped) ll/' _, Clean Under Lawn Mower Clean Drive Cover (Power-Propelled Mowers) ; t/' I/ Check/Sharpen/Replace Blade LubricationChart Clean Battery/Recharge IElectdc Start MowersI BE=Check Engine OilOil Level Change Engine DA"-" If E_i Check belVpulleys Power-Propelled drive Mowers) R Z I/3 I_ I_ _1 Ibm4 V'1.
PRODUCT SPECIFICATIONS Serial number: Date of purchase: Gasoline capacity / type: 1.0 quarts Oil type (API-SF-SJ): SAE 30 (above 32°F); SAE 5W-30 (below 32°F) Oil capacity: 18.5 ounces Spark plug (gap: .030 =) Blade bolt torque: (unleaded regular) NGK BPR6ES 35-40 ft. Ibs. The model and serial numbers will be found on a decal on the rear of the mower housing.
GRASSCATCHER • The grass catcher may be hosed with water, but must be dry when used. • Check your grass catcher often for damage or deterioration. Through normal use it will wear. If catcher needs replacing, replace only with a manufacturer approved replacement catcher. Give the lawn mower model number when ordering. DRIVE WHEELS Check front drive wheels each time before you mow to be sure they move freely. The wheels not turning freely means trash, grass cuttings, etc.
Your engine will not run properly and may be damaged by using a dirty air filter. Replace the air filter every 100 hours of operation or every season, whichever occurs first. Service air cleaner more often under dusty conditions. SPARK PLUG Replace spark plugs at the beginning of each mowing season or after every 100 hours of operation, whichever occurs first. Spark plug type and gap setting are shown in "PRODUCT SPECIFICATIONS" in Maintenance section of this manual. TO CLEAN AIR FILTER 1. Remove cover.
TO REMOVE DRIVE BELT 1• Remove drive cover. Remove belt 2. 3. 4. 5. TO from gearcase pulley by pushing down on pulley and rolling belt off it. Turn lawn mower on its side with air filter and carburetor up. Remove blade. Remove debris shield. Remove belt from engine pulley on crankshaft. REPLACE DRIVE BELT 1. Install new belt on engine pulley. 2. Reinstall debris shield and blade. 3. Return mower to upright position. 4. Install new belt on gearcase pulley. 5. Reinstall drive cover.
Immediately prepare your lawn mower for storage at the end of the season or if the unit will not be used for 30 days or more. LAWN MOWER When lawn mower is to be stored for a period of time, clean it thoroughly, remove all dirt, grease, leaves, etc. Store in a clean, dry area. 1. Clean entire lawn mower (See "CLEANING" in the Maintenance section of this manual). 2. Lubricate as shown in the Maintenance section of this manual. 3. Be sure that all nuts, bolts, screws, and pins are securely fastened.
CYLINDER I. 2. Remove spark plug. Pour one ounce (29 ml) of oil through spark plug hole into cylinder. 3. Pull starter handle slowly a few times to distribute oil. 4. Replace with new spark plug. OTHER • Do not store gasoline from one season to another. • Replace your gasoline can if your can starts to rust. Rust and/or dirt in your gasoline will cause problems.
TROUBLESHOOTING - See appropriate to a Sears Service PROBLEM Poor cutuneven section in manual unless directed Center. CAUSE CORRECTION 1. Worn, bent or loose blade. 2. Wheel heights uneven. 3. Buildup of grass, leaves and trash under mower, Excessive vibration 1. Worn, bent or loose blade. 2. Bent engine crankshaft. Starter rope hard to pull 1. Engine flywheel brake is on when control bar is released. 2. Bent engine crankshaft. 3. 4. Loss of drive or slowing of drive speed Blade adapter broken.
Garantfa ........................................................ 19 Reglas de Seguridad ............................... 19-21 Montaje / Pre-Operaci6n .............................. 22 Operaci6n ................................................ 23-27 Mantenimiento ......................................... 28-31 Programa de Mantenimiento ......................... 28 Especificaciones dai Producto ..................... 29 Servicio y Adjustes ................................. 31-32 Almacenamiento ..............
I. OPERACION • Antes de empezar, debe familiadzarse complotamente con los controles y el uso correcto de la maquina. Para esto, debe leer y comprender todas las instrucciones que aparecen en la maquina yen los manuales de operaci6n. • No ponga las manos o los pies cerca o debajo de las partes rotatorias. Mantdngase siempra lejos de la abertura de la descarga. • Permita que solamente las personas responsables que estdn familiarizadas con las instrucciones operen la m_.quina. • Despeje el _.
• Nunca haga funcionar una mdquina dentro de un drea cerrada. • Nunca haga ajustes o reparaciones mientras el motor estd en marcha. Desconecte el cable de la bujfa, y mantdngalo a cierta distancia de dsta para prevenir un armnque accidental. • Mantenga las tuercas y los pemos, especialmente los pernos del accesorio de la cuchilla, apretados y mantenga el equipo en buenas condiciones. • Nunca manipule de forma indebida los dispositivos de seguddad. Controle regularmente su funcionamiento correcto.
Lea estas instrucciones y el manual completamente antes de tratar de montar u operar su segadora nueva. IMPORTANTE: Este cortacesped viene SIN ACEITE O GASOLINA an el motor. Su segadora nueva ha sido montada en la fdbrica con la excepci6n de aquellas partes que se dejaron sin montar por razones de envfo. Todas las partes como las tuemas, ]as arandelas, los pemos, etc., que son necesarias para completar el montaje han sido colocadas en la bolsa de partes.
FAMILIARICESE CON SU SEGADORA LEA ESTE MANUAL DEL DUEI_IO Y LAS REGLAS DE SEGURIDAD ANTES DE OPERAR SU SEGADORA. Compare las ilustraciones con su segadora para familiadzarse con la ubicaci6n de los diversos controles y ajustes. Guarde este manual para referencia en el futuro. Estos simbolos pueden apareser sobrs su segadora o en la literatura proporcionada con el producto. Aprenda y comprenda sus significados.
segadora puede hacer que salten objetos extrafios dentro La sus de operaci6n ojos, Io deque cualquier puede producir dafios graves en 6stos. Siempre use anteojos de seguridad o protecci6n para los ojos mientras opero su segadora o cuando haga ajustes o reparaciones. Recomendamos gafas o una mascara de seguridad de visi6n amplia de seguridad usada sobre las gafas.
PARAUNCORTEALTO, BAJELASRUEDAS PAPAUN CORTEBAJO,LEVANTELASRUEDAS /1= PR,ECAUC,16N: No haga funcionar su segaoora sin la puerta trasera se cerro, o sin el desviador de recortes o sin el recogedor cdsped aprobados en su lugar. Nunca trate de operar la segadora cuando se halla removido la puerta trasera o cuando se ha removido a puerta trasera o cuando estd un poco abierta. PARA CONVERTIR LA SEGADORA Su segadora fue enviada lista para usarse como acolchadora de capa vegetal.
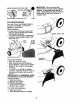
PARA VACIAR EL RECOGEDOR DE CESPED I. Levante el mcogedor de c_sped usando el mango del bastidor. 2. Remueva el recogedor de c6sped, con los recortes, de debajo del mango de la segadora. 3. Vacfe los recortes de la bolsa usando tanto el mango del bastidor como _I de la bolsa. AVISO: No armstre la bolsa cuando la vacfe; se producir_, un desgaste innecesario. r/ Mango del recogedor de c6sped Mango de la bolsa necesitar cambiar el aceite m_,s a menudo cuando las condiciones son polvorosas o sucias.
PARA HACER ARRANCAR EL MOTOR AVISO: Debido a tas capas protectoras del motor, una cantidad pequei_a de humo puede estar presente durante el uso inicial del producto y se debe eonslderar normal. I. Asegurase que vdlvula del combustible estd en la posici6n ON. 2. Para hacer arrancar un motor frfo, mueva la palanca de control de aceleraci6n/ estrangulaci6n, montada en elmango, a la posici6n de ESTRANGULACION. 3.
jd_v __'_'/'t'_ _'t _('7 0_/_P'O Revisar si hay sujetadores suettos Umplar,'lnspecolonar el recogedor de SE cdsped vlene equipad°' Umpiar (s' la segadora C'€_ft_'t_f" _ _ FECHASDE SERVIClO _/ V_ U mp.
ESPEClFICAClONES DEL PRODUCTO Ndmero de serie: Fecha de compra: Capacidad y tipo de gasolina: Tipo de aceite (API-SF-SJ): Capacidad de aceite: Bujfa (abertura: .030") Torsi6n del perno de la cuchilla: 1.0 cuartos (regular sin plomo) SAE 30 (sobre 32°F);SAE 5W-30 18.5 onzas (debajo 32°F) NGK BPR6ES 35-40 FT. LBS. El n_mero del nodelo y el de serie se encuentran en la calcomania adjunta a la parte trasera de la caja de la segadora.
RECOGEDOR DE ClaSPED • El recogedor de cdsped puede ser rociado con el agua de la manguera pero tiene que estar seco cuando se vaya a usar. • Revise su recogedor de cdsped a menudo para verificar si estd dafiado o deteriorado. Se va a desgastar con el uso normal. Si se necesita cambiar el recogedor, cdmbielo solamente por uno que sea aprobado por el fabricante. Dd el nDmero del modelo de la segadora cuando Io ordene.
BUJ|AS Cambie las bujl'asal comienzo de cada tamporada de siega o dospu6s de cada 100 horas de operaci6n, Io que suceda pdmero. El tipo de bu fa y el ajuste de la abertura aparecen en "ESPECIF CAC ONES DEL PRODUCTO" secciSn de este manual. LIMPIEZA IMPORTANTE: Pare obtener el mejor rendimiento, mantenga la caja de la segadora sin acumulacion de cesped y basure. Umpin la parte de abajo de su segadora despues de cada uso.
PARA REMOVER LA CORREA DE IMPULSI6N 1. Remueva la cubierta de la impulsi6n. Remuova la correa ompujando hacia abajo en la polea de la caja de engranajes. 2 Haga descansar la segadora en su lado con el filtro de aire y el carburador mirando hacia arriba. 3. Remueva la cuchina. 4. Remueva la defensa en contra del desperdicio. 5. Remueva la correa de la polea del motor en el cigueSal. PARA CAMBIAR LA CORREA DE IMPULSI6N 1. Instale la correa nueva en la polea del motor. 2.
Inmediatamente prepare su segadore para el almacenamiento al final de cada temporada o si la unidad no se va a usar por 30 dias o mds. SEGADORA Cuando se va a guardar la segadora por cierto perfodo de tiempo, Ifmpiela cuidadosamente, remueva toda la mugre, la grasa, las hojas, etc. Gu&rdela en un area limpia y seca. 1. Limpie toda la segadora (Vea =LIMPIEZA" en la seccibn de Mantenimento de este manual). 2. Lubrfquela seg0n se muestra en la seccibn de Mantenimento de este manual. 3.
• Si es posible, guarde su unidad en un recinto cerrado y c_brala para protegerla contra el polvo y la mugre. • Cubra su unidad con un forro protector adecuado que no retenga la humedad. No use pldstico. El pldstico no puede respirar, Io que permite la formaci6n de condensaci6n, Io que producir._la oxidacibn de su unidad. IMPORTANTE: Nunca cubra la segadora mientras el motor y las areas de escape to davia estan calientes.
SOLUCI(_N DE PROBLEMAS - Vea la secci6n est6 dirigido a un centro de servlco Sears. PROBLEMA Mal cortedlsparejo sproplada en el manual amenos que CORRECCl6N CAUSA 1. Cuchilla desgastada, doblada o suelta. 2. Altura de las ruedas dispareja. 3. Acumulaci6n de cdsped, hojas o basura debajo de la segadora. 1. Cambie la cuchilla. Apriete el pemo de la cuchilla. 2. Ajuste todas las ruedas a la misma altura. 3. Limpie la parte inferior de la caja de la segadora. Vibraci6n excesiva 1.
SERVICE NOTES 36
CRAFTSMAN ROTARY LAWN MOWER-- MODEL NUMBER 917.378520 GEAR CASE ASSEMBLY -- PART NUMBER 174915 4 13 10 9 7 4 6 5 8 KEY NO. PART NO. DESCRIPTION 1 2 3 4 5 6 7 8 9 10 11 12 13 14 15 16 --- 17060410 174917 57072 77881 57079 174918 160817 174916 160818 850848 171755 12000003 137051 182225X004 169738X004 86447 750369 176746 Screw, Tapping 1/4-20 x .
CRAFTSMAN ROTARY LAWN MOWER -- MODEL NUMBER 917.
CRAFTSMAN KEY PART NO. NO. 1 2 3 4 5 6 7 8 9 10 11 12 13 14 15 16 17 18 19 2o 21 22 23 24 25 26 27 28 29 3o 31 32 33 34 182714 151721X479 182713 182903 171407 180833 51793 66426 180479 128415 175069X479 175070)(479 17060410 181019X479 181018X479 180071 180072 132004 179585 178398 88652 169747 87677 -°- ROTARY LAWN MOWER -- MODEL NUMBER DESCRIPTION Upper Handle, with Grip LowerHandle ControlBar Engine Zone ControlCable Handle Bolt Handle Knob HairpinCotter WiraTie Rear Door Kit (incl.
CRAFTSMAN ROTARY LAWN MOWER - - MODEL NUMBER 917.
CRAFTSMAN j_ ROTARY LAWN MOWER - - MODEL NUMBER KEY PART NO. NO. DESCRIPTION 1 3 4 5 6 7 8 9 10 11 12 13 14 16 17 18 19 2O 25 26 28 31 32 35 Drive ControlAssembly Pan Head Tapping Screw #10-24 x 2-3/4 Spring, Pulley Adjuster V-Belt Connector,Lever/Pulley Plate, Trigger, EZ Walk Drive Control Hubcap Locknut Screw, PhillipsHead #10-5/8 Wheel & Tire Assembly E-Ring DriveshaftCover Dust Cover Washer 1/2 x 1ol/2 x .
HONDA 4-CYCLE ENGINE MODEL NUMBER GCV-160-AIAE FAN COVER I CONTROLJ 8 6 13 3 14 CAMSHAFT 5 J lo I_,_ _" 6.
HONDA 4-CYCLE ENGINE MODEL NUMBER GCV-160-AIAE FANCOVER NO. PART NO. 1 2 3 4 5 6 7 5580311 5580329 5580345 5580352 4439428 0800466 5580378 6094122 8 9 10 11 12 5580386 2418671 5580998 0145557 0471623 DESCRIPTION Arm, Governor Rod,Governor Spring,Governor Spring,Throftle Return Spring, Lever Holder,Cable Base Comp., Control(Use up to Sedal Number1177559) Base Comp.
HONDA 4-CYCLE ENGINE MODEL NUMBER GCV-160-AIAE OIL PAN CYLINDER BARREL I 3 $O,--_ T 5 4 5 PISTON CONNECTING ROD I CRANKSHAFT J .
HONDA 4-CYCLE ENGINE MODEL NUMBER GCV-160-AIAE CYUNDERBARREL PISTON CONNECTING ROD KEY PART NO. NO. DESCRIPTION I_-Y NO. PARr NO. DESCRIPTION 1 2 3 4 5 6 7 8 CylinderAssembly Clip,Valve Guide Cover, Head Cover Comp., Breather Bolt, Flange (6 x 12) Bolt, Range (6 x 14) Oil Seal 25.
SERVICE NOTES 46
SERVICE NOTES 47
no matter who made it, no matter who sold 1-800-4-MY-HOME @ An,/_e,deyornight (1-800-469-4663) www.seats, (U.S_. and Canada) com www,seal_.ca For repair of carry-in products like vacuums, lawn equipment, and electronics, call for the nearest Sears Parts and Repair Center. 1-800-488-1222 _, dayorn_ht0J.SA orgy) www.seal_.com For the replacement parts,accessories and owner'smanuals that you need to do-it-yourself,callSears PartsDirectS"! 1-800-366-PART 6 a.m.-11 p.m.