Owner's Manual CRIIFTSMRN° WHEEl. ED WEEDTRIMMER 6.0 Horsepower 22 Inch Cut Model No. 917.773708 • Espahol, p. 17 _IbCAUTION: Read and follow all Safety Rules and Instructions before operating this equipment. Sears, Roebuck and Co., Hoffman Estates, IL 60179 Visit our Craftsman website: www.sears.com/craftsman U.S.A.
Warranty ................................................... 2 Safety Rules .......................................... 2-4 Product Specifications .............................. 5 Assembly / Pre-Operation ........................ 5 Operation ............................................... 6-8 Maintenance Schedule ............................. 9 LIMITED TWO YEAR WARRANTY Maintenance ........................................ 9-11 Service and Adjustments ................... 12-13 Storage .................
AWARNING: Engine exhaust, some of its constituents, and certain vehicle components contain or emit chemicals known to the State of California to cause cancer and birth defects or other reproductive harm. CAUTION: Muffler and other engine parts become extremely hot during operation and remain hot after engine has stopped. To avoid severe burns on contact, stay away from these areas. I. GENERAL OPERATION • Read, understand, and follow all instructions on the machine and in the manual before starting.
III. CHILDREN Tragic accidents can occur if the operator is not alert to the presence of children. Children are often attracted to the machine and the trimming activity. Never assume that children will remain where you last saw them. • Keep children out of the trimming area and under the watchful care of another responsible adult. • Be alert and turn machine enter the area. off if children • Before and while moving backwards, look behind & down for small children. • Never allow children machine.
Serial Number: Date of Purchase: GasolineCapacity/Type: 1.6 Quarts (UnleadedRegular) Oil Type (API SG-SL): SAE 30 (above32°F);SAE 5W-30 (below32°F) Oil Capacity: 20 Ounces Spark Plug (Gap: .030") ChampionRJ19LM or J19LM TrimmerLine Length: 18.75Inches (0.155 Inch Diameter) • The model and serial numberswill be found on a decal on the rear of the trimmer. Record both serial number and date of purchasein the space providedabove.
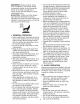
KNOW YOUR TRIMMER READ THIS OWNER'S MANUAL AND ALL SAFETY RULES BEFORE OPERATING YOUR TRIMMER. Compare the illustrations with your trimmer to familiarize yourself with the location of various controls and adjustments. Save this manual for future reference. These symbols may appear on your trimmer and understand their meaning. FAST /A SLOW or in literature supplied with the product.
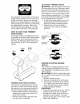
TO ADJUST The height of cut can be set to six (6) different positions ranging from 1-1/2 inches to 3 inches. Recommended cutting height for the average yard is 2 inches. 1. To adjust trimming height, push in the locking plate tab and move trimmer head up or down to desired position. 2. Release tab and be sure head is The operation of any trimmer can result in foreign objects being thrown into the eyes, which can result in severe eye damage.
ADD GASOLINE • Fill fuel tank to bottom of gas tank filler neck. Do not overfill. Use fresh, clean, regular unleaded gasoline with a minimum of 87 octane. Do not mix oil with gasoline. Purchase fuel in quantities that can be used within 30 days to assure fuel freshness. NOTE: In cooler weather it may be necessary to repeat priming steps. In warmer weather overpriming may cause flooding and engine will not start.
MAINTENANCE F,LL ,NDATES AS OUOOMPLETE REGULARSERVICE Check T for Loose /__/_/%'4 Fasteners _£'_%'4S/'_" I_ Clean Trimmer _ M_ Clean Under Engine Cover E II t,/'2 If tf Check / Replace Trimmer Lines 1_3 Check Engine Oil Level I_ Change Engine Oil 5/'1,2 Clean Air Filter I_ Inspect I_ Muffler Clean or Replace Replace Spark Air Filter Paper DATES I_ Check Drive Belt / Pulleys R / k#' 2 Plug Cartridge 1_2 1 - Change more often when operating under a heavy load or in high
TRIMMER Always observe safety rules when performing any maintenance. TIRES • Keep tires free of gasoline, oil, or insect control chemicals which can harm rubber. • Avoid stumps, stones, deep ruts, sharp objects and other hazards that may cause tire damage. TRIMMER LINE For best results, replace trimmer lines when they have worn to half their original length. Use .155 inch diameter trimmer line. Cut new trimmer line length to 18-3/4 inches. After new line is installed on TO REPLACE 1.
ENGINE LUBRICATION 6. 7. Use only high quality detergent oil rated with API service classification SG-SL. AIR Select the oil's SAE viscosity grade according to your expected operating temperature. SAE VISCOSITY Replace engine oil cap. Reconnect spark plug wire to spark plug. FILTER Your engine will not run properly and may be damaged by using a dirty air filter. Replace the air filter cartridge every 100 hours of operation or every season, whichever occurs first.
Keepfinishedsurfacesand wheels free of all gasoline,oil, etc. We do not recommendusing a garden hoseto clean trimmer unlessthe electrical system, muffler,air filter andcarburetorare coveredto keepwater out. Water in engine can result in shortened engine life. ACAUTION: Disconnectspark plug wire from spark plug and place wire where it cannot come in contact with plug. • Turntrimmer on its side. Makesure air filter and carburetorare up.
9. Note the position of the control cable and idler return spring, then remove idler assembly from chassis and remove belt and idler from trimmer. 10. Remove belt from idler assembly by removing bottom belt keeper and idler pulleys. 11 .Assemble new belt, idler pulleys and bottom belt keeper to idler bracket. Tighten pulley bolts securely. NOTE: Be sure belt is inside top belt keeper on idler assembly. 12. Position belt and idler assembly in trimmer, reconnect idler spring and assemble idler to chassis.
Immediately prepare your trimmer for storage at the end of the season or if the unit will not be used for 30 days or more. TRIMMER When trimmer is to be stored for a period of time, clean it thoroughly, remove all dirt, grease, leaves, etc. Store in a clean, dry area. 1. Clean entire trimmer (See "CLEANING" in the Maintenance section of this manual). 2. Lubricate as shown in the Maintenance section of this manual. 3. Be sure that all nuts, bolts, screws, and pins are securely fastened.
TROUBLESHOOTING to a Sears - See appropriate Parts & Repair PROBLEM Does not start section in manual unless directed Center. CAUSE CORRECTION 1. Dirty air filter. 2. Out of fuel. 3. Stale fuel. 4. Water 1. Clean/replace 2. Fill fuel tank. 3. Empty fuel tank with fresh, clean 4. Empty fuel tank with fresh, clean 5. Connect wire to in fuel. 5. Spark plug wire is disconnected. Loss of power Excessive Vibration 6. Replace spark plug. 7. Move throttle lever to FAST position. 1. Dirty air filter.
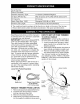
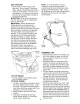
I lO DEGREES 15 DEGREES Use this guide and do not trim on a slope A 10 degree slope A 15 degree slope Use extreme j_lllk manual slopes. Is a hill that Increases Is a hill that Increases greater than 15 degrees. In height In height at approximately at approximately care at all times and avoid sudden turns or maneuvers. 1.7 feet in 10 feet. 2.5 feet in 10 feet. Follow other Instructions for trimming on slopes. on Operate acrossobstructions.
Garantfa .......................................................... 17 Reglas de Seguridad ................................. 17-19 Especificaciones del Producto ........................ 20 Montaje / Pre-Operaci6n ................................ 20 Operaci6n .................................................. 21-23 Mantenimiento ........................................... 24-26 Programa de Mantenimiento .......................... 24 Servicio y Adjustes ....................................
I. OPERAClON GENERAL • Antes de empezar, debe familiarizarse completamente con los controles y el uso correcto de la maquina. Para esto, debe leer y comprender todas las instrucciones que aparecen en la maquina y en los manuales de operaci6n. • No ponga las manos o los pies cerca o debajo de las partes rotatorias. • Mantener todas las partes del cuerpo lejos del silenciador del escape y la linea de rotaci6n. El silenciador caliente puede causar serias quemaduras.
IV. SERVlClO • Tenga cuidado extra al manejar la gasolina y los dem_.s combustibles. Son inflamables y los gases son explosives. Use solamente un envase aprobado. Nunca remueva la tapa del dep6sito de gasolina o agregue combustible con el motor funcionando. Permita que el motor se enfrfe antes de volver a poner combustible. No fume. Nunca vuelva a poner combustible en la mdtquina en recintos cerrados.
Nt_mero de Serie: Fecha de Compra: Capacidad y Tipo de Gasolina: Tipo de Aceite Capacidad de Aceite: Bujia (Abertura: Longitud (API SG-SL): 1.6 Cuartos (Regular SAE 30 (Sobre sin Plomo) 32°F); SAE 5W-30 (Debajo 32°F) 20 Onzas .030") Champion de la Iinea de la recortadora: RJ19LM 18.75 o J19LM Inches (0.155 Inches Dia.metro) El n0mero del modelo y el de serie se encuentran en la calcomania adjunta a la parte trasera de la caja de la recortadora.
FAMILIAR[CESE CON SU RECORTADORA LEA ESTE MANUAL DE USUARIO Y LAS REGLAS DE SEGURIDAD ANTES DE OPERAR SU RECORTADORA. Compare las ilustraciones con su recortadora para familiarizarse con la ubicaci6n de los diversos controles y ajustes. Guarde este manual para referencia en el futuro. Estos simbolos pueden aparecer sobre su recortadora el producto. Aprenda y comprenda sus significados.
SEGURIDAD Cabeza de recortadora La operaci6n de cualquier recortadora puede hacer que salten objetos extra_os dentro de sus ojos, Io que puede producir da_os graves en estos. Siempre use anteojos de seguridad o protecci6n para los ojos mientras opere su recortadora o cuando haga ajustes o reparaciones. Recomendamos gafas de seguridad o una mascara de visi6n amplia, de seguridad usada sobre las gafas. COMO UTILIZAR SU RECORTADORA Tabulacidn de la placa de bloque .
GASOLINA • Llene el estanque de combustible hasta la parte inferior del cuello de relleno del estanque de gasolina. No Io Ilene demasiado. Use gasolina regular, sin plomo, nueva y limpia con el mfnimo de 87 octanos. No mezcle el aceite con la gasolina. Para asegurar que la gasolina utilizada sea fresca compre estanques los cuales puedan ser utilizados _kdurante los primeros 30 dfas. PREOAUClON: Limpie el aceite o el combustible derramado. No almacene, derrame o use gasolina cerca de una llama expuesta.
P ROGRAMA DE MANTENIMIENTO o_f__ _ __J __ s o s .v.o.
4. _PRECAUCl6N: Utilice s61o la linea de recortadora recomendada. No utilice otros materiales como cables, cuerdas, cintas, etc. un cable podria romperse durante el funcionamiento y volverse un peligroso cohete que podria causar heridas serias. PARA CORTAR LA LiNEA A LA LONGITUD APROPIA NOTA: La linea de la recortadora precortada a la Iongitud apropiada ester disponible para esta unidad; vea la secci6n de las Piezas de Recambio de este manual. 5. 6. 7.
Revise el nivel del aceite del c_trter antes de arrancar el motor y despues de cada cinco (5) horas de uso continuado. Apriete el tap6n del aceite en forma segura cada vez que revise el nivel del aceite. PARA CAMBIAR EL ACEITE DEL MOTOR AVlSO: Antes de inclinar la recortadora para drenar el aceite, drene el tanque de combustible haciendo funcionar el motor hasta que el tanque est_ vacio. 1. Desconecte el alambre de la bujia y p6ngalo de modo que no pueda entrar en contacto con _sta. 2.
,_ ADVERTENClA: PARA REMOVER/AJUSTAR LA CORREA DE IMPULSION DEL CABEZAL DE LA RECORTADORA 1. Remueva el tornillo en el frente de la cubierta del chasis. 2. Gire la cubierta hacia arriba y a distancia de la recortadora. Para evitar lesi6nes serias ntes de dar cualquier sercicio o de hacer ajustes: 1. Pare el motor. 2. Asegt3rese que las Ifneas rotatorias y que todas las partes movibles se hayan detenido completamente. 3.
8. Remueva la correa de la polea del cabezal de la recortadora. 9. Observe la posici6n del cable de control y del resorte de Ilamada del piton Ioco. A continuaci6n remueva el conjunto del piton Ioco del chasis y remueva la correa y el piton Ioco de la recortadora. 10. Remueva la correa del conjunto del piton Ioco al remover el fijador de correa inferior y las poleas del piton. 11. Monte la nueva correa, las poleas del piton Ioco y el fijador de correa inferior al soporte del piton.
Prepareinmediatamente su recortadora parael almacenamiento al finalde cadatemporada o si launidadnosevaa usarpor30diaso m_.s. RECORTADORA Cuanclo se va a guarclar la recortaclora por un cierto perfoclo de tiempo, Ifmpiela cuiclaclosamente, remueva tocla la mugre, la grasa, las hojas, etc. Gu_.rclela en un _.rea limpia y seca. 1. Limpie tocla la recortaclora (Vea"LIMPIEZA" en la secci6n de Mantenimiento de este manual). 2. Lubrfquela seg_n se muestra en la secci6n de Mantenimiento de este manual. 3.
SOLUCION DE PROBLEMAS - Vea la seccibn est_ dirigido a un centro de servico Sears. PROBLEMA No arranca apropiada CAUSA 1. Filtro de aire sucio. 2. Sin combustible. 4. Agua en el combustible. 5. Alambre de la bujia desconectado. 6. Bujia mala. 7. La palanca de control de la aceleraci6n no est,. en posici6n correcta (si existe). Vibracibn excesiva amenos que CORRECCION 3. Combustible rancio. P_rdida de potencia en el manual 1. Limpie/cambie el filtro de aire. 2. Llene el estanque de combus tible.
.- GU I "'""_'--_-.4.D08 i i . .,:... DE INCLINACION VEA Y DETENGA ".................. VERTICAL, ESTA GUIA DE NIVEL CON UN ARBOL LA ESQUINA DE UNA ESTRUCTURA, I .......................... t UN POSTE EN POSICION DE LUZ O UNA CERCA. i Opere una recortadora de maleza en sentido diagonal a trav_s de las cuestas, nunca cuesta arriba o cuesta abajo.
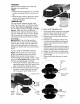
CRAFTSMAN WEED TRIMMER - - MODEL NUMBER 917,773708 30 29 \ 39 40 28 18 20 11 26 21 / 16 1 i i 27 i 15 24 26 23 24 27 32
CRAFTSMAN WEED KEY NO. TRIMMER PART NO. 1 --- 2 3 150406 179466 8 9 169821 X479 150078 - - MODEL NUMBER DESCRIPTION Engine, Briggs & Stratton, Model No. 128H02-0515-E1 (See Breakdown) Bolt, Engine Mounting 3/8-16 Pulley, Engine (Includes Setscrew, Key #4) Handle, Lower Screw, Hex Washer Head 5/16-18 x .
CRAFTSMAN WEED TRIMMER . "MODEL 52 NUMBER 917.773708 51 20 14 44 47 21 43 / / / / / / / / / / / / f 22 23 24 4 r 40 J 26 27* 19 J 28 J i 30* i .......... -...................
CRAFTSMAN WEED TRIMMER KEY NO. 1 2 3 4 5 6 7 8 9 10 11 12 13 14 15 16 17 18 19 20 21 22 23 24 25 26 27 28 29 30 PART NO.
BRIGGS & STRATTON 4-CYCLE ENGINE MODEL NUMBER 128H02-0515-E1 684 287 E 718 51 525 524 _.
BRIGGS & STRATTON 121 CARBURETOR OVERHAUL 127 104 4-CYCLE ENGINE MODEL NUMBER 128H02-0515-E1 KIT 163 276 @ 617 633 @ 188 443 _ 163 977 CARBURETOR GASKET SET 276 _ 617 163 _ 137 276 @ 617 633 117J _ 5o6 968 967 9 7 37 276 @
BRIGGS & STRATTON 4-CYCLE ENGINE MODEL NUMBER 128H02-0515-E1 @ 65 58 1210 601 k__ 563_ 304 564 [_ KEY PART NO. NO. DESCRIPTION KEY PART NO. NO.
BRIGGS & STRATTON KEY PART NO. NO. 134 137 159 163 187 188 190 202 209 222 227 276 287 300 304 305 306 307 324 332 333 334 337 356 358 363 365 383 404 425 443 445 456 459 505 523 524 525 529 562 563 564 584 585 592 597 601 604 608 613 615 616 617 621 633 635 4-CYCLE ENGINE MODEL NUMBER 128H02-0515-E1 KEY PART NO. NO.
Your Home For repair - in your home - of all major brand appliances, lawn and garden equipment, or heating and cooling systems, no matter who made it, no matter who sold it! For the replacement parts, accessories and owner's manuals that you need to do-it-yourself. For Sears professional and items like garage installation of home appliances door openers and water heaters. 1-800-4-MY-HOlVlE ® (1-800-469-4663) www.sears.com Anytime, day or night (U.S.A. and Canada) www.sears.