OPERATOR'S MANUAL DELUXE PUSH ROTARY LAWN MOWER • Assembly • Operation • Maintenance • Service and Adjustments • Storage • Troubleshooting AWARNING: This lawn mower is equipped with an internal combustion engine and should not be used on or near any unimproved forest-covered, brush-covered or grass-covered land unless the engine's exhaust system is equipped with a spark arrester meeting applicable local or state laws (if any).
Safety Rules ................. 2-3 Assembly ...................... 4-8 Operation .................... 9-15 Maintenance ............. Service and Adjustments .............. 16-18 Storage ..................... 20-21 Troubleshooting ........ 22-23 18-20 IMPORTANT: Thiscutting machine iscapable of amputating hands and feet and throwing objects. Failure to observe the following safety instructions could result in serious injury or death. _IbLook for this symbol to point out important safety precautions.
• Removeobstacles(rocks,tree limbs,etc.) • Watchfor holes,ruts, or bumps.Tall grass can hide obstacles. DO NOT: • Do not trim near drop-offs,ditches or embankments.The operator could lose footingor balance. • Do not trim excessivelysteep slopes. • Do not mow on wet grass.Reducedfooting could causeslipping. III. CHILDREN Tragic accidents can occur if the operator is not alert to the presence of children. Children are often attracted to the machine and the mowing activity.
TO REMOVE MOWER FROM CARTON • Remove all loose parts from carton. • Remove lawn mower housing with care. Avoid touching blade under housing. wear gloves or other protection when working under or lifting mower. THINGS TO KNOW BEFORE YOU ASSEMBLE MOWER Do I have a side or rear discharge mower? lawn Look for the grass discharge opening on your mower. If the opening is on the right side of the mower housing, it is a side discharge mower.
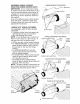
Operator presence MOWING POSITION control bar _.// / / 3 POSITION "QUICK" HANDLES • Raise lower handle section to operating position and squeeze the bottom ends of lower handle towards each other until the pin in handle can be inserted into one of the three height adjustment holes.
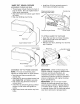
ASSEMBLE (REAR GRASS DISCHARGE CATCHER MOWERS HINGE BRACKET MOUNTED ONLY) Rear door IMPORTANT: If your model lawn mower is mulcher ready, the mulcher plate or plug must be removed before using mower as a bagger. To convert mower to bagging or discharging, see the Operation section in this manual. bracket Grass catcher frame Look at the different grass catcher illustrations that follow. Determine which type of grass catcher you have and follow the appropriate instructions.
"HARD TOP" ASSEMBLE GRASS FRAME CATCHER AND • Install two (2) blunt pointed screws front holes and tighten securely. BAG • Thread upper tubular frame into hem of bag as shown. Be sure angled ends of frame point downwards. • Slip lower frame into tubular upper frame as shown. • Slip vinyl bindings Sharp pointed screws (Rear and side holes) in Catcher top over frame.
SPARK PLUG BOOT On some models a packed loose in the model has the boot, wire and reconnect spark plug. spark parts install spark plug boot is bag. If your on spark plug plug wire to Spark plug O IMPORTANT: The engine alternator not charge a discharged battery. will ALL UNITS: At the end of the mowing season the battery should be charged for 48 hours to protect the battery during winter storage.
The operation of any lawn SAFETY GLASSESmower can result in foreign objects thrown into the eyes, which can result in severe eye damage. Always wear safety glasses or eye shields while operating your lawn mower or performing any adjustments or repairs. We recommend standard safety glasses or a wide vision safety mask worn over spectacles.
TO ADJUST CUTTING HEIGHT FOR MULCHING MOWERS ONLY Adjust cutting height to suit your requirements. Medium position is best for most lawns. Raise wheels for low cut and lower Most mulching mowers are shipped to be used as a mulcher. wheels Some models have a seperate mulcher plug, other models have the mulcher plug built into the rear door. To convert to bagging or discharging, the plate or plug (if so equipped) must be removed from the discharge opening of the lawn mower.
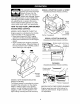
MULCHER PLUGBUILTINTOREARDOOR • Position lock lever over hinge bracket as shown and raise lever to lock mulcher plug in place. • Allow discharge lock lever. guard to rest against • To return to discharging or bagging operation, simply lower lock lever and remove mulcher plug from mower. ACAUTION: Do not run your lawn mower without discharge guard, approved grass catcher or mulcher plate or plug in place.
MULCHER PLUG TYPE "B" To convert to mulching operation, mulcher plug must be installed into discharge opening of mower. • Open discharge guard. • Insert tab of mulch plug into housing opening. • Align hooks of mulch plug over hinge rod of discharge guard. Push mulch plug down until mulch plug is seated in housing opening. _I, CAUTION: Do not run your lawn mower without catcher discharge guard, approved or mulcher plug in place.
SIDE DISCHARGING SIMPLE STEPS TO REMEMBER WHEN CONVERTING YOUR "COMBI-CUT" LAWN MOWER • Mulcher plate must be installed into rear discharge opening of mower (see above instructions). • Open mulcher door and install discharge deflector under door as shown. FOR MULCHING - • Rear mulcher plate installed door closed. • Mulcher door closed. • Mower is now ready for discharging operation. • To convert to mulching or bagging operation, discharge deflector must be removed and mulcher door must be closed.
BEFORE STARTING Read the engine mower. FILL ENGINE manual ENGINE TO START packed ACAUTION: with your whenever WITH OIL • Remove engine oil filler plug (oil fill cap/ dipstick on models so equipped). • Slowly add oil. For type and grade of oil to use, see "ENGINE" in the Maintenance section of this manual. • Fill to the top of slot in filler hole (to "FULl" line on dipstick on models so equipped). Do not overfill. • Replace plug (oil fill cap/dipstick on models so equipped) and tighten.
MOWING TIPS A CAUTION: Do not use de-thatcher bladeattachmentson your mower.Such attachmentsare hazardous,will damage your mowerand could void your warranty. FOR MOWERS MOWING ONLY TIPS IMPORTANT: For best performance, keep mower housing free of built-up grass and trash. See "CLEANING" in the Maintenance section of this manual. • For most cutting conditions and better bagging performance, the engine speed should be set in the FAST position.
MAINTENANCE SCHEDULE Check for Loose EVERY Clean / Inspect _ Check N Check Drive Wheels *** Clean Lawn Mower ....
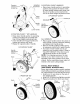
LAWN IMPORTANT: MOWER Always observe safety ing any maintenance. TIRES rules when perform- • Keep tires free of gasoline, oil, or insect control chemicals which can harm rubber. • Avoid stumps, stones, deep ruts, sharp objects and other hazards that may cause tire damage. BLADE Blade bolt is heat treated. If bolt needs replacing, replace only with approved bolt shown in the Repair Parts section of this manual.
AIR FILTER trash. Clean the underside after each use. Your engine will not run properly and may be damaged by using a dirty air filter. Clean the element after every 25 hours of operation or every season. Replace the air filter every 100 hours of operation or every season, whichever occurs first. Service air cleaner more often under dusty conditions. See the maintenance section of your engine manual.
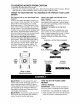
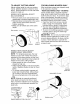
3 POSITION"EURO"OR"EZ" The handleon your lawn mowerhas three (3) height positions- adjust to heightthat suits you. • Remove knoband carriage bolt on one side of the lower handle. • While holding handleassembly,remove knob and carriage bolt from opposite side, align hole in handlewith desired hole in handlebracketand reassemble bolt and knob and tightensecurely. • Align oppositeside of handlewith same positioninghole and securewith bolt and knob.
ENGINE See the ADJUSTMENT section of your engine manual for further instructions. CARBURETOR The carburetor has been preset at the factory and adjustment should not be necessary. However, minor adjustment may be required to compensate for differences in fuel, temperature, altitude or load. • The air filter must be assembled to the ENGINE The engine speed has been factory set. Do not attempt to increase engine speed as it may result in personal injury.
3 POSITIONHANDLES When setting up your handlefrom the storage position,the lower handlewill require manuallylocking into the mowingposition. 3 POSITION"EURO" Handle adjustment bracket Knob • Start the engine and let it run until the fuel lines and carburetor are empty. • Never use engine or carburetor cleaner products in the fuel tank or permanent damage may occur. • Use fresh fuel next season.
TROUBLESHOOTING to an authorized PROBLEM Does not start - See appropriate Service section in manual unless directed Center. CAUSE CORRECTION 1. Dirty air filter. 2. Out of fuel. 3. Stale fuel. 1. 2. 3. Clean/replace air filter. Fill fuel tank. Drain fuel tank and refill tank 4. Water in fuel. 4. with fresh, clean gasoline. Drain fuel tank and refill tank 5. Spark plug wire is disconnected. 5. with fresh, clean gasoline. Connect wire to plug. 6. 7. Bad spark plug. Loose blade or broken 6.
TROUBLESHOOTING - See appropriate to an authorized Service Center. PROBLEM CAUSE Poor cut uneven Excessive vibration CORRECTION 1. Worn, bent or loose 2. Wheel heights 3. Buildup of grass, leaves and trash under mower. 1. Worn, 2. Starter rope hard to pull section in manual unless directed blade. uneven. bent or loose Bent engine blade. crankshaft. 1. Engine flywheel brake is on when control bar is released. 2. Bent engine crankshaft. 3. 4. Blade adapter broken.