Owner's Manual I CRRFTSMRN'I SPRAY GUN HLVP High Volume Low Pressure Model No. 919.155190 • Safety Guidelines • Operation • Maintenance = Storage = Repair CAUTION: Parts Read the Safety Guidelines and A+i Instructions Operating. Sears, D29783 _ev_ Carefully Before Roebuck and Co., Hoffman Estates, IL 60179 U.S.A. visit our Craftsman website: www.sears.
Warranty ..................... 2 Safety Guidelines - Definitions .... 2 Important Safety Instructions .... 3-4 Specifications ................. 4 Assembly ................... 5-7 Operation .................. 8-t0 Maintenance ................. 11 Troubleshooting ............ 12-13 Parts List .................... 14 Spanish .................. 15-27 How to Order Repair Parts ........ .....................
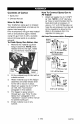
= SAVE THESE INSTRUCTIONS = _ IMPROPER OPERATION OR MAINTENANCE OF THIS PRODUCT COULD RESULT IN SERIOUS INJURY AND PROPERTY DAMAGE, READ AND UNDERSTAND ALL WARNINGS AND OPERATING INSTRUCTIONS BEFORE USI NG THIS EQUIPMENT° _The Following Hazards Can Occur During The Normal Use Of This Product: HAZARD Risk of explosion or fire - flammable materials WHAT COULD HAPPEN HAZARD Risk of explosion - incompatible materials WHAT COULD HAPPEN HOW TO PREVENT IT Read the label or data sheet for the material yo
HAZARD Risk of injection WHAT COULD HAPPEN Minimum Maximum HOW TO PREVENT tT Gun Inlet Pressure Gun Inlet Pressure 20 PSt 45 PSI Air Connection Fluid Connection Paint Canister Standard Standard Needle Stainless 1 Qt- Aluminum Mouth Canister Type Feed Type Bleed Type Air compressor Wide Steel Siphon* Non-bleeder Requirements 8.6 SCFM@4O * This spray gun can easily be converted with a paint tank (sold separately) large projects.
!:_..'_.:,] =liv_ 1=]li'il Contents of Carton 1- Spray Gun 1- Owners Manuat How to Set Up Your Craftsman spray gun is shipped completely assembled, and set-up for siphon feed spraying. Prior to shipment, this gun was treated with an anticorrosive agent. Before using this gun flush it with a suitable solvent (mineral sprits is a suitabte solvent). To Flush Spray Gun Before Use 1. Removethe matehat cup from lid/gun assembly. NOTE: Slide release lever to the right, rotate lid, and remove material cup.
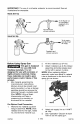
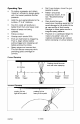
IMPORTANT: The use of a oiVwater extractor is recommended. illustrations for exampIas. See set Basic Set Up Air Inlet _! _ _ R?corameeded _ir con_prsssor equipped with regulator TO Air Supply- ar_ r Ideal Set Up TO air s_lpply hard plumbed air suppFy Before Using Spray Gun This gun is designed for use with most finishing materials. It is not designed for use with corrosive or highly abrasive materials. Using these materials can lead to poor performance and/or failure of this product. 1.
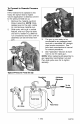
To Convert Feed to Remote Pressure If the material to be sprayed is too heavy for siphon feed or higher volume appIication is desired, convert to the pressure feed set up, 1. Remove the material cup from lid/gun assembly. NOTE: Stide release lever to the right, rotate lid, and remove material cup. 2. Siide yoke, with buiit in socket feature, over nut. Grip the yoke and turn to loosen nut, after the nut is loosened hand turn untit tid assembly can be removed from gun. 3.
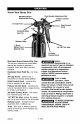
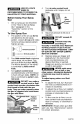
Know Your Spray Gun Fluid Needle Adjustment Machined Brass Nut Pattern Control Air Car __ Fluid Control Knob Hardened Steel Fluid Tip Release Lever 1- Quart Siphon Feed Material Cup 1/4" NPT Air Inlet Air Valve Control Knob Machined Brass External Mix Cap The air and material are mixed after leaving the nozzle to provide a superior finish with thick and thin material Hardened Steel Fluid Tip - for long life.
4. F_q_,_ USE OF A FACE MASK IS RECOMMENDED TO PREVENT INHALATION OF TOXIC MATERIAL. Before Gun 1. Air Valve Using Your Spray Set up spray gun as described in the "How to Set Up Spray Gun" paragraph in the "AssembIy" section of this manual. 5. To Use Spray Gun 1. Turn air valve control knob clockwise until it stops, do not force. The position of the air cap horns wilt determine the fan spray pattern. Loosen air cap and rotate horns to achieve desired pattern. Tighten air cap.
Don't are strokes, move the gun paraiieI to work. Pattern should be shaped as shown, if not see "Troubleshooting" section. Care should be exercised when handling spray gun to avoid damage to the orifice of the air cap and tip of fluid nozzle. Damage to these parts results in irregular spray patterns. Practice on a cardboard target to make sure pattern size and material consistency are correct before spraying on actual project.
DO NOT ATTEMPT TO UNCLOG (BACK FLUSH) SPRAY GUN BY SQUEEZING TRIGGER WHILE HOLDING FINGER IN FRONT OF FLUID NOZZLE. Always exercise extreme care when using any solvent or thinner. Never clean gun near fire, flame, or any source of heat or sparks. Properly dispose of used cleaning materials. DO NOT soak entire spray gun in solvent or thinner for a long period of time as this will destroy lubricants and possibly make motion uneven. NEV+ ER use lye or caustic alkaline solu+ tion for cleaning.
NOTICE: See parts fist to identify parts referred to inthese Troubleshooting steps. PROBLEM 4envy right or left side 3attarn • ) t •" _ 4envy top or bottom 3attarn ii CAUSE 1, Dried material is clogging side- port _ side-port and spray "B" to"Ablow causing CORRECTION A 1. Soak side-ports in thinner to alean alog, DO NOT poke any j (_ towards the clogged side. opening with hard objects. B 1, Dried material at fluid nozzte "C restricts air flow. 2, Loose air nozzle. c / / /_--'_ 1.
PROBLEM Unatomized or spattered spray CAUSE CORRECTION 1. Material too heavy. 1. Thin material 2. Insufficient air pressure. 2, Turn pattern control knob counter clockwise to increase air pressure. Turn air valve control knob counter clockwise to increase air pressure. 3. Fluid pressure too high. 3. Turn fluid control knob clockwise to decrease fluid flow. If using in remote pressure feed mode decrease fluid pressure at paint tank. 4. Dried material on tip of fluid nozzle or air jets of air cap.
I ",?-'_ :J t_ B_..Sii Spray Gun Model Number 919.155190 11 2 1 3 13 12 14 5 15 20 21 17 35 15 18 _7 25 KEY NO.
Garantfa ......................... Defi_iciones de normas de seguridad 15 .... 15 lnstruooiones importantesde seguridad ..................... Especificaciones .................. 16-17 17 Ensam blaje 18-20 ................... Operacibn .................... Mantenimiento ................... 21 _23 24 DiagnSstico de probiemas .......... Lista de partes ................... Come solicitar repuestos ....
I 11t.____ililit Ill 11ict II_1]I,] ;it:l _i i tC_lilt_ll ;] rn.,_,] • CONSERVE ESTAS INSTRUCCIONES • LA OPERACION INAPROPIADA DE ESTA UNIDAD PUEDE CAUSAR _ LESIONES SERIAS Y DAI_OS A LA PROPIEDAD. LEER Y ENTENDER TODAS LAS ADVERTENCIAS DE SEGURIDAD E INSTRUCCIONES DE OPERACI(_N : ANTES DE USAR ESTA UNIDAD.
Riesgo de lnye_cibRn IESGO _,_ Presi6n minima a la entrada de la pistoia 20 PSI Presi6n mc_bximaa ta entrada de ta pistola Conexi6n de aire 45 PSI Conexi6n de liquldos Estandar 3/8 NPS Contenedor Est_dar de pintura 1/4 NPS 946mt, de aluminio con boca ancha Tipo de aguja Acero inoxidabfe Tipo de alimentaeion Sif6n* Tipo de purga Requisitos deI compresor NO se purga 8.
1:4__;'1__I iV_l =1Ilr:!!]_ Contenido de la caja 1- Pistela pulverizadera 1- Manuiat del propietario C6mo armar La pistola puiverizadora Craftsman se despanha eompletamente ensambtada y preparada para putverizar atiment&ndose per sif6n. Esta pistota fue tratada con un antieorrosivo antes de su despaeho, per Io que antes de usarse debe lavarse intemamente con un solvente apropiado (destilado mineral). Pata lavar intemamente de su use Come conectar la pistola pulverizadora al suministro de airs 1.
tMPORTANTE: itustraciones, Configuracibn Se recomienda usar un extractor de _ceitei_gua. Ver los ejemplos en las bdsica B_trad_ de aire surainist_ode aire (Un corap_esor equipado con ui_ regulador) Extractor de aceite!_gLia Configuracibn ideal A la linea de surninist[o de aire (concalda fuerte de pre_i6_! Regulador y extractor de aceite!agLia Antes de usar la pistola pulverizadora 3.
Para convertir a alimentaci6n remota a presi6n Si el material a pulverizarse fuese muy pesado para atimantaei6n per sif6n o se desea apticar una mayor cantidad de vo}umen: 1. 2. Desmontar el contenedor de la pistol& NOTA= Deslizar ta palanea a la derecha, tatar la tapa en ta pistoia y desprender ef contenedor, DeslJzar el yugo con el adaptador incorporado sabre la tuerea. Agarrar et yugo y girarlo para aftoiar la tuerca y gJrar a mane basra queet conjunto de ta tapa pueda sacarse de la pistota, 3. 4.
Familiarizaci6n con la pistola pulverizadora Tapa mezcladora exterior de latbn maquinado Tueroa reguladora de Perina de control de Aletas de la tapa de airo (Abanico) .Perilla de control del flujo Boquilla de liquido de acero endurecido Palanca de seguro Contenedor de material de 946ml. (1/4 de Gal.} con de alimentacibn por sribn Tapa mezcladora exterior de latbn maquinado. Et aire y el material se mezdan despu6s de satir pot la boquilta para proveer un acabado superior con material grueso o fino.
4. MASCARA PROTECTORA PARA EVlTAR INHALAR MATERIALES TOXICOS, Antes de usar la pistola pulverizadora 1. 1. Pcrilla de control de Arrnarl8 orno se indica en el p_rafo "Armado de I_ pistola pulverizadara" en la secci6n "Enssmblaje", Para usar la pistola Girar la peritla de ta vAivula de aire en et sefltido del retoj hasta que se detenga, no forzarla.
Consejos prbcticos: No arquear }aspasadas, mover {a pistola en forma paraiela a {a superfisie de trabajo durante toda ta pasada. Et patron de pu{verizado normalmente debe tenet ta {orma mostrada; de 1o contrario vet la secci6n "Diagn6stiso de Problemas". Para svitar pulverizar _ sxceso y tograr el m&ximo de eficiencia, siempre puiverizar con ta combinaci6n de presi6n de pintura y airs m&s baja posib{e.
hV_lr.'_l_ Ji:i_l ILvJI1 :l_i I[_] _NO INTENTAR LA DESATORAR PISTOLA APRETANDO EL GATILLO Y TAPANDO LA BOQUlLLA CON EL DFDO. cuando se usen solventes o diluyentes. Nunca lirnpiar o lavar la pistola eerea de fuego, llamas rti faentes de ealor o ehispas. Deseehar apropiadamente los materiales ueados err la limpieza o ]avado. per largo tiempo porque se destruir_ su ]ubrieacibn y posiblemente su accionamiento se vuelva irregular.
NOTA: Referirse a la lista de partes para identiticar referencia aaul CAUSA PROBLEMA Patr6n grueso en el lade izquierdo o derecho. )( Patr6n grueso arriba o abajo. Patr6n grueso en el centre. I tas plazas a tas qua se hace CORRECCION 1, Material seco 1. Sumergir los boquillas de ambos lades en so}vente limpio para desatorarlas.
PROBLEMA Material rociado no pulverizado o salpicado, CAUSA CORRECCION 1. Material demasiado pesado o espeso 2. Presi6n de aire insuficiente. 3. Presi6n de fluido demasiado alta, 4. Material seco en el orificio de la boquilia de fluido o fugas de aire per la tapa de'aire. Salida de aire inadecuada. 1. Per#In de eontroi de la vaivuta de aire pareiatmente Nebutizaei6n excesiva. cerrada. 1. Adelgazar el material. 2.
I_l]i_..
D29783 28-SP
-SP D29783
D29783 30-SP
3_-SP D29783