
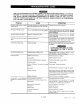
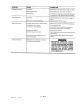
Troubleshooting guide


gVtIW-'1_
UNIT CYCLES AUTOMATICALLY WHEN POWER IS ON. WHEN DOING MAINTENANCE, YOU MAY BE
EXPOSED TO VOLTAGE SOURCES, COMPRESSED AIR OR MOVING PARTS. PERSONAL INJURIES
CAN OCCUR. BEFORE PERFORMING MAINTENANCE OR REPAIR, TURN OFF AND LOCK OUT
ELECTRIC POWER AND BLEED OFF AIR TANK PRESSURE. NEVER OPERATE THE COMPRESSOR
WITH THE BELT GUARD REMOVED.
PROBLEM
Excessive tank pressure - safety
valve pops off.
Air leaks at fittings or hose.
CAUSE
Unloader valve does not release pressure
when tank reaches "blow-off" pressure•
Tube or hose fittings are not tight enough.
CORRECTION
Unloader valve must be replaced•
Tighten fittings where air can be heard escaping.
Check fittings under soapy water solution. DO NOT
OVER-TIGHTEN.
Air leaks inside check valve, Defective or dirty check valve. Remove and clean or replace check valve. DO NOT
OVER-TIGHTEN.
Continuous air leak at unloader Defective checkvalve, Turn off engine, move unloader valve toggle lever to
valve• vertical position. If air leaks out of tank through
unloader valve, clean or replace check valve.
Air leaks at air tank welds. Defective air tank. Air tank must be replaced. Do not attempt repair of
any leaks.
Air leak from safety valve. Possible defect in safety valve•
Knocking noise, Defective check valve.
Loose pulley.
Low oil level (Compressor or engine).
Loose flywheel.
Loose compressor or engine mountin(
screws.
Loose belt.
Carbon build-up.
Stiffener bar loose,
Prolong excessive use of air.
Compressor is not large enough for air
requirement.
Compressor is not supplying
enough air to operate accesso-
ries.
Restricted air intake filter.
Loose belt.
Hole in hose.
Check valve restricted
Air leaks•
DO NOT DRILL INTO, WELD OR OTHER-
WISE MODIFY AIR TANK. IT WILL BE
WEAKENED.
Operate safety valve manually by pulling on ring. If
valve still leaks, it should be replaced.
Remove and clean or replace.
Tighten pulley set screw.
Maintain prescribed oil level• Add oil
Tighten screw•
Check bolts. Tighten as required•
Tension belt per instructions on page 12, step 5.
Remove the head and valve plate. Clean the valve
)late and the top of the piston. (Be sure carbon does
not fall into the cylinder.) Reassemble to 25-30 ft,lbs.
using new gasket and torque screws.
Check both nuts and tighten if required
Decrease amount of air usage.
Check the accessory air requirement• If it is higher
than the SCFM or pressure supplied by your air
compressor, you need a larger compressor.
Clean or replace air intake filter•
Adjust belt tension.
Check and replace•
Remove and clean or replace•
Tighten fittings• (See Air Leaks section of Trouble-
shooting Guide•)
15 - ENG
D20396 Rev 0 2/16/00