
Manual


Tools Required for Assembly
Adjustable wrench
Allen wrench
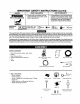
Remove Pressure Washer from Carton
• Open carton from the top. Locate and removefrom
box the handle, gun, wand, videotape, and oil.
• Cut carton along doffed lines.
• Remove all carton inserts.
• Roll unitthroughopening incarton.
NOTE: The hose is located at the bottom of the box.
Preparing the Pressure Washer for First Use
Note: Included with your pressure washer is a video
cassette tape on how to prepare your unitfor
operation. It is recommended you view this tape
before performing the nextsteps.
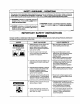
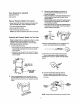
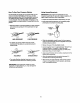
1. Insert handle onto frame.
• Insert knobs into the threaded slot in front of the
frame handle and tighten by turning in a clock-
wise direction.
• Slide bolts into the slot in the side of the frame
handle and tighten the nut by turning in a clock-
wise direction.
Insert bolt and
tighten lock nut,
Tighten knob in
_.___ clockwise
direction.
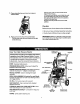
2. Usingan adjustable wrench, remove nut from
bolt that attaches board to frame. Removewood
plank from the frame of the unit. Discard bolt and
board.
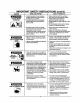
, Mountthe rubber isolator to the frame. To
mount isolatorplace threaded end of bolt
throughthe washer.
• Next with washeron bolt place threaded end of
bolt throughthe largerhole in bottom of the
rubberisolator.
• Place threadedportionof bolt throughthe same
hole locationthe wood plank was mounted to
onthe pressurewasher.
• Next place the tee nutoverthe threaded portion
of the bolt and usethe allen wrench provided to
tightenisolatorto the frame.
TEENtrr
r[ ]
PRESSURE _ -- EOL4TOR
WASHER
FRAME
W/i_HER -_. BOLT
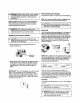
4, Connect wand extensionto gun.Totighten, turn
knob inclockwise direction. Hand tighten.
5. Remove tie wrap off of high pressure hose,
Unwind high pressure hose and attach the
threaded end to the gun.Tighten with adjustable
wrench.
6. Connect high pressure hose to outlet on
pressure washer and hand tighten firmly.
Connect chemical pickup hoseto hosebarb
onpump.
CHEMICAL--
HOSE
HIGH
PRESSURE
HOSE
NOTE: Always keep hose away from engine muffler.
6