Operator's Manual II:RRFTSMRN I 10 mm (3/8 in.) 12 VOLT CORDLESS DRILL-DRIVER Variable Speed / Reversible Stock No. 9_22540 Model No. 973.225400 Save this manual for future reference CAUTION: Read and follow all Safety Rules and Operating Instructions before first use of this product. Customer • Safety • Features Help Line: 1-877-369-8665 Sold by: Sears Canada Inc., Toronto M5B Visit the Craftsman web page: www.sears.
Warranty ......................................................................................................................................................................... 2 • Introduction ..................................................................................................................................................................... 3 • General Safety Rules, Specific Safety Rules ................................................................................................
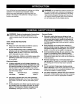
Your drill-driver has many features for making your drilling operations more pleasant and enjoyable. Safety, performance and dependability have been given top priority in the design of this drill-driver making it easy to maintain and operate. ,_ WARNING: Read and understand all instructions. Failure to follow all instructionslisted below, may result in electric shock, fire and/or serious personal injury.
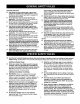
Tool Use and Care • • • • • • • • • Use clamps or other practical way to secure and support the workpiece to a stable platform. Holding the work by hand or against your body is unstable and may lead to loss of control. Do not force tool. Use the correct tool for your application. The correct tool will do the job beMer and safer at the rate for which it is designed. DO not use tool if switch does not turn it on or off.
• That wire size is large enough for AC ampere rating of charger as specified below: _IWARNING: Never use a battery that has been dropped or received a sharp blow, A damaged battery is subject to explosion. Properly dispose of a dropped battery immediately. Failure to heed this warning can result in serious personal injury. Before using battery charger, read all instructions and cautionary markings in this manual, on battery charger, and product using battery charger.
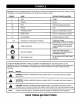
Important: Some of the following symbols may be used on your tool. Please study them and learn their meaning. interpretation of these symbols will allow you to operate the tool better and safer. SYMBOL Proper NAME DESIGNATION/EXPLANATION V Volts Voltage A Amperes Current Hz Hertz Frequency (cycles per second) min Minutes Time Alternating Current Type or a characteristic of current Direct Current Type or a characteristic of current no No Load Speed Rotational speed, at no load ...
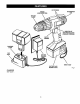
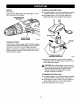
Chuck Motor 10mm (3/8 in.) Keyless DC 12 Volt Gear Train One Speed Switch No Load Speed Variable Speed O-600/min. BATTERY 130139012 PACK KNOW YOUR DRILL-DRIVER See Figure 1. Before attempting to use your drill-driver, familiarize yourself with all operating features and safety requirements. KEYLESS CHUCK Your drill-driverhas a keyless chuckthat allowsyou to hand tightenor release drillbit in the chuck jaws. SWITCH To turn your drill-driver ON, depress the switch trigger.
BIT STORAGE TORQUE ADJUSTMENT RING SCREWDRIVER BITS KEYLESS CHUCK DIRECTION OF ROTATIONSELECTOR (FORWARD / REVERSE) CHARGING STAND RED_ LIGHT WRIST STRAP BATI'ERYPACK SHOWNINTOOL CHARGER SeeFigurel. Fig.
,_ WARNING: Do not allow familiarity with your drilldriver to make you careless, Remember that a careless fraction of a second is sufficient to inflict severe injury, CHARGING BATI'ERY See Figure 1. PACK The battery pack for this tool has been shipped in a low charge conditionto prevent possible problems. Therefore, you should charge it at least 3 to 6 hours prior to use.
SWITCH See Figure 2. TO INSTALL BA'I-rERY PACK • Lock switch trigger on your drill by placing the direction of rotation selector in center position. See Figure 4. To turn your drill ON, depress the switch trigger. To turn it OFF, release the switch trigger. • FORWARD/REVERSE SELECTOR Place battery pack in your drill. Align raised rib on battery pack with groove inside drill. See Figure 3. BATrERYPACK VARIABLE SPEED SWITCH TRIGGER Fig.
SWITCH LOCK See Figure 4. KEYLESS CHUCK See Figure 5. The switch trigger can be locked in the OFF position. This feature can be used to prevent the possibility of accLdental starting when not in use. To lock switch trigger, place the direction of rotation selector (Forward/Reverse Selector) in center position. Your drill has a keyless chuck. As the name implies, you can hand tightenor release drillbits in the chuckjaws. Grasp and hold the collarof the chuck with one hand.
INSTALLING REMOVING BITS BITS See Figure 6. See Figure 6. • Lock the switch trigger by placing the direction of rotation selector in center position. See Figure 4. • Lock the switch triggerby placing the direction of rotationselector in center position.See Figure 4. • Open or close chuck jaws to a point where the opening is slightly larger than the bit size you intend to use. Also, raise the front of your drill slightly to keep the bit from falling out of the chuck jaws.
BIT STORAGE See Figure 9. DRILLING See Figure 10. When not in use, bits providedwith your drill can be placed in the storage area located on the bottomof your drill as shown in Figure 9. SCREWDRIVER BITS BIT STORAGE AREA Fig. 9 _. WARNING: Always wear safety goggles or safety glasses with side shields when operating tools. Failure to do so could result in objects being thrown into your eyes, resulting in possibleserious injury. Fig.
CHUCK REMOVAL • insert hex key in chuck and tighten chuck jaws securely. Tap sharply with a mallet in a counterclockwise direction. This will loosen chuck on the spindle. It can now be unscrewed by hand. See Figure 13. See Figures 11, 12, and 13. The chuck must be removed in order to use some accessories. To remove: • Lock the switch trigger by placingthe direction of rotation selector in center position.See Figure 4. • Inserta 5/16 in.
,_ Do not abuse power tools. Abusive practices can damage tool as well as workpiece. WARNING: When servicing, use only identical Craftsman replacement parts. Use of any other part may create a hazard or cause productdamage. Only the parts shown on parts list, page 17, are intended to be repaired or replaced by the customer. All other parts should be replaced at a Sears Service Center. Avoid using solvents when cleaning plastic parts.
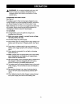
CRAFTSMAN 10mm(3/8in.),12VOLTCORDLESS DRILL-DRIVER - MODELNO.973.225400 I inallcorrespondence regarding your10mm(3/8in.),12VOLTCORDLESS DRILL-DRIVER orwhenordering I Themodel willbefoundonaplateattached tothemotorhousing. Alwaysmention themodelnumberI repair parts.number SEE BACK PAGE FOR PARTS ORDERING INSTRUCTIONS 2 4 \ 3 \ PARTS LIST Key No. Part Number Description 1 660120002 Screw (Special) ...................................................................... 1 2 690033001 Chuck ....
Operator's Manual STOCK NO. 9 22540 MODEL NO. 973.225400 Sears service is available at or through your Sears Retail Store or Catalogue Sales Office, How to order repair parts SERVICE AND REPAIR PARTS CALL 1-800-665-4455 * | Keep this number handy should you require a service call or need to order repair pads, If ordering parts, make sure you have the name, make and model no, of the merchandise and the name and number of the part you wish to order, When orderingrepair parts always give: 1.