Instruction Manual 46cc/2.8 cu.in. 2-Cycle GASOLINE CHAIN SAW Model No. 0944.414460 • Safety • • • Assembly Operation Maintenance • Parts List - 18 in. Bar Read and follow all Safety Rules and Operating WARNING: Instructions before first use of this product. Sears Canada, 530164939 3/12/04 Inc.
Warranty Statement Identification of Symbols Safety Rules Assembly Operation Maintenance 2 2 3 7 7 14 Service and Adjustments 17 Storage 19 Troubleshooting Table 20 Emissions Statement 22 Parts List Center Section Parts & Ordering Back Cover LIMITED ONE (1) GAS CHAIN SAW For one (1) year from the date of purchase Sears Canada, Inc., will repair or replace free of charge at Sears option parts which are defective as a result of materials or workmanship.
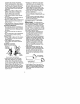
• Do not start cutting until you have a clear work area, secure footing, and especially if you are felling a tree, a retreat path. OPERATE YOUR SAW SAFELY • Do not operate with one hand. Serious injury to the operator, helpers, or bystanders may result from onehanded operation. A chain saw is intended for two-handed use. • Operate the chain saw only in a wellventilated outdoor area. • Do not operate saw from a ladder or in a tree.
• Keep unitsharp andclean forbetter 41_WARNING: zt _ Avoid kickback which andsaferperformance. • Follow instructions forlubricating and can result in serious injury. Kickback is the backward, upward or sudden forchanging accessories. • Check fordamaged parts.
increase thechance ofkickback, • Position your left hand on the front Follow manufacturer's chain sharp- handlebar so it is in a straight line ening andmaintenance instructions, with your right hand on the rear hanCheck tension atregular intervals, dle when making bucking cuts. butnever withengine running. Make Stand slightly to the left side of the surechainbrake nutsaresecurely saw to keep your body from being in tightened. a direct line with the cutting chain.
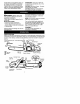
Low-Kickback Chain Contoured Depth Gauge Deflects Kickback Force And Allows _._ longated Guard Link Wood To Gradually Ride Into Cutter CHAIN BRAKE & CKA ANGLE • Chain Brake: designed to stop the chain in the event of kickback. _WARNING: WE DO NOT REP_ RESENT AND YOU SHOULD NOT ASSUME THAT THE CHAIN BRAKE WILL PROTECT YOU IN THE EVENT OF A KICKBACK. Kickback is a lighting fast action which throws the bar and rotating chain back and up toward the operator.
locale where suchregulations exist, you STANDARDS: This saw is listed by arelegally responsible formaintaining Underwriter's Laboratories, Inc., in actheoperating condition ofthese parts. cordance with: Failure todosoisaviolation ofthelaw. CSA Z62.1-03 Chain Saws - OccupaRefer toCUSTOMER RESPONSiBILiTIES Health and Safety TABLE intheMAINTENANCE section. tional CSA Z62.
ON/STOP SWITCH The ON/STOP SWITCH is used to stop the engine. THROTTLE TRIGGER The THROTTLE TRIGGER controls gine speed. CHAIN BRAKE The CHAIN BRAKE is a device designed to stop the chain if kickback occurs. The chain brake activates automatically in the event of kickback. The chain brake activates manually if the front hand guard is pushed forward. The chain brake is disengaged by pulling the front hand guard back toward the front handle as far as possible.
Never useengine orcarburetor clean- NOTE: DO NOT cut material with the erproducts inthefueltankorperma- choke/fast idle lever at the FULL nentdamage mayoccur. CHOKE position. SeetheSTORAGE section foraddition- STARTING A COLD ENGINE (or a alinformation.
Starting could require many pullsdepending onhowbadlytheunitis flooded. Ifengine stillfailstostart,refer totheTROUBLESHOOTING TABLE or contact yourSears Service Centre. CHAIN BRAKE _WARNING: If the brake band is worn too thin it may break when the chain brake is triggered. With a broken brake band, the chain brake will not stop the chain. The chain brake must be replaced if any par[ is worn to less than 0.020 inch (0.5 mm) thick.
• The chain saw operator should keep on the uphill side of the terrain as the tree is likely to roll or slide downhill after it is felled. • Study the natural conditions that can cause the tree to fall in a particular direction. These conditions include: • The wind direction and speed. • The lean of the tree. The lean of a tree might not be apparent due to uneven or sloping terrain. Use a plumb or level to determine the direction of tree lean. • Weight and branches on one side.
IMPORTANT POINTS • Cut only one log at a time. • Cut shattered wood very carefully; sharp pieces of wood could be flung toward operator. • Use a sawhorse to cut small logs. Never allow another person to hold the log while cutting and never hold the log with your leg or foot. • Do not cut in an area where logs, limbs, and roots are tangled. Drag logs into a clear area before cutting hem.
LIMBING AND PRUNING WARNING: Be alert for and guard against kickback. Do not allow the moving chain to contact any other branches or objects at the nose of the guide bar when limbing or pruning. Allowing such contact can result in serious _njury. _WARNING: Never climb into a tree to limb or prune. Do not stand on ladders, platforms, a log, or in any position which can cause you to lose your balance or control of the saw. IMPORTANT POINTS • Watch out for springpotes.
CUSTOMER RESPONSIBILITIES ,_WARNING: Disconnect the spark plug before performing except for carburetor adjustments. Fill in dates as you complete regular service Check for damaged/worn Befon Use After Use Ever 5 hrs maintenance Every 25 hrs.
1. Use the screwdriver end of the chain adjustment tool (bar tool) to move chain around guide bar to ensure kinks do not exist. The chain should rotate freely. Guide , _r_k'_ Nuts 2. 3. am Adjustment _ Chain AodJo_Stm Adjusting (Bar Tool) Screw Loosen chain brake nuts until they are finger tight against the chain brake. Turn adjusting screw clockwise until chain solidly contacts bottom of guide bar rail. _L__Adjusting screw Chain Brake Nuts 4. 5.
LUBRICATION Bar Oil _Fill_Cap • See GUIDE BAR AND CHAIN OIL under the OPERATION section. INSPECT AND CLEAN UNIT AND DECALS • After each use, inspect complete unit for loose or damaged parts. Clean the unit and decals using a damp cloth with a mild detergent. • Wipe off unit with a clean dry cloth.
Exhaust Outl_ ttetCover Exhaust Outlets must face chain brake (bar side) ofchain saw 9. Inspect themuffler gasket andreplaceifdamaged. ket andmuffler usingm uffler bolts, 1O. Reinstall backplates, muffler gasTighten until secure. 11.Reinstall boltcover andIocknut. 12. the plug boot. 13.R Reinstall einstall thespark cylinder cover and3 screws. REPLACE SPARK PLUG The spark plug should be replaced each year to ensure the engine starts easier and runs better. Ignition timing is fixed and nonadjustable. 1.
Inside view of /# C_ain Brake Chain Brake [q_ _f_ I_ Adjustment located on Chain Brake 5. Turn adjusting screw by hand counterclockwise until adjusting pin just touches the stop. 6. Slide guide bar behind clutch drum until guide bar stops against clutch drum sprocket. 7. Carefully remove new chain from package.
£A _ aWARNING: Perform the following steps after each use: • Allow the engine to cool, and secure the unit before storing or transpor_ng. • Store chain saw and fuel in a well ventilated area where fuel vapors cannot reach sparks or open flames from water heaters, electric motors or switches, furnaces, etc. • Store chain saw with all guards in place and position chain saw so that any sharp object cannot accidentally cause injury. • Store chain saw well out of the reach of children.
TROUBLESHOOTING _j. TABLE WARNING: Always stop unit and disconnect spark plug before performing all of the recommended remedies below except remedies that require operation TROUBLE Engine will not start or will run only a few seconds after starting. of the unit. REMEDY CAUSE f. ON/STOP switch STOP position. 2. Engine flooded. in 3. Fuel tank empty. 4. Spark plug not firing. 5. Fuel not reaching carburetor. 6. Carburetor requires adjustment. 7. None of the above. Engine will not idle properly.
TROUBLESHOOTING TABLE - Continued TROUBLE Oi_ inadequate for bar and chain lubrication. CAUSE 1. Oil tank empty. 2. Oil pump or oil filter clogged. 3. Guide bar oil hole blocked. REMEDY 1. Fill oil tank. 2. Contact Sears Service (see back cover). Chain moves at idle speed, 1. Idle speed requires adjustment. 2. Clutch requires repair. 1. See"CarburetorAdjustment" in the Service and Adjustments Section. 2. Contact Sears Service (see back cover). Chain does not move when engine is acceler* ated. 1.
YOUR WARRANTY RIGHTS AND OBLIGATIONS: The U. S. Environmental Protection Agency/Environment Canada and Sears Canada, Inc., are pleased to explain the emissions the emissions control system warranty on your year 2002-2004 small off-road engine. Sears Canada must warrant the emission control system on your small off-roed engine for the periods of time listed below provided there has been no abuse, neglect, or improper maintenance of your small off-roed engine.
beprovided atallSears Canada service the part is under warranty. EMISSION centres. Call1-800-4694663. MAINTE-CONTROL WARRANTY PARTS LIST: NANCE, REPLACEMENT AND RECarburetor, Ignition System: Spark Plug PAIR OF EMISSION RELATED PARTS: Any Sears Canada approved replacement part used in the performance of any warranty maintenance or repair on emission related parts will be provided without cha_e to the owner if (covered up to maintenance schedule), Ignition Module.