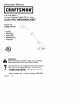
Instruction Manual I CRRFTSlVlRN°I 4.6 Amp Motor 15 Inch Cutting Path/0.065 In. Line ELECTRIC WEEDWACKER ® Model No. C944.511110 • Safety • Assembly • Operation • Maintenance • Franqais 0® WARNING: Read and follow all Safety Rules and Operating Instructions before first use of this product. For answers to your questions about this product: Call 7 am-7 pm, Mon-Sat; Sun, 10 am-7 pm 1-800-235-5878 Sears Canada, 530086234 1/9/03 {.o._ Inc.
Warranty Statement Safety Rules Assembly Operation Maintenance Service & Adjustments 2 2 5 6 8 9 Parts Available Storage Troubleshooting 9 10 10 Table French Parts Ordering 11 Back Cover TWO (2) YEAR LIMITED WARRANTY ON CRAFTSMAN ELECTRIC WEEDWACKER ® LINE TRIMMER For two (2) years from the date of purchase, Sears Canada, Inc,, will repair or replace free of charge, at Sears option, parts which are defective as a result of material or workmanship, COMMERCIAL OR RENTAL USE: Warranty is void if the ele
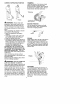
OPERATOR SAFETY • Dress properly. Always wear safety glasses or similar eye protection when operating, or performing maintenance on your unit. (Safety _alaSses are available.) Always wear ce or dust mask if operation is dusty. Always wear heavy, long pants, long sleeves, boots, and gloves. Do not go barefoot or wear sandals. • Secure hair above shoulder length. Secure or remove loose clothing and jewelry or clothing with loosely hanging ties, straps, tassels, etc. They can be caught in moving parts.
TRANSPORTING AND STORAGE • Stop the unit and disconnect the power source when not in use. • Carry the unit with motor stopped. • Store the unit so the line limiter blade (on underside of shield) cannot cause injury. • Store unit indoors in a high, dry place out of the reach of children. Store unit unplugged. • Do not hang unit so that the trigger switch is depressed. DOUBLE INSULATION CONSTRUCTION This unit is double insulated to help protect against electric shock.
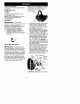
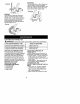
CARTON CONTENTS Check carton contents against the fol* 1owing list. Model C944.511110 • Trimmer • Shield Examine parts for damage. Do not use damaged parts. NOTE: If you need assistance or find parts missing or damaged, call 1-800-235-5878. ASSEMBLY NOTE: Edge guide must be positioned on shield prior to installation on motor housing (see following illustration). Edge C Shield _WARNING: If received assembled, review all assembly steps to ensure your unit is properly assembled and all fasteners are secure.
KNOW YOUR TRIMMER READ THiS INSTRUCTION MANUAL AND SAFETY RULES BEFORE OPERATING YOUR UNI]_ Compare the illustrations with your unit to familiarize yourself with the location of the various controls and adjustments, Save this manual for future reference, Trigger Switch i_L_- Assist Handle _...f Twist and Edge Button Cord Retainer i_ Motor Housing Recessed / Plug Air Vents _._ Edge Guide / Debris Shield_'_ _ Line Limiter Blade Trimmer Head with 0.
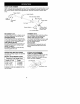
CORRECT OPERATING Trimming POSITION TRIMMING Hold the bottom of the trimmer head about 3 inches (8 cm) above the ground and at an angle. Allow only the tip of the line to make contact. Do not force trimmer line into work area. Edging above ground WARNING: Always wear eye protection. Never lean over the trimmer head. Rocks or debris can ricochet or be thrown into eyes and face and cause blindness or other serious injury.
SWEEPING The fanning action of the rotating line can be used for a quick and easy clean up. Keep the line parallel to and above the surfaces being swept and move the tool from side to side. Scalping Sweeping MOWING Your trimmer is ideal for mowing in places conventional lawn mowers cannot reach. In the mowing position, keep the line parallel to the ground. Avoid pressing the head into the ground as this can scalp the ground and damage the tool. .
REPLACING THE LINE Pre-wound spools offer the most convenient method for replacing line and ensuring optimum performance. * Replacement spools are colorcoded to ensure use of the correct spool with your unit. Be sure to use the same color spool as the existing spool. NOTE: Always clear dirt and debris from cutting head components when performing any type of maintenance. * Hold spool and unscrew cap by turning in the direction shown on top of the cap. * Remove line guide ring and spool.
_WARNIN6: Perform thefollowingstepsafter each use. * Stop the unit and disconnect the power source when not in use. * Carry the unit with motor stopped. * Store the unit so the line limiter blade cannot cause injury. TROUBLESHOOTING • Store unit and extension cord indoors in a high, dry place out of the reach of children. Store unit unplugged. • Store unit with all guards in place. Position unit so that any sharp object cannot accidentally cause injury.
Garantie Reglages de securit6 Montage Fonctionnement Entretien 11 11 14 15 18 Service et Ajustements Liste de pieces Rangement Tableau de depannage Pieces et commandes 18 19 19 20 Pagearriere GARANTIE LIMITEE DE DEUX (2) ANS SUR LE COUPE-HERBE CRAFTSMAN ® _:LECTRIQUE Durant une periode de deux (2) ans _ compter de la date d'achat, Sears Canada Inc,, _ sa discretion, reparera ou remplacera gratuitement les pieces qui sont defectueuses, suite _ route defectuosit6 de materiaux ou de fabrication, UTiLISATIO
protection dejambes.Tenirlecorps que, n'utilisez jamais votre appareil dans des endroits mouilles ou hu61oign6 dufil quitourne. Lunettes deprotection ouautre protectior mides, ou _ proximit6 de piscines, de similaire desyeux baignoires, etc. N'utilisez jamais votre appareil sous la pluie, dans la neige ou dans reau. • N'utilisez qu'une source de courant du voltage indiqu6 sur la plaque d'identification de rappareiL • Evitez les situations dangereuses.
• N'utilisez jamais de ranonge multiple. • Ne transportez jamais I'appareil en le prenant par le fil 6lectrique. Ne tirez jamais sur le fil pour le debrancher. • Pour 6viter que le fil se debranche de ]'appareil et pour eviter des dommages possibles _ I'appareil due au mouvement de prise, servez-vous du retenue de corde. Voir POUR FIXER LA RALLONGEA VOTRE COUPEHERBE dans la section FONCTIONNEMENT. • N'utilisez pas I'appareil si I'interrupteur ne le met pas en route/ne I'arrete pas bien.
CONSTRUCTION DOUBLE ISOLATION Cette appareil est doublement isolL_e pour 6viter les d6charges 6]ectriques. La construction de la double isolation consiste en deux "couches" s6par6es d'isolation 61ectrique _ la place de la raise _ la terre. Les appareils construits avec ce syst6me d'isolation ne doivent pas etre mis ]a terre. Aucun moyen de raise _ la terre n'est fourni sur cot appareil et vous ne devez pas non plus en ajouter.
2, Mettez leprotecteur versleboftier demoteur,Assurez-vous letete de coupe passe par le trou dans le protecteur sans s'accrocher au tabulateurs de verrouillage du protecteur, 3. Tournez I'avant du protecteur vers ]a fente avant du bottler de moteur. Poussez le tabulateur de verrouil]age sur le devant du protecteur dane la fente avant du boitier de moteur. Un claquement audible dolt _tre entendue.
INSTRUCTIONS DE FONCTIONNEMENT Utilisez uniquement la tension d'alimentation sp6cifi6e sur rappareil. RALLONGE F:LECTRIQUE Calibre de rallonge Longueur de rallonge 25 pieds (7.5 m) 50 pieds (15 m) 100 pieds (30 m) Calibre 18 Calibre 16 Calibre 16 Calibre Des rallonges pour cet appareil sont disponibles de Sears.. POUR FIXER LA RALLONGE AU COUPE-HERBE Faites passer la rallonge _ travers la poign6e et autour du retenue de corde.
Bouton COUPE BORDURES Quand vous coupe des bordures, permettez au bout du fll d'entrer en contact avec I'herbe. Ne forcez pas le ill. Le guide de bordure aide _ prot6ger I'appareil en I'emp6chant de toucher le sol. Faites particulierement attention en couper les bordures parce que des objects peuvent etre projet6s par le fil de coupe. jJ FAUCHAGE Votre coupe-herbe est ideal pour la fauchage d'herbe dans les endroits que les tondeuses traditionnelles ne peuvent pas atteindre.
RESPONSABILITF:S DU CLIENT AVERTISSEMENT: Avant de faire tout entretien, debranchez de la source de courant.
blessures s@ieuses. N'utilisez jamais des mat@iaux tels que du fil de fer, de la ficelle, de la corde, etc. Le fil de fer peut se casser pendant la coupe et devenir un missile dangereux qui peut occasionner des blessures graves. 1. Coupez une Iongueur de 8 metres (25 pieds) de fil rond de 1,65 mm (0.065 pouce) de diam#tre de marque Craftsman®. 3. Continuez _ faire entrer le fil dans la bobine, en laissant une Iongueur de 10 _ 15 cm (4 - 6 pouces) non enroul6s qui d6passent du centre de la bobine.
TABLEAU DE D#PANNAGE _AVERTISSEMENT: Toujours arr_tez votre appareil et d6branchez la prise de courant avant d'ex6cuter n'importe lequel des rem_des recommand6s ci-dessous autre que les remedes qui exigent fonctionnement de votre appareil, PROBL#ME CAUSE La tote de coupe s'arr0te ou ne tourne pas quand I'interrupteur est press0. 1. Fil forc0 dana le mat0riau coup0, 2. Panne 01ectrique. Le fil n'avance paa ou se brise durant la coupe, 1. Fil pas bien achemin0 dens la tote. 2.
Dear Customer, In manufacturing this product, many steps have been taken to provide you with the highest quality. Unfortunately, errors or omissions occasionally occur. In the event that you find a missing or defective part, please contact your nearest Sears store. SERVICE AND REPAIR PARTS CALL 1-800-665-4455" Keep this number handy should you require a service call or need to order repair parts. If ordering parts make sure you have the name, make and model no.