
Instruction Manual


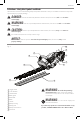


ENGLISH
8
SAVE THESE INSTRUCTIONS FOR
FUTURE USE
Intended Use
This hedge trimmer is designed for residential use.
DO NOT use under wet conditions or in presence of
flammable liquids orgases.
DO NOT let children come into contact with the tool.
Supervision is required when inexperienced operators use
thistool.
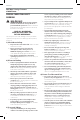
ASSEMBLY AND ADJUSTMENTS
WARNING: To reduce the risk of
serious personal injury, turn unit off and remove
the battery pack before making any adjustments
or removing/installing attachments or
accessories. An accidental start-up can causeinjury.
Assembly Tools Required
• Crosshead Screwdriver
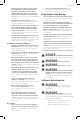
Attaching Guard and Bail Handle to
Trimmer (Fig. B, C)
WARNING: Only use with bail handle
and guard properly assembled to hedge trimmer. The
use of the hedge trimmer without the proper guard or
handle provided may result in serious personalinjury.
The trimmer is shipped with the guard and bail handle
attached to the trimmer with a plastic zip tie.
Attaching Guard to Trimmer (Fig. B)
1. Remove guard retaining screw
12
with a crosshead
screwdriver (notsupplied).
2. Slide the guard fully onto the front of the trimmer housing.
3. Insert the guard retaining screw
12
into the opening
on the side of the housing and tighten securely.
Fig.B
12
Attaching the Bail Handle (Fig. C)
1. Cut the plastic ziptie.
2. Remove the two screws
13
that are partially run into
the trimmer housing (Fig. C).
3. Slide the bail handle
5
onto the front of the trimmer
housing behind theguard.
4. Insert the two screws into the openings on the side of
the bail handle and tighten securely.
Fig.C
13
5
13
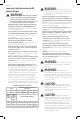
Switch (Fig. A, D)
WARNING: Never attempt to lock a
switch in the ON position.
CAUTION: Do not use blade to cut stems
greater than 3/4" (19mm). Use the trimmer only
for cutting normal shrubbery around houses and
buildings. NOTE: Powersaw can cut stems and
branches up to 1.5" (38.1 mm).
To turn the unit on, push the lock-off switch
2
forward as
shown in FigureD, and squeeze the trigger switch
1
. Once
the unit is running, you may release the lock-off switch.
In order to keep the unit running you must continue to
squeeze the trigger. To turn the unit off, fully release the
trigger and allow the lock-off switch to engage.
Fig.D
2
1