
Instruction Manual


ENGLISH
6
MAINTENANCE
WARNING: To reduce the risk of serious personal
injury, turn unit off and remove the battery pack
before making any adjustments or removing/
installing attachments or accessories. An
accidental start-up can causeinjury.
Repairs
The charger and battery pack are notserviceable. There are
no servicable parts inside the charger or battery pack.
WARNING: To assure product SAFETY and
RELIABILITY, repairs, maintenance and adjustment
(including brush inspection and replacement, when
applicable) should be performed by a CRAFTSMAN
factory service center or a CRAFTSMAN authorized
service center. Always use identical replacementparts.
OPERATION
WARNING: To reduce the risk of serious personal
injury, turn unit off and remove the battery pack
before making any adjustments or removing/
installing attachments or accessories. An
accidental start-up can causeinjury.
Switch (Fig. A)
The worklight has a high beam and low beam setting. Press
the switch
3
once for high beam, twice for low beam, and
a third time to turn the worklight off.
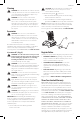
Installing and Removing the Battery Pack
(Fig. C)
NOTE: For best results, make sure your battery pack is
fullycharged.
To install the battery pack
1
into the tool handle, align the
battery pack with the rails inside the tool’s handle and slide
it into the handle until the battery pack is firmly seated in
the tool and ensure that it does notdisengage.
To remove the battery pack from the tool, press the release
button
2
and firmly pull the battery pack out of the tool
handle. Insert it into the charger as described in the charger
section of thismanual.
Carrying and Suspending the Worklight
(Fig. A, E)
CAUTION: When the worklight hangs by the belt
hook or hang hook, do not shake the worklight or the
object from which it hangs. Do not hang the worklight
from any electrical wires or anything that is not
secure. Personal injury or property damage may occur.
CAUTION: Only use the belt hook or the hang hook
for hanging the LED worklight. The belt hook and
hang hook are not intended to support additional
weight. Do not attach or hang anything additional to
the worklight or risk of breakage may occur.
CAUTION: Do not use the belt hook or hang hook to
reach with or to support your weight in any situation.
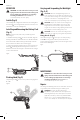
Hang Hook (Fig. E)
The built-in hang hook
5
telescopes out of the pivoting
head
6
. The hang hook locks into place in the down
position and when fully extended, as shown in FigureE. The
hook rotates 360 degrees.
Fig. E
5
6
Fig. C
1
2
Pivoting Head (Fig. D)
The pivoting head
6
rotates in nine positions ranging from
0°–140°.
Fig. D
6