
Instruction Manual


7
ENGLISH
An extended coverage guard is available (sold separately)
for extra coverage if desired. Use CRAFTSMAN replacement
guard Part NumberN640544.
Fig.B
8
5
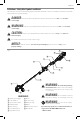
Assembling the Pole (Fig. C–E)
1. Do not remove the zip tie until the pole is assembled.
2. Ensure that the sleeve
14
on the lower trimmer
pole
6
is fully extended.
NOTE: To adjust the sleeve, release the sleeve latch
15
and
move the sleeve into position.
3. Lock the sleeve latch.
4. With the sleeve latch closed, slide the upper trimmer
pole into the sleeve lower trimmer pole. The latching
button
17
will click into position when it engages the
latch hole.
5. Tighten the top screw
18
with a crosshead screwdriver.
Fig.C
17
18
14
15
6
14
Fig.D
Fig.E
15
17
18
Adjusting the Auxiliary Handle (Fig. F)
The auxiliary handle
4
is positioned to maximize balance.
However, if adjustment is necessary, release the auxiliary
handle latch
19
. and slide the handle up or down the upper
trimmer pole until it is in the desired location. Close the
auxiliary handle latch to lock the handle inplace.
Fig.F
19
4
OPERATION
WARNING: To reduce the risk of
serious personal injury, turn unit off and
remove the battery pack before making any
adjustments or removing/installing attachments
or accessories, when replacing line, or prior to
cleaning. An accidental start-up can causeinjury.
WARNING: Always use proper eye
protection that conforms to ANSI Z87.1 (CAN/CSA
Z94.3) while operating this appliance.
CAUTION: Before you begin trimming, only
use the appropriate type of cutting line.