
Use and Care Guide


10
ENGLISH
To Check Safety Valve
WARNING: Risk of bursting. If the safety valve does not
work properly, over-pressurization may occur,
causing air tank rupture or an explosion.
WARNING: Risk from flying objects. Always wear
certified safety equipment: ANSI Z87.1 eye protection
(CAN/CSA Z94.3) with side shields.
Before starting compressor, pull the ring on the safety valve to
make sure that the safety valve operates freely. If the valve is
stuck or does not operate smoothly, it must be replaced with
the same type of valve.
To Drain Tank
WARNING: Risk of unsafe operation. Air tanks contain
high pressure air. Keep face and other body parts
away from outlet of drain. Use eye protection
[ANSIZ87.1 (CAN/CSAZ94.3)] when draining as debris
can be kicked up into face.
WARNING: Risk from noise. Always wear proper
hearing protection during use. Under some
conditions and duration of use, noise from this
product may contribute to hearing loss.
NOTE: All compressed air systems generate condensation that
accumulates in any drain point (e.g., tanks, filter, aftercoolers,
dryers). This condensate contains lubricating oil and/or
substances which may be regulated and must be disposed of in
accordance with local, state, and federal laws and regulations.
WARNING: Risk of bursting. Water will condense in the
air tank. If not drained, water will corrode and
weaken the air tank causing a risk of air tank
rupture.
NOTICE: Risk of property damage. Drain water from air tank
may contain oil and rust which can cause stains.
1. Move the Auto/Off switch to "OFF (O)".
2. Turn regulator knob counterclockwise to set the outlet
pressure to zero.
3. Pull ring on safety valve allowing air to bleed from the
tank until tank pressure is approximately 20 PSI.
Release safety valve ring.
4. Remove the air tool or accessory.
5. Place a suitable container under the drain valve
to catch discharge.
6. Drain water from air tank by opening drain valve on
bottom of tank.
7. After the water has been drained, close the
drain valve. The air compressor can now be stored.
NOTE: If drain valve is plugged, release all air pressure. The valve
can then be removed, cleaned, then reinstalled.
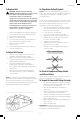
To Check Air Intake Filter
WARNING: Hot surfaces. Risk of burn. Tubes, pump
head, and surrounding parts are very hot, do not
touch (See Hot Surfaces identification (Fig. A)). Allow
compressor to cool prior to servicing.
A dirty air filter will not allow the compressor to operate at full
capacity. Keep the air filter clean at all times.
1. Ensure Auto/Off switch is in the "OFF (O)" position.
2. Allow unit to cool.
3. Unsnap the air filter cover to remove.
4. Check the filter element. If it is dirty, blow
compressed air through the filter element for 10-15
seconds or replace if needed. If the filter is filled with
paint, replace it.
5. Place element into housing and reattach the air
filter cover.
CAUTION: Risk of unsafe operation. Do not operate
without air filter.
Compressor Pump Oil
NOTICE: Risk of property damage. Use air compressor oil only.
Multi-weight automotive engine oils like 10W30 should not be
used in air compressors. They leave carbon deposits on critical
components, thus reducing performance and compressor life.
NOTE: Use full synthetic, non-detergent air compressor oil.
NOTE: Crankcase oil capacity is approximately 16 fluid ounces
(473ml).
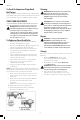
To Check
WARNING: Drain tank to release air pressure before
removing the oil fill plug or oil drain plug.
1. Remove the oil fill plug (14).
2. Remove the oil drain plug (16) and drain oil into a
suitable container.
3. Replace the oil drain plug and tighten securely
4. Slowly add compressor oil until it reaches the middle
of the sight glass (15). NOTE: When filling the
crankcase, the oil flows very slowly into the pump. If the
oil is added too quickly, it will overflow and appear to
be full.
CAUTION: Overfilling with oil will cause premature
compressor failure. Do not overfill.
5. Replace oil fill plug and tighten securely.
ENGLISH
WARNING: This unit starts automatically.
ALWAYS shut off and unplug the compressor, and
bleed all pressure from the system before
servicing the compressor, and when the
compressor is not in use. Do not use the unit with
the shrouds or belt guard removed. Serious injury
could occur from contact with moving parts. Hot
surfaces. Risk of burn. Pump head, and
surrounding parts are very hot, do not touch (see
the Hot Surfaces identified in Fig. A). Allow
compressor to cool prior to servicing.
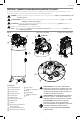
1. Move the Auto/Off switch to "OFF (O)", unplug the
unit, and relieve all air pressure from the air tank.
2. Remove the outer belt guard.
3. Mark motor position on saddle.
4. Loosen the motor mounting screws and slide the
motor toward the air compressor pump.
5. Remove the belt and replace
with a new one.
6. See the Adjusting Belt Tension before tightening
motor mounting screws.
To Adjust Belt Tension
1. Slide motor into original position, line the motor
up with the mark made earlier on saddle.
2. Tighten two outside motor mounting screws
enough to hold the motor in place for checking
pulley and flywheel alignment.
3. The belt should deflect 1/4" (6.5mm) at
midway between the pulley and the flywheel
when a 10 pound (4.5kg.) weight is applied at the
midway point.
4. When proper belt tension is achieved, tighten
motor mounting screws. Torque to 20-25 ft-lbs
(27.1-33.9 Nm)
NOTE: Once the motor pulley has been moved from its
factory set location, the grooves of the flywheel and pulley
must be aligned to within 1/16" (1.6mm) to prevent
excessive belt wear. Verify the alignment by performing the
following Motor Pulley/Flywheel - Alignment.
To Align Motor Pulley/Flywheel
NOTE: Once the motor pulley has been moved from its
factory set location, the grooves of the flywheel and pulley
must be aligned to within 1/16" (1.6 mm) to prevent
excessive belt wear.
The air compressor flywheel and motor pulley hub must be
in-line (in the same plane) within 1/16" (1.6 mm) to assure
belt retention within flywheel belt grooves. To correct
misalignment, perform the following steps:
1. Move the Auto/Off switch to "OFF (O)", unplug the
unit, and relieve all air pressure from the air tank.
2. Remove the outer belt guard.
3. Loosen the motor mounting bolts.
4. Loosen the set screws on the motor pulley.
5. Align the motor pulley with the pump flywheel.
6. Retighten the motor pulley set screws. Torque
115-125 in.-lbs (13.0 - 14.1 Nm).
7. Adjust the proper belt tension.
8. Retighten the motor mounting bolts. Torque to
20-25 ft.-lbs (27.1–33.9 Nm)
9. Reinstall the outer belt guard. All moving parts
must be guarded.
To Check Air Compressor Pump Intake
and Exhaust Valves
Once a year have a Trained Service Technician check the air
compressor pump intake and exhaust valves.
To Inspect Air Lines and Fittings for Leaks
1. Move the Auto/Off switch to "AUTO (-)" and allow
tank pressure to build. Motor will stop when tank
pressure reaches “cut-out” pressure.
2. Move the Auto/Off switch to "OFF (O)" and
unplug unit.
3. Apply a soap solution to all air-line fittings and
connections/piping to look for any leaks.
4. Pull ring on safety valve allowing air to bleed from
the tank until tank pressure is approximately 20 PSI.
Release safety valve ring.
5. Drain water from air tank by opening drain valve on
bottom of tank.
6. Correct any leaks found.
IMPORTANT: Even minor leaks can cause the air
compressor to overwork, resulting in premature
breakdown or inadequate performance.
To Replace Belt