
Instruction Manual
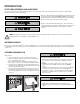
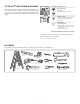
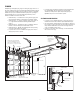
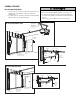

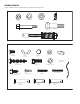
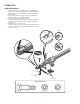
Table Of Contents
- English (United States)
- INTRODUCTION
- INSTALLATION
- ADJUSTMENT
- myQ® SMARTPHONE CONTROL
- OPERATION
- TROUBLESHOOTING
- REPAIR PARTS
- Accessories
- Warranty
- Automatic Garage Door Opener Safety & Maintenance Guide
- Repair Parts and Service
- Español (México)
- INTRODUCCIÓN
- Revisión de los símbolos y términos de seguridad
- Operación en estado pasivo
- Preparación de la puerta de garaje
- Pruebe la intensidad de la señal de Wi-Fi® en el garaje.
- Herramientas necesarias
- Planificación
- Contenido de la caja
- Inventario de herrajes
- ENSAMBLAJE PASO 1
- Ensamblaje Paso 2
- ensamblaje paso 3
- Ensamblaje paso 4
- Ensamblaje paso 5
- Ensamblaje paso 6
- INSTALACIÓN
- AJUSTES
- CONTROL myQ® PARA TELÉFONOS INTELIGENTES
- FUNCIONAMIENTO
- RESOLUCIÓN DE PROBLEMAS
- Piezas de repuesto
- Accesorios
- Garantía
- Guía de seguridad y mantenimiento del abre-puertas de garaje automático
- Piezas de repuesto y servicio
- INTRODUCCIÓN

ASSEMBLY STEP 3
INSTALL THE IDLER PULLEY
1. Lay the belt beside the rail, as shown. Grasp the end with the hooked
trolley connector and pass approximately 12" (30 cm) of belt through the
window. Keep the ribbed side toward the rail, and allow it to hang until
Assembly Step 4.
2. Remove the tape from the idler pulley. The inside center should be pre-
greased. If dry, regrease to ensure proper operation.
3. Place the idler pulley into the window as shown.
4. Insert the idler bolt from the top through the rail and pulley. Tighten with
a 3/8" lock washer and nut underneath the rail until the lock washer is
compressed.
5. Rotate the pulley to be sure it spins freely.
6. Locate the rail tab. The rail tab is between the idler bolt and the trolley in
the front rail section. Use a flathead screwdriver and lift the rail tab until
the tab is vertical (90º).
Idler Bolt
Rail Tab
Rail Tab
CORRECT
INCORRECT
Screwdriver
Grease inside pulley
Pulley
Trolley Connector
Lock Washer 3/8"
Nut 3/8"
Trolley
Nut 3/8"
Idler Bolt
HARDWARE SHOWN ACTUAL SIZE
Lock Washer 3/8"
10