
Instruction Manual
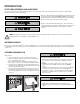
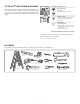
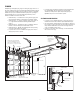
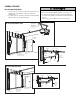

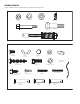
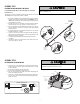
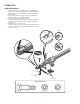
Table Of Contents
- English (United States)
- INTRODUCTION
- INSTALLATION
- ADJUSTMENT
- myQ® SMARTPHONE CONTROL
- OPERATION
- TROUBLESHOOTING
- REPAIR PARTS
- Accessories
- Warranty
- Automatic Garage Door Opener Safety & Maintenance Guide
- Repair Parts and Service
- Español (México)
- INTRODUCCIÓN
- Revisión de los símbolos y términos de seguridad
- Operación en estado pasivo
- Preparación de la puerta de garaje
- Pruebe la intensidad de la señal de Wi-Fi® en el garaje.
- Herramientas necesarias
- Planificación
- Contenido de la caja
- Inventario de herrajes
- ENSAMBLAJE PASO 1
- Ensamblaje Paso 2
- ensamblaje paso 3
- Ensamblaje paso 4
- Ensamblaje paso 5
- Ensamblaje paso 6
- INSTALACIÓN
- AJUSTES
- CONTROL myQ® PARA TELÉFONOS INTELIGENTES
- FUNCIONAMIENTO
- RESOLUCIÓN DE PROBLEMAS
- Piezas de repuesto
- Accesorios
- Garantía
- Guía de seguridad y mantenimiento del abre-puertas de garaje automático
- Piezas de repuesto y servicio
- INTRODUCCIÓN

TEST THE WI-FI
®
SIGNAL STRENGTH IN YOUR GARAGE
Monitor and control your garage door from anywhere using the myQ
®
App. You will
need a router with Wi-Fi and a smartphone or other mobile device. Make sure your
mobile device is connected to your Wi-Fi network. Hold your mobile device in the
place where your garage door opener will be installed and check the Wi-Fi signal
strength.
Wi-Fi signal is weak.
The garage door opener will likely connect to
your Wi-Fi network. If not, try one of the
options below.
No Wi-Fi signal.
Try one of the following:
• Move your router closer to the garage door
opener to minimize interference from walls
and other objects
• Buy a Wi-Fi range extender
Check Signal Strength. If you see:
Wi-Fi signal is strong.
You’re all set!
Install your new garage door opener.
Visit support.chamberlaingroup.com for more details
See myQ
®
App Control page 32 to connect your garage door opener to your Wi-Fi
network. Do NOT connect prior to installation.
Wi-Fi
®
is a registered trademark of Wi-Fi Alliance
TOOLS NEEDED
During assembly, installation and adjustment of the opener, instructions will call for hand tools as illustrated below.
Stepladder
Drill Bits 3/16",
5/16", and 5/32"
Claw Hammer
Carpenter’s Level
(optional)
Pencil
Screwdriver
Drill
Wire Cutters
Adjustable End Wrench
Tape Measure
Pliers
Sockets and Wrench 1/2",
5/8", 7/16", 9/16", and 1/4"
Hack Saw
4