
Instruction Manual
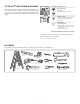
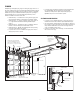
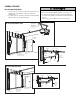

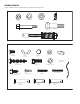
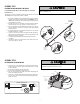
Table Of Contents
- English (United States)
- INTRODUCTION
- INSTALLATION
- ADJUSTMENT
- myQ® SMARTPHONE CONTROL
- OPERATION
- TROUBLESHOOTING
- REPAIR PARTS
- Accessories
- Warranty
- Automatic Garage Door Opener Safety & Maintenance Guide
- Repair Parts and Service
- Español (México)
- INTRODUCCIÓN
- Revisión de los símbolos y términos de seguridad
- Operación en estado pasivo
- Preparación de la puerta de garaje
- Pruebe la intensidad de la señal de Wi-Fi® en el garaje.
- Herramientas necesarias
- Planificación
- Contenido de la caja
- Inventario de herrajes
- ENSAMBLAJE PASO 1
- Ensamblaje Paso 2
- ensamblaje paso 3
- Ensamblaje paso 4
- Ensamblaje paso 5
- Ensamblaje paso 6
- INSTALACIÓN
- AJUSTES
- CONTROL myQ® PARA TELÉFONOS INTELIGENTES
- FUNCIONAMIENTO
- RESOLUCIÓN DE PROBLEMAS
- Piezas de repuesto
- Accesorios
- Garantía
- Guía de seguridad y mantenimiento del abre-puertas de garaje automático
- Piezas de repuesto y servicio
- INTRODUCCIÓN

CARTON INVENTORY
Your garage door opener is packaged in one carton which contains the motor unit
and all parts illustrated below. Accessories will depend on the model purchased.
If anything is missing, carefully check the packing material.
Hardware for assembly and installation is shown on the next page. Save the
carton and packing material until installation and adjustment is complete.
Straight Door Arm Section
(packaged inside the front rail)
Curved Door
Arm Section
Safety Labels
and Literature
2-Conductor Bell Wire
White and White/Red
Idler Pulley
(In Hardware Bag)
Motor Unit with 2 Light Lenses
Hanging Brackets
(2) Safety Reversing Sensors
(1 Sending Sensor and 1 Receiving Sensor)
with 2-Conductor White and White/Black
Bell Wire attached
Door Bracket
3-Button Remote Control (2)
Trolley
Safety Reversing
Sensor Bracket (2)
Rail
Center/Back
Sections
“U” Bracket
Header Bracket
Hardware Bag
Wireless Keypad
Sprocket cover
with screws (3)
Belt
Rail
Front (header)
Section
Multi-Function Control Panel
7