
Use and Care Guide


12
SERVICE AND MAINTENANCE
WARNING
Before performing any type of maintenance/service, disengage all controls
and stop the engine. Wait until all moving parts have come to a complete
stop. Disconnect spark plug wire and ground it against the engine to
prevent unintended starting. Always wear safety glasses during operation
or while performing any adjustments or repairs.
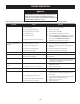
Follow the maintenance schedule given below. This chart describes service guidelines
only. Use the Service Log column to keep track of completed maintenance tasks. To
locate the nearest authorized Service Center or to schedule service, call
the following toll free number: 1-888-331-4569.
Interval Item Service Service Log
Each use 1. Engine oil level.
2. Snow blower and exhaust area.
1. Check.
2. Clean.
1st 5 hours 1. Engine oil. 1. Change.
Every 5 hours 1. Engine oil.
2. Exhaust area.
1. Check.
2. Clean.
25 hours 1. Spark plug. 1. Check. (See engine manual)
Every season/50 hours 1. Engine oil. 1. Change.
Every season/100 hours 1. Spark plug. 1. Clean, replace, re-gap. (See engine
manual)
Every season/Before storage 1. Pivot points.
2. Control handle.
3. Extension spring.
1. Lubricate.
2. Lubricate.
3. Lubricate.
NOTE: This Operator’s Manual covers several models. Snow blower features may
vary by model. Not all features in this manual are applicable to all snow blower
models and the snow blower depicted may differ from yours.
Maintenance
Engine
Refer to the Engine Operator’s Manual for all engine maintenance procedures.
Checking, adding and changing oil are also found in this manual.
Lubrication
Lubricate the pivot points on the control handle and the extension spring at the end
of the control cable with a light oil once every season and before the snow blower is
put into storage at the end of the season.
Adjustments
Shave Plate
To check the adjustment of the shave plate, place the machine on a level surface.
The wheels, shave plate and auger paddles should all contact the level surface.
Note that if the shave plate is adjusted too high, snow may blow under the auger
housing. If the shave plate wears out excessively, or the snow blower does not self-
propel, the shave plate may be too low to the ground and needs to be adjusted.
NOTE: On new snow blowers or machines with a new shave plate installed, the
auger paddles may be slightly off the ground.
To adjust the shave plate proceed as follows:
1. Run the snow blower until the fuel tank is empty.
MAINTENANCE SCHEDULE
2. Pull the starter cord until resistance is felt. Then tip the snow blower back
until it rests on the handles. To ensure that the snow blower does not tip
forward, it may be necessary to secure the handle to the ground with a block
or other object.
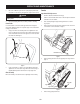
3. Loosen the four flange lock nuts and carriage screws which secure the shave
plate to the housing. See Figure 1. Move the shave plate to the appropriate
position and retighten the nuts and screws securely.
Side View
Lock Nut
Screw
Reversible Shave Plate
Figure 1
4. Tip the snow blower back to the operating position and pull the recoil starter
handle a few times to see if it is difficult to pull.