
Use and Care Guide


10
ASSEMBLY
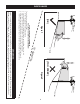
4. Using the harness clip attached to the harness, secure the excess wire to the
fender by snapping the harness clip in place as shown in Figure 4.
Figure 4
Lower Deck Discharge Chute Deflector
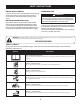
WARNING
Never operate the mower deck without the chute deflector installed and in
the down position.
Check the mower deck for a shipping brace that may be holding the chute deflector
upward for shipment. If the brace is present, it must be removed before operating
the tractor. Holding the chute deflector fully upward, remove the shipping brace.
Lower the chute deflector. See Figure 5.
Figure 5
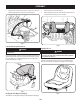
Installing the Front Bumper (If equipped)
The hardware for attaching the front bumper is shipped installed into the bumper.
1. Remove the four hex screws from the bumper.
2. Position the bumper brackets to the inside of the tractor’s frame and secure
it in place with the four hex flange screws. See Figure 6.
Figure 6
Adjusting the Seat
WARNING
Before operating the tractor, make sure the seat is engaged in the seat-
stop. Engage the parking brake. Stand behind the machine and pull back
on seat until it clicks into place.
To adjust the position of the seat, lift the seat adjustment lever up. Slide the seat
forward or rearward to the desired position; then release the adjustment lever.
Make sure seat is locked into position before operating the tractor. See Figure 7.
Figure 7