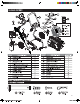
A | Hose Holder 1 K | Spray Gun 1 B | Handle 1 L |Spray Gun Trigger Lock 1 *C | Rotary Nozzle 1 M | Spray Gun Holster 1 D | O-Ring Replacement Kit 1 N | Super Soft Hose 1 E Quick Connect Nozzles 4 O | High Pressure Foam Cannon 1 F | Power Washer Unit 1 P | Nozzle Cleaning Wire 1 G |Lower Frame 1 AA | Axle Pins 2 H | Nozzle Holder 1 BB |Screws 2 *| | Extension Lance 1 CC | Screws 2 1 Wheels 2 DD | Cotter Pins 2 *Packaged on the power washer unit. HARDWARE CONTENTS Axle Pins Qty. 2 Cotter Pins Qty.
SAFETY INFORMATION This manual contains information that relates to PROTECTING PERSONAL SAFETY and PREVENTING EQUIPMENT PROBLEMS. It is very important to read this manual carefully and understand it thoroughly before using the product. The symbols listed below are used to indicate this information.
SAFETY INFORMATION back flow. CAUTION! Store the power washer indoors to prevent the water in the unit from expanding under freezing conditions. When the water freezes and expands, your power washer will be damaged and become inoperable. If storing outdoors, it is recommended you use pump saver {not included) to protect pumps. 1. Ever use hot water with your power washer. 1t will overheat and damage the high pressure pump 2. He var leave the prows washer unattended while it is powered “on”. 3.
iU e ] Before beginning assembly of product, make sure all parts are present. Compare parts with package contents list and hardware contents list. if any part is rising or damaged, DO NOT pattern to assemble the product.Please call customer service at 1-888-3314569, Replacement parts will be sent no charge Estimated Assembly Time: 5 minutes. Tools Required for Assembly (not included): Phillips screwdriver.
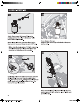
Install nozzle holder (H) to lower frame (G). Secure with two screws (BB). Press bunions on lower frame (G} extensions and install handle (8). Lower frame extensions will click when handle is in proper position. Install hose holder (A) onto back side of upper handle {B). Secure with two screws (CC). £\ @ Screws T slide spray gun holster (M} into place on the upper handle (B).
Place power washer unit {F) into position on the lower frame {G). Pull back on collar at one end of super soft hos (N). Push firmly to connect hose to spray gun {K). Twist collar to secure. Confirm hose is locked into spray gun by sightly pulling on them. The hose is now securely attached to spray gun. Pull upward on latches that are located on sides of lower frame (G). Once upper latch is flush with the lower lip, push down until lower latch clicks inch place.
Attach nozzle {E) and Rotary nozzle (*C) into end of lance {*1} by pressing selected nozzle into place. it will make 3 “slick” sound when firmly in place. Meets: Always push safety lock button to lock trigger Extension Lance installation when changing lances and nozzles to ensure that they While spray gun (K} is in the locked position, insert do not accidentally eject with force during removal. fiance (*1} into the end of spray gun by inserting and turning clockwise until fully in place.
Attach foam cannon {0} into end of lance by pressing cannon into place. it will make a “click” sound when firmly in place. Foam Cannon Storage Rote: Always lock spray gun when changing the Store the foam cannon {0} on the back of the power foam cannon to ensure it does not eject with force. washer unit. * When using the foam cannon, fill it with a properly formulated detergent or deanery with water ratio according to instructions on the container. Pull back on collar at the other end of super soft hose {N}.
» Make sure the power switch is off (it will be off). ® Unwind the power cord completely and plug into a grounded 120 volt outlet = Turn on water supply at the faucet to completely open. = Turn the safety lock button on the spray gun to gridlocked. While pointing the spray gun in a safe direction, squeeze the trigger on the spray gun until there is a steady stream of water, letting the water and air out of the hose. Attach a garden hose to built in garden hose adapter.
T I = When removing the detergent tank, squeeze the clamp and remove the small hose from detergent tank. Pull the detergent tank straight out. To replace tank, push straight in and then reattach hose with © Always test a small area to avoid chance of clamp. damaging the surface. = Tha power washer will pull a ratio of water to detergent of 10:1 or 10 @& parts water to 1 part detergent. The detergent concentration can be adjusted by turning the detergent knob on the top of the making.
OPERATING INSTRUCTIONS Removing Power Washer Unit from Drama for Handheld Operation © Locate latches on the lower side of frame. Unlock latches by pulling downward on the latches, Place a foot on the pad at the front of the lower frame and then fight the power washer unit off the frame. {operation Tips © Note: Test the GUCCI before each usa: 1. Plug GFC1 into power outlet. Indicator should turn green to show that cord has power. 2.
UL TPV T Y e Detergents + Use detergents designed for power washers. Hardware stores or home centers lase have power washer detergents for different cleaning projects. The cleaning solution should be the consistency of water in order to prevent dogging your detergent bottle and nozzle. « This system applies detergent under low pressure The dinning power of the detergents is enhanced when applied with iow pressure and enough time is given to break down dirt and grime.
CARE AND MAINTENANCE = Make sure to discard any remaining detergent from the tank. Residual chemical will stick to the container which could become contaminated, and can cause the detergent injector to
TROUBLESHOOTING if you have any questions regarding the product, please call customer service at 1-888-331-4569 Unit will not vermilion. sl IOA 1. The Module on the end of the power cord must be pigged directly into an outlet 2. Do not use an extension cord: 3 with the GFC| Connected make sire the power switch s Turned on Note: When power switch s Turned on, the power washer will ruin o by itself for 152 seconds and shut off This is normal. prob Sleepy 2 3 e slipped 4 e Ancient 1% i 1 iow feigned.
TROUBLESHOOTING LIMITED WARRANTY The Warranty of this product is covers by A.R North America. This product has a 2 {two) year warranty. Please read the following carefully to understand what each warranty entails: This product is under warranty 1o the original retail consumer against defects in material and workmanship for a period of 1{one) year and is a complete “bumper to bumper” warranty including the spray gun,the high pressure hose and all accessories from the date of purchase.