OPERATOR’S MANUAL 12V Battery Charger & Engine Starter Model No. 28 71222 Read and follow all Safety Rules and Operating Instructions before Every Use of this Product. SAVE THESE INSTRUCTIONS. Sears Brands Management Corporation, Hoffman Estates, IL 60179 U.S.A.
DIEHARD THREE-YEAR FULL WARRANTY When operated and maintained according to all supplied instructions, if this DieHard product fails due to a defect in material or workmanship within 3 years from the date of purchase, return it to any DieHard outlet in the United States for free replacement. This warranty gives you specific legal rights, and you may also have other rights which vary from state to state.
IMPORTANT: READ AND SAVE THIS SAFETY AND INSTRUCTION MANUAL. SAVE THESE INSTRUCTIONS – This manual will show you how to use your charger safely and effectively. Please read, understand and follow these instructions and precautions carefully, as this manual contains important safety and operating instructions. The safety messages used throughout this manual contain a signal word. The signal word indicates the level of the hazard in a situation.
RISK OF EXPLOSIVE GASES. 1.10 WORKING IN THE VICINITY OF A LEAD-ACID BATTERY IS DANGEROUS. BATTERIES GENERATE EXPLOSIVE GASES DURING NORMAL BATTERY OPERATION. FOR THIS REASON, IT IS OF UTMOST IMPORTANCE THAT YOU FOLLOW ALL INSTRUCTIONS IN THIS MANUAL EACH TIME YOU USE THE CHARGER. 1.11 To reduce the risk of a battery explosion, follow all instructions in this manual and those published by the battery manufacturer and the manufacturer of any equipment you intend to use in the vicinity of the battery.
3.5 Read, understand and follow all instructions for the charger, battery, vehicle and any equipment used near the battery and charger. Study all of the battery manufacturer’s specific precautions while charging and recommended rates of charge. 3.6 Determine the voltage of the battery by referring to the vehicle owner’s manual and make sure that the output voltage is correct for your battery. 3.7 Make sure that the charger cable clips make tight connections. 4.
.6 For a positive-grounded vehicle, connect the NEGATIVE (BLACK) clip from the battery charger to the NEGATIVE (NEG, N, -) ungrounded post of the battery. Connect the POSITIVE (RED) clip to the vehicle frame or engine block at a distance away from the battery. Do not connect the clip to the carburetor, fuel lines or sheet-metal body parts. Connect to a heavy gauge metal part of the vehicle frame or engine block. 6.7 Connect charger AC supply cord to electrical outlet. 6.
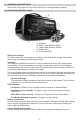
9. ASSEMBLY INSTRUCTIONS Remove all cord wraps and uncoil the cables prior to using the battery charger. 10. FEATURES /CONTROL PANEL 1 2 3 4 5 1. 2. 3. 4. 5. Ammeter Battery Type Selector Switch Charge Rate Selector Switch Battery Clips Full Charge LED Setting the controls All of the controls for your charger are located on the front of the charger. Read these instructions to properly set the charger controls.
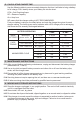
11. OPERATING INSTRUCTIONS This battery charger must be properly assembled in accordance with the assembly instructions before it is used. NOTE: The charger does not have an ON/OFF switch. The ON and OFF commands are controlled by plugging the 71222 into a 120V AC electrical wall outlet only after the battery connections have been made. Charging 1. Make sure to place the charger on a dry, non-flammable surface, such as metal or concrete. 2.
Using the 50 Amp Engine Start feature Your battery charger can be used to jumpstart your car if the battery is low. Follow these instructions on how to use the ENGINE START feature. Follow all safety instructions and precautions for charging your battery. Wear complete eye protection and clothing protection. Charge your battery in a well-ventilated area. Using the ENGINE START feature WITHOUT a battery installed in the vehicle could cause damage to the vehicle’s electrical system.
12. CALCULATING CHARGE TIME Use the following table to more accurately determine the time it will take to bring a battery to full charge. First, identify where your battery fits into the chart. CCA = Cold Cranking Amps RC = Reserve Capacity Ah = Amp hour NR means that the charger setting is NOT RECOMMENDED. Find your battery’s rating on the chart below, and note the charge time given for each charger setting. The times given are for batteries with a 50% charge prior to recharging.
15. TROUBLESHOOTING PROBLEM The charger will not turn on. No reading on the Ammeter. (Needle stays on the left.) Ammeter reading stays high. Ammeter reads less than selected charge rate when charging a discharged battery. POSSIBLE CAUSE REASON/SOLUTION Charger is not plugged in. Plug the charger into an AC outlet. No power at the receptacle. Check for open fuse or circuit breaker supplying AC outlet. Poor electrical connection.
PROBLEM Short or no start cycle when cranking engine. The measured current is much lower than what was selected. POSSIBLE CAUSE REASON/SOLUTION Drawing more than 50 amps. Crank time varies with the amount of current drawn. Failure to wait 3 minutes between cranks. Wait 3 minutes of rest time before the next crank. Battery may be severely discharged. Charge for 10 to 15 minutes at the 10A rate to help assist in cranking. The charger may be overheated.