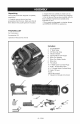
Operator's durable, affordable, Manual everyday tools. 3 Gallon Oil-free Compressor with Brad nailer and inflation/blowgun kit item 15206 CAUTION: Read the Safety Guidelines and All Instructions Carefully Before Operating. Sears, Roebuck and Co., Hoffman Visit our Craftsman N032601 Rev. o o7/29/o9 website: Estates, IL 60179 U.S.A. www.sears.
WARRANTY ................................................ SPECIFICATION CHART ...................................... SAFETY GUiDELiNES = DEFiNiTiONS ........................... 2 3 3 iMPORTANT SAFETY iNSTRUCTiONS ........................ GLOSSARY ................................................ ACCESSORIES ............................................. DUTY CYCLE .............................................. ASSEMBLY ............................................... iNSTALLATiON ............................
Motor Running Horsepower Tank Size Air Hose Type Air Delivery 120V 60Hz, 2.6-amp 1/3 Hp 3-gallon 25' recoil, MAX. 1.0 SCFM @ 40 PSi 0.6SCFM @ 90 PSI 85 PSI 100 PSI 100 PSI 6ft, 3-prong, 18 AWG 18.691b (8.5kg) Cut-in Pressure Cut-out Pressure Max. Pressure Power Cord Unit Weight This manual contains information that is important for you to know and understand. This information relates to protecting YOUR SAFETY and PREVENTING EQUIPMENT PROBLEMS.
'" " RISK OF EXPLOSION OR FiRE WHAT CAN HAPPEN HOW TO PREVENT iT 1 It is normal for electrical contacts within the motor and pressure switch to spark, 2 If electrical sparks from compressor 2/1 If spraying flammable materials, come into contact with flammable locate compressor at least 20 feet vapors, they may ignite, causing fire (6.1 m) away from spray area. An or explosion. additional length of air hose may be required. 2/2 Store flammable materials in a secure location away from compressor.
Exposure to chemicals in dust created by power sanding, sawing, grinding, drilling, and other construction activities may be harmful. Sprayed materials such as paint, paint solvents, paint remover, insecticides, weed killers, may contain harmful vapors and poisons. _ I__ 2 Work in an area with good cross ventilation. Read and follow the safety instructions provided on the label or safety data sheets for the materials you are spraying.
Attachments & accessories: Exceeding the pressure rating of air tools, spray guns, air operated accessories, tires, and other inflatables can cause them to explode or fly apart, and could result in serious injury. Follow the equipment manufacturers recommendation and never exceed the maximum allowable pressure rating of attachments. Never use compressor to inflate small low pressure objects such as children's toys, footballs, basketballs, etc.
__ RiSK FROM FLYING OBJECTS WHAT CAN HAPPEN 1 HOW TO PREVENT IT The compressed air stream can cause soft tissue damage to exposed skin and can propel dirt, chips, loose particles, and small objects at high speed, resulting in property damage or personal injury. 1/1 Always wear certified safety equipment: ANSI Z87.1 eye protection (CAN/CSA Z94.3) with side shields when using the compressor. 1/2 Never point any nozzle or sprayer toward any part of the body or at other people or animals.
[__ RiSK OF UNSAFE OPERATION WHAT CAN HAPPEN 1 HOW TO PREVENT iT Unsafe operation of your air compressor could lead to serious injury or death to you or others. 1 Review and understand all instructions and warnings in this manual. Become familiar with the operation and controls of the air compressor. Keep operating area clear of all persons, pets, and obstacles. Keep children away from the air compressor at all times. Do not operate the product when fatigued or under the influence of alcohol or drugs.
Become familiar with these terms before operating the unit. CFM: Cubic feet per minute. SCFM: Standard cubic feet per minute; a unit of measure of air delivery. PSI: Pounds per square inch gauge; a unit of measure pressure. Code Certification: Products that bear one or more of the following marks: UL_>*,CUL, ETL_*>*, CETL, have been evaluated by OSHA certified independent safety laboratories and meet the applicable Standards for Safety.
Unpacking This product has been shipped completely assembled. 1. Carefully remove the tool and any accessories from the box. Mark sure that all items listed in the packing PACKING list are included. 2. Inspect the tool carefully to make sure no breakage or damage occurred during shipping. 3. Do not discard the packing material until you have carefully inspected and satisfactorily operated the tool. 4. If any parts are damaged or missing, please call SERVICE CENTER for assistance.
HOW TO SET UP YOUR UNIT 3. Location of the Air Compressor 1. Locate the air compressor in a clean, dry and well ventilated area. 2. The air compressor should be located at least 12" (30.5 cm) away from the wall or other obstructions that will interfere with the flow of air. 3. The air compressor pump and shroud are designed to allow for proper cooling. The ventilation openings on the compressor are necessary to maintain proper operating temperature.
_Risk of unsafe operation. Certain air compressors operated on a 15 amp circuit if the following conditions are met. can be 1. Voltage supply to circuit must comply with the National Electrical Code. circuit breaker or 15 amp time delay fuse. 2. Circuit must not be used to supply any other electrical needs. NOTE: if compressor is connected to a circuit protected by fuses: use only Time delay fuses should be marked "D" in "Canada" and "T" in the U.S. 3. Extension cords must comply with specifications.
OPERATING COMPRESSOR TURNING COMPRESSOR ON 1. Pull and release the Air Release Safety Valve to verify it does not stick. 2. Plug the power cord into a grounded electrical outlet. 3. Press the Power Switch to the On position. 4. Allow the Tank to fill to 85 PSi before using. With the Air Compressor turned on, operation is automatic and under the control of the internal Pressure Controller. _ Slightly open the water Drain Valve to blow air and moisture out of the Tank.
OPERATING BRAD NAILER Always disconnect the tool from the air supply before loading. When loading the tool always aim the tool away from yourself and others. Make sure that the trigger is not pressed while the tool is being loaded. 1.Press the magazine release button and slide open the magazine. (See Fig. F) 2.Insert a strip of fasteners. Strip should lay flat against magazine wall with heads resting on magazine ribbing and fastener points at bottom of magazine. Strip should slide freely. (See Fig. G) 3.
TROUBLESHOOT|NG Failure OF COMPRESSOR Solution 1. Check for proper use of extension Compressor cord will not run 2. Plugged in? Check fuse/breaker or motor overload 3. Blown fuse 3. Replace blown fuse 4. Breaker open 4. Reset, determining why problem 5. Thermal overload open happened 6. Pressure switch bad 5. Motor will restart when cool; turn off compressor and wait 20 minutes 6. Replace Motor hums but 1. Low voltage 1. Check with voltmeter caRRot run or 2. Wrong gauge wire or 2.
TROUBLESHOOTING OF COMPRESSOR Failure Compressor vibrates Possible Cause Loose mounting bolts Air output lower than normal 1. Broken inlet valves 2. Intake filter dirty 3. Connections leaking 16 - ENG Solution Tighten 1. Have authorized service representative repair unit 2. Clean or replace intake filter 3.
TROUBLESHOOTING OF BRAD NAILER _lf any of the following problems arise during operation, stop using the tool immediately. Only a qualified technician or service center can perform repairs on this tool. Disconnect the tool from the air supply before any repair or adjustment. When replacing O-rings or cylinders, lubricate with air tool oil before reassembly. Problem Possible Causes Air leak near the 1. O-ring in trigger valve top of the tool or damaged. in the trigger area 2. Trigger valve head damaged.
Air Compressor item 15206 PARTS SHOWN FOR REFERENCE ONLY _ jjjjT, 18 - ENG
Air Compressor Item item 15206 Qty Item 1 Part No. 3290408 Flat Washer Description 2 21 3410152 Ball 2 3220552 Screw, 2 22 3420350 Damping 3 3410652 Handle 1 23 3220150 Screw, M6xl 4 3220404 Screw, ST4.
Manual del Operador durable, affordable, everyday tools. Compresor Sin Aceite de 3 Galones con Martillo de Clavos Peque_os y Juego para Inflar/Pistola para Soplado Articulo 15206 PRECAUCl0N: Antes de hacer funcionar esta herramienta lea cuidadosamente los lineamientos de seguridad y todas las instrucciones. Sears, Roebuck Visite N032601 et sitio and Co., Hoffman web de Craftsman Rev. o o7/29/o9 Estates, IL 60179 en: www.sears.com/craftsman EE.UU.
GARANTIA .................................................... CUADRO DE ESPECIFICACIONES 21 .................................. 22 L|NEAMIENTOS DE SEGURIDAD, DEFINUCIONES ...................... INSTRUCCIONES IMPORTANTES SOBRE SEGURIDAD ............... 22 22=27 GLOSARIO .................................................... 28 ACCESORIOS .................................................. 28 CICLO DE TRABAJO ............................................. 28 ENSAMBLAJE ..............................
Motor Caballos de fuerza de funcionamiento Tamar_o del tanque Tipo de manguera para aire Entrega de aire Presi6n de corte de entrada Presi6n de corte de salida Presi6n m_.xima Cord6n el6ctrico Peso de la unidad 120V 60Hz, 2.2 amp. 1/3 Caballos 3 galones 25 pies MAX, replegable 1.0 pIES/MIN ESTANDAR A 40 LBS/PUL 2 0.6 PIESS/MIN EST_,NDAR A 90 LBS/PUL 2 85 LBS/PUL 2 100 LBS/PUL 2 100 LBS/PUL 2 6 pies, 3 espigas, 18 AWG 8.5kg (18.691b) Este manual contiene informaci6n importante de saber y comprender.
RIESGO DE INCENDIO O EXPLOSION QUE PODRIA SUCEDER COMO PREVENIRLO 1 Es normal que los contactos el6ctricos dentro del motor y los interruptores de presi6n produzcan chispas, 2 Si las chispas el6ctricas del compresor entran en contacto con vapores inflamables, estos se podrian encender, provocando incendios o explosiones. 4 1 Opere siempre el compresor en lugares bien ventilados que est6n libres de materiales combustibles, gasolina o vapores solventes.
2 La exposici6n a los quimicos dentro 2 Trabaje en &reas con buena ventilaci6n del polvo creado por los chorros de cruzada. Lea y obedezca las arena, aserrado, esmerilado, instrucciones de seguridad que se taladrado y otras actividades de la presentan en las vifietas o en las hojas construcci6n puede ser dafiina. de seguridad de los materiales que est6 3 Los materiales que estan siendo rociando.
Accesorios y utensilios: 1 Exceder la presi6n limite de las herramientas neum&ticas, pistolas de rociado, accesorios impulsados pot aire, Ilantas y otros elementos inflables podria hacer que exploten o vuelen en pedazos y se provoquen lesiones graves. Siga las recomendaciones de los fabricantes de los equipos y nunca exceda la presi6n m&xima permitida de los accesorios. Nunca use el compresor para inflar objetos de baja presi6n tales como juguetes para ni_os, balones de f0tbol, de b&squetbol, etc.
__ RIESGO DE OBJETOSAEROTRANSPORTADOS QUE PODRiA SUCEDER COMO PREVENIRLO 1/1 Use siempre equipo de seguridad El chorro de aire comprimido puede certificado: Protecci6n para los ojos provocar da_os al tejido suave de la ANSI Z87.1 (CAN/CSA Z94.3) con piel expuesta y puede propulsar a cubiertas laterales al usar el gran velocidad suciedad, astillas, particulas sueltas y objetos 1/2 compresor.
[_ I__ RIESGO DEBtDO A FUNCIONAMIENTO QUE PODRtA SUCEDER 1 COMO PREVENIRLO El funcionamiento inseguro del compresor de aire puede generar lesiones graves o la muerte a usted u otras personas. 1 2 3 4 5 6 7 8 _ I__ Estudie y comprenda todas las instrucciones y advertencias de este manual. Familiaricese con el funcionamiento y los controles del compresor de aire. Mantenga el lugar de operaciones libre de espectadores, mascotas y obst&culos.
Familiaricese con los siguientes t6rminos antes de hacer funcionar la unidad. PIESS/MIN (CFM pot sus siglas en ingles): Pies cObicos pot minuto. PtES3)IVIIN ESTANDAR (SCFM pot sus siglas en ingles): Pies cL_bicos pot minuto est&ndar; es una unidad de medida de la entrega de aire.
Desempaquetado Este producto se envia completamente ensamblado. 1. Saque cuidadosamente la herramienta y los accesorios de la caja. AsegQrese de encontrar todos los articulos mencionados en la lista de empaque. 2. Revise la herramienta cuidadosamente para asegurarse de que no se quebr6 o daft6 durante el envio. 3. No deseche el material de empaque antes de inspeccionar cuidadosamente la herramienta y de hacerla funcionar satisfactoriamente. 4.
COMO ACOPLAR SU UNIDAD Ubicaci6n det compresor de aire 1. Coloque el compresor de aire en un b.rea limpia, seca y con buena ventilaci6n. 2. Se debe colocar el compresor de aire por Io menos a 30.5 cm. (12 pulgadas) de cualquier pared u otra obstrucci6n que pudiera interferir con el flujo de aire. 3. La bombay la cubierta del compresor de aire est_.n diser_adas para permitir el enfriamiento apropiado.
_ Riesgo debido a funcionamiento inseguro. Ciertos compresores de aire pueden operar en circuitos de 15 amperios si se cumplen las siguientes condiciones: 1. El voltaje suministrado al circuito NOTA: Si el compresor esta debe cumplir las indicaciones del conectado a un circuito protegido c6digo nacional sobre electricidad mediante fusibles: use s61o (National Electrical Code). fusibles con retrazo de tiempo 2.
RESOLUCI6N DE AVERtAS DEL CONIPRESOR Falla El oompresor vibra Pernos de montaje sueltos Salida de aire menor que Io normal Causas Posibles 1.V_lvulas de entrada rotas 2. Filtro de entrada sucio 3.Conexiones con fugas 35 - SP Soluciones Apri6telos 1. Haga que un representante de una compa_ia de servicio autorizado 2. repare la unidad 3.
RESOLUCION DE AVERIAS EN EL MARTILLO DE CLAVOS PEQUE_IOS .w ,_v _ _ Dejedeusarla herramienta inmediatamente si surge alguno de los siguientes problemas durante su funcionamiento. S61o t6cnicos o centros de servicio calificados pueden hacer reparaciones a esta herramienta. Antes de efectuar cualquier reparaci6n o ajuste, desconecte la herramienta del suministro de aire. AI reemplazar aros t6ricos o cilindros, lubriquelos con aceite para herramientas neumaticas antes de reensamblarlos.
Compresor de aire Articulo 15206 LAS PIEZAS SE MUESTRAN _ COMO REFERENCIA jjjjT, 37 - SP SOLAMENTE
Compresor Attic. de aire Articulo 15206 Pieza No. Descripci6n Cant Artic. Pieza No.
Your Home For repair - in your home - of all major brand appliances, lawn and garden equipment, or heating and cooling systems, no matter who made it, no matter who sold it! For the replacement parts, accessories and owner's manuals that you need to do-it-yourself. For Sears professional installation of home appliances and items like garage door openers and water heaters. 1-800-4-MY-HOME ® Anytime, day or night (1-800-469-4663) www.sears.com (U.S.A. and Canada) www.sears.