Operator's Manual I CRRFTSMRN°I evolv I Hammer Drill Model No. 320.17263 US WARNING: To reduce the risk of injury, the user must read and understand the Operator's Manual before using this product. Sears Brands Management www.craftsman.
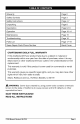
Warranty Page 2 Safety Symbols Page 3 Safety Instructions Page 4-7 Unpacking Page 8 Description Page 9-10 Operation Page 10-14 Maintenance Page 15 Troubleshooting Page 16 Parts List Page 17-19 Sears Repair Parts Phone Number Back Cover CRAFTSMAN® EVOLV FULL WARRANTY If this Craftsman@ Evolv product fails due to a defect in material or workmanship within one year from the date of purchase, return it to any Sears store or other Craftsman@ Evolv outlet in the United States for free replac
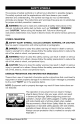
The purpose of safety symbols is to attract your attention to possible dangers. The safety symbols and the explanations with them deserve your careful attention and understanding. The symbol warnings do not, by themselves, eliminate any danger. The instructions and warnings they give are no substitutes for proper accident prevention measures.
A_, WARNING: Be sure to read and understand all instructions in this manual before using the hammer drill. Failure to follow all instructions may result in hazardous radiation exposure, electric shock, fire, and/or serious personal injury. _, WARNING: Do not attempt to operate this tool until you have thoroughly read all instructions, safety rules, and warnings. Failure to comply with them can result in fire, electric shock, or serious personal injury. Save the manual and refer to it frequently.
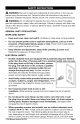
extension cords. Recommended sizes of extension cords Volts Ampere Rating 120v Total Length of Cord in feet 25ft 50ft 100ft 150ft More Than Not More Than AWG 0 6 18 16 16 14 6 10 18 16 14 12 10 12 16 16 14 12 12 16 14 12 Not Recommended PERSONAL SAFETY Stay alert, watch what you are doing and use common sense when operating a power tool. Do not use tool while tired or under the influence of drugs, alcohol, or medication.
tool will do the job better and more safely at the rate for which is designed. Do not use tool if the switch does not turn it on or off. Any tool that cannot be controlled with the switch is dangerous and must be repaired. Disconnect the plug from the power source before making any adjustments, changing accessories, or storing the tool. Such preventive safety measures reduce the risk of starting the tool accidentally.
[] .............................................................. Class II construction .../min ....................................................... Revolutions or Strokes per minute & • k, ........................................................... Indicates danger, warning caution. It means attention! Your safety is involved. SPECIFIC SAFETY RULES FOR HAMMER DRILL Hold the tool by its insulated gripping surfaces when performing an operation where the cutting tool may contact hidden wiring.
A_, WARNING: Your hammer drill should never be connected to the power source when you are assembling parts, making adjustments, installing or removing bits, cleaning it or when it is not in use. Disconnecting the hammer will prevent accidental starting, which could cause serious personal injury. When unpacking the box, do not discard contents are accounted for: any packing 1. Carefully 2.
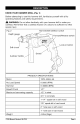
ID]=_.'_o_l[e_] KNOW YOUR HAMMER DRILL (Fig. 1) Before attempting to use this hammer drill, familiarize operating features and safety requirements. yourself with all its _, WARNING: Do not allow familiarity with your hammer drill to make you careless. Remember that a careless fraction of a second is sufficient to inflict severe injury. Hammer/Drill Fig.
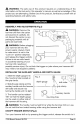
_, WARNING: The safe use of this product requires an understanding of the information on the tool and in this operator's manual, as well as knowledge of the project you are attempting. Before use of this product, familiarize yourself with all operating features and safety rules. ASSEMBLY AND ADJUSTMENTS (Fig.2) I A_, WARNING: Remove the hammer drill from the carton and examine it carefully. Do not discard the carton or any packaging material until all parts are examined.
turn OFF. LOCK-ON BUTTON (Fig.4) 1. To lock the switch ON for continuous operation, depress the switch and push in the "lock-on" button, then release the switch. 2. To stop the hammer drill when in the "lock-on" position, depress and release the switch. Note: If you have the "lock-on" feature engaged during use and your hammer drill becomes disconnected from the power supply, immediately disengage the "lock-on" feature. FORWARD/REVERSE SWITCH (Fig.
or rotation action. with hammering Fig. 5 hammer/drill selection switch 1. For rotation only, push the switch to the side of the hammer drill with the mark. 2. For rotation with hammering action, push the switch to the side with the mark. DEPTH GAUGE (Fig.6) 1. The adjustable depth gauge is used to control the depth of drilled holes. 2. Install the depth gauge as shown in the Assembly section. Fig. 6 depth gauge 3 3. Loosen the auxiliary handle to facilitate the adjustment of the depth gauge.
To remove 1. Unplug the hammer drill. 2. Insert the chuck key into a guide hole and turn it counter-clockwise. loose, remove the bit. 3. Remove the chuck HAMMER When key. DRILLING When drilling in concrete, granite, tile, marble, etc. use the hammer action by pressing the button on the marked side. 1. Be sure to use a tungsten carbide-tipped bit. When the hole becomes clogged with chips, do not apply more pressure. Allow the tool to idle and partially remove the bit from the hole. 2.
MASONRY DRILLING (Fig.8) 1. Set the forward/reverse 2. Secure workpiece switch for the desired rotation direction. to keep it from turning when drilling. 3. Push the hammer/drill selection switch to set the action mode. 4. Push the switch to start the hammer drill. 5. Apply pressure to the hammer drill handles to keep the bit cutting. 6. Use tungsten 17263Manual carbide-tipped Revised 09-0709 bits for drilling concrete, ceramic tile, brick, etc.
A_, WARNING: by a qualified _, WARNING: To ensure safety and reliability, service technician all repairs should be performed at a Sears Service Center. For your safety, always turn off the switch and disconnect plug from the electrical outlet before performing any maintenance the or cleaning. Periodic maintenance of your drill allows for long life and trouble free operation. A cleaning, lubrication, and maintenance schedule should be maintained.
b/_l[l_I_ [,,1][[I][I]llll]_] PROBLEM CAUSE SOLUTION The hammer drill does Check to be sure power cord is connected to Connect source. power source and that power source (outlet) is operable Confirm power source (outlet) is operable not start when trigger switch is squeezed Check drill bit and chuck jaws Replace drill bit if dull or worn; tighten chuck jaws to firmly secure drill bit Sleeve is not released Release the sleeve Be sure cooling Clean, clear vents.
Hammer Always Drill MODEL NUMBER 320.
1 5620138000 Screw (L.H.
2820725000 1 2820717000 1 2820718000 30 1 Internal Wire ASSY 1-6 2820719000 1 2820721000 1 2820723000 1 31 3121008000 Cord Guard 1 32 4810002000 Power Cord & Plug 1 33 5610023000 Tapping 2 34 3700285000 Cord Anchorage 1 35 3320048000 Left Housing 1 36 2240139000 Name Plate 1 37 3420063000 Left Alum Cover 1 38 5620037000 Screw 3 39 3120263000 Auxiliary 40 3121143000 Handle Hoop 1 41 3550098000 Depth Stop 1 42 5640015000 Hexagon 1 17263 Manual Revise
Your Home For expert troubleshooting and home solutions advice: manage home www.managemyhome.com For repair - in your home - of all major brand appliances, lawn and garden equipment, or heating and cooling systems, no matter who made it, no matter who sold it ! For the replacement parts, accessories and owner's manuals that you need to do-it-yourself. For Sears professional installation of home appliances and items like garage door openers and water heaters. 1-800-4-MY-HOME (1-800-469-4663) www.sears.