
Owners manual
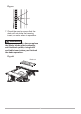

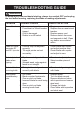
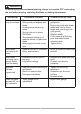

40 41
40 41
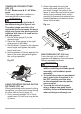
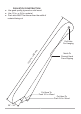
COMPOUND CROSSCUTTING
(FIG. ZZ)
0°~45° Blade bevel & 0°~45° Miter
angle
This sawing operation combines a
miter angle with a bevel angle.
Always work to the right side of
the blade during this type of cut.
The miter gauge must be in the
right side groove because the bevel
angle may cause the blade guard to
interfere with the cut if used on the
left side groove.
1. Set the miter gauge (3) to the
desired angle.
2. Place the miter gauge in the right
side groove of the table.
3. Set the blade (1) bevel to the desired
bevel angle and tighten the blade
bevel lock knob.
4. Hold workpiece (2) rmly against the
face of the miter gauge throughout
the cutting operation.
Fig. ZZ
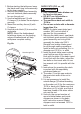
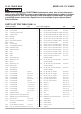
USING THE WOOD FACING ON THE
RIP FENCE (FIG. aa)
When performing some special cutting
operations, you can add a wood facing
to either side of the rip fence (2).
1. Use a smooth straight 3/4 in. thick
wood board (1) that is as long as the
rip fence.
WARNING
!
2. Attach the wood facing to the
fence with wood screws (3) (not
included) through the holes in the
fence. A wood fence should be used
when ripping material such as thin
paneling to prevent the material from
catching between the bottom of the
fence and the table.
Fig. aa
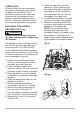
NON-THROUGH CUT (FIG. bb)
A non-through cut is used to cut
grooves and rabbets in the workpiece
without exposed the blade.
● Only this type cut is made
without installing the blade guard
assembly, anti-kickback pawls
assembly.
● To avoid injury from an accidental
start, make sure the switch is in
the OFF position and the plug
is disconnected from the power
source outlet.
● To avoid the risk of personal
injury. Always use push block,
auxiliary fence and featherboard
when making non-through cut.
WARNING
!
3
2
1
1
2
3