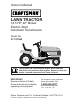
Owner’s Manual LAWN TRACTOR 18.5 HP, 42” Mower Electric Start Automatic Transmission Model No. 917.27582 02494 This product has a low emission engine which operates differently from previously built engines. Before you start the engine, read and understand this Owner’s Manual. IMPORTANT: Read and follow all Safety Rules and Instructions before operating this equipment.
TABLE OF CONTENTS Maintenance Schedule ........................ 18 Service and Adjustments..................... 23 Storage ................................................ 29 Troubleshooting ................................... 30 Repair Parts......................................... 34 Sears Service ........................Back Cover Warranty ................................................ 2 Safety Rules .......................................... 3 Product Specifications ...........................
SAFETY RULES IMPORTANT: This cutting machine is capable of amputating hands and feet and throwing objects. Failure to observe the following safety instructions could result in serious injury or death. • WARNING: In order to prevent accidental starting when setting up, transporting, adjusting or making repairs, always disconnect spark plug wire and place wire where it cannot contact spark plug. WARNING: Do not coast down a hill in neutral, you may lose control of the tractor.
SAFETY RULES • II. SLOPE OPERATION Slopes are a major factor related to loss of control and tip-over accidents, which can result in severe injury or death. Operation on all slopes requires extra caution. If you cannot back up the slope or if you feel uneasy on it, do not mow it. • Mow up and down slopes, not across. • Watch for holes, ruts, bumps, rocks, or other hidden objects. Uneven terrain could overturn the machine. Tall grass can hide obstacles.
SAFETY RULES • • • • Remove gas-powered equipment from the truck or trailer and refuel it on the ground. If this is not possible, then refuel such equipment with a portable container, rather than from a gasoline dispenser nozzle. Keep the nozzle in contact with the rim of the fuel tank or container opening at all times until fueling is complete. Do not use a nozzle lock-open device. If fuel is spilled on clothing, change clothing immediately. Never overfill fuel tank.
PRODUCT SPECIFICATIONS Gasoline Capacity and Type: Oil Type (API-SG-SL): Oil Capacity: Spark Plug: (GAP: .030") Ground Speed (MPH): Tire Pressure: In the state of California the above is required by law (Section 4442 of the California Public Resources Code). Other states may have similar laws. Federal laws apply on federal lands. A spark arrester for the muffler is available through your nearest Sears service center (See REPAIR PARTS section of this manual). 3.
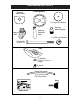
UNASSEMBLED PARTS Steering Wheel Insert Steering Wheel (1) Large Flat Washer Steering Extension Shaft Steering Boot Steering Wheel Adapter (1) 5/16 Lock Washer (1) Hex Bolt 5/16-18 x 4 Seat (1) Washer 17/32 x 1-3/16 x 12 Gauge (1) Knob (1) Oil Drain Tube For Future Use Keys Slope Sheet 7
ASSEMBLY/PRE-OPERATION Your new tractor has been assembled at the factory with the exception of those parts left unassembled for shipping purposes. To ensure safe and proper operation of your tractor all parts and hardware you assemble must be tightened securely. Use the correct tools as necessary to insure proper tightness. TOOLS REQUIRED FOR ASSEMBLY Insert A socket wrench set will make assembly easier. Standard wrench sizes you need are listed below.
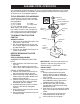
6. Lower seat into operating position and sit in seat. 7. Slide seat until a comfortable position is reached which allows you to press clutch/brake pedal all the way down. 8. Get off seat without moving its adjusted position. 9. Raise seat and tighten adjustment knob securely. Seat Seat Pan Shoulder Bolt 66 24 Flat Washer NOTE: You may now roll or drive your tractor off the skid. Follow the appropriate instruction below to remove the tractor from the skid.
✔CHECKLIST CHECK TIRE PRESSURE The tires on your tractor were overinflated at the factory for shipping purposes. Correct tire pressure is important for best cutting performance. • Reduce tire pressure to PSI shown in “PRODUCT SPECIFICATIONS” section of this manual. CHECK DECK LEVELNESS For best cutting results, mower housing should be properly leveled. See “TO LEVEL MOWER HOUSING” in the Service and Adjustments section of this manual.
OPERATION These symbols may appear on your tractor or in literature supplied with the product. Learn and understand their meaning.
KNOW YOUR TRACTOR READ THIS OWNER'S MANUAL AND SAFETY RULES BEFORE OPERATING YOUR TRACTOR Compare the illustrations with your tractor to familiarize yourself with the locations of various controls and adjustments. Save this manual for future reference.
00155 The operation of any tractor can result in foreign objects thrown into the eyes, which can result in severe eye damage. Always wear safety glasses or eye shields while operating your tractor or performing any adjustments or repairs. We recommend standard safety glasses or a wide vision safety mask worn over spectacles. HOW TO USE YOUR TRACTOR TO SET PARKING BRAKE Your tractor is equipped with an operator presence sensing switch.
TO ADJUST GAUGE WHEELS Gauge wheels are properly adjusted when they are slightly off the ground when mower is at the desired cutting height in operating position. Gauge wheels then keep the deck in proper position to help prevent scalping in most terrain conditions. NOTE: Adjust gauge wheels with tractor on a flat level surface. 1. Adjust mower to desired cutting height (See “TO ADJUST MOWER CUTTING HEIGHT” in this section of manual). 2.
TO OPERATE ON HILLS WARNING: Do not drive up or down hills with slopes greater than 15° and do not drive across any slope. Use the slope guide at the back of this manual. • Choose the slowest speed before starting up or down hills. • Avoid stopping or changing speed on hills. • If slowing is necessary, move throttle control lever to slower position. • If stopping is absolutely necessary, push clutch/brake pedal quickly to brake position and engage parking brake.
TO START ENGINE When starting the engine for the first time or if the engine has run out of fuel, it will take extra cranking time to move fuel from the tank to the engine. 1. Be sure freewheel control is in the transmission engaged position. 2. Sit on seat in operating position, depress clutch/brake pedal and set parking brake. 3. Place motion control lever in neutral (N) position. 4. Move attachment clutch to disengaged position. 5. Move throttle control to choke position.
MOWING TIPS • Mower should be properly leveled for best mowing performance. See “TO LEVEL MOWER HOUSING” in the Service and Adjustments section of this manual. • The left hand side of mower should be used for trimming. • Drive so that clippings are discharged onto the area that has already been cut. Have the cut area to the right of the tractor. This will result in a more even distribution of clippings and more uniform cutting.
MAINTENANCE MAINTENANCE SCHEDULE FILL IN DATES AS YOU COMPLETE REGULAR SERVICE E E S S RS S AG US UR OUR OU SON OR UR O H T O H H A 0 S H SE RE 25 10 50 EE Y 8 R RY ERY ERY ERY FO OR E E F E V B SERVICE E EV EV EV EV BE H AC DATES Check Brake Operation Check Tire Pressure T R A C T 0 R Check Operator Presence and ROS Systems Check for Loose Fasteners 5 Sharpen/Replace Mower Blades 3 Lubrication Chart Check Battery Level 4 Clean Battery and Terminals Check Transaxle Cooling Check V-Belts Check En
TRACTOR Always observe safety rules when performing any maintenance. BRAKE OPERATION If tractor requires more than five (5) feet to stop at highest speed in highest gear on a level, dry concrete or paved surface, then brake must be checked and adjusted. (See “TO ADJUST BRAKE” in the Service and Adjustments section of this manual). TIRES • Maintain proper air pressure in all tires (See “PRODUCT SPECIFICATIONS” section of this manual).
• Inspect cooling fins for dirt, grass clippings and other materials. To prevent damage to seals, do not use compressed air or high pressure sprayer to clean cooling fins. TRANSAXLE PUMP FLUID The transaxle was sealed at the factory and fluid maintenance is not required for the life of the transaxle. Should the transaxle ever leak or require servicing, contact a Sears or other qualified service center. V-BELTS Check V-belts for deterioration and wear after 100 hours of operation and replace if necessary.
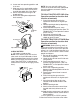
6. Align tabs on cover with slots in blower housing and replace cover. 7. Hook handle on cover and push down on handle to close. IMPORTANT: Petroleum solvents, such as kerosene, are not to be used to clean the cartridge. They may cause deterioration of the cartridge. Do not oil cartridge. Do not use pressurized air to clean cartridge. Oil Drain Valve Closed and Locked Position 3 46 02 Yellow Cap Handle Drain Tube 3. Unlock drain valve by pushing inward slightly and turning counterclockwise. 4.
MUFFLER Inspect and replace corroded muffler and spark arrester (if equipped) as it could create a fire hazard and/or damage. SPARK PLUG(S) Replace spark plug(s) at the beginning of each mowing season or after every 100 hours of operation, whichever occurs first. Spark plug type and gap setting are shown in “PRODUCT SPECIFICATIONS” section of this manual. IN-LINE FUEL FILTER The fuel filter should be replaced once each season.
SERVICE AND ADJUSTMENTS WARNING: TO AVOID SERIOUS INJURY, BEFORE PERFORMING ANY SERVICE OR ADJUSTMENTS: 1. Depress clutch/brake pedal fully and set parking brake. 2. Place motion control lever in neutral (N) position. 3. Place attachment clutch in “DISENGAGED” position. 4. Turn ignition key to “STOP” and remove key. 5. Make sure the blades and all moving parts have completely stopped. 6. Disconnect spark plug wire from spark plug and place wire where it cannot come in contact with plug. TRACTOR 9.
7. Push clutch cable housing guide into bracket, slide collar onto guide and secure with large retainer spring. 8. Place flat washer and clutch spring on idler pulley bolt and secure with small retainer spring. 9. Install belt onto engine pulley. TO LEVEL MOWER HOUSING Adjust the mower while tractor is parked on level ground or driveway. Make sure tires are properly inflated (See “PRODUCT SPECIFICATIONS” section of this manual). If tires are over or underinflated, you will not properly adjust your mower.
BELT INSTALLATION 1. Work belt around both mandrel pulleys and idler pulleys 2. Make sure belt is in all pulley grooves and inside all belt guides. 3. Install mower (See “To Install Mower” in this section of this manual). Mandrel Pulley Mandrel Pulley 5. Road test tractor for proper stopping distance as stated above. Readjust if necessary. If stopping distance is still greater than five (5) feet in highest gear, further maintenance is necessary.
Engine Pulley Clutching Idler Stationary Idler Center Span Keeper Transmission Input Pulley 01510 TRANSAXLE MOTION CONTROL LEVER NEUTRAL ADJUSTMENT The motion control lever has been preset at the factory and adjustment should not be necessary. 1. Loosen adjustment bolt in front of the right rear wheel, and lightly tighten. 2. Start engine and move motion control lever until tractor does not move forward or backward. 3. Hold motion control lever in that position and turn engine off. 4.
If “jumper cables” are used for emergency starting, follow this procedure: IMPORTANT: Your tractor is equipped with a 12 volt system. The other vehicle must also be a 12 volt system. Do not use your tractor battery to start other vehicles. 8. Close terminal access doors. 9. Close hood. TO ATTACH JUMPER CABLES 1. Connect one end of the RED cable to the POSITIVE (+) terminal of each battery(A-B), taking care not to short against tractor chassis. 2.
ENGINE IMPORTANT: Damage to the needle valve and the seat in carburetor may result if screw is turned in too tight. Maintenance, repair, or replacement of the emission control devices and systems, which are being done at the customers expense, may be performed by any non-road engine repair establishment or individual. Warranty repairs must be performed by an authorized engine manufacturer's service outlet.
STORAGE Immediately prepare your tractor for storage at the end of the season or if the tractor will not be used for 30 days or more. CAUTION: Never store the tractor with gasoline in the tank inside a building where fumes may reach an open flame or spark. Allow the engine to cool before storing in any enclosure. TRACTOR Remove mower from tractor for winter storage. When mower is to be stored for a period of time, clean it thoroughly, remove all dirt, grease, leaves, etc. Store in a clean, dry area. 1.
TROUBLESHOOTING CHART: See appropriate section in manual unless directed to Sears service center PROBLEM CAUSE CORRECTION Will not start 1. Out of fuel. 2. Engine not “CHOKED” properly. 3. Engine flooded. 1. Fill fuel tank. 2. See “TO START ENGINE” in Operation section. 3. Wait several minutes before attempting to start. 4. Bad spark plug. 4. Replace spark plug. 5. Dirty air filter. 5. Clean/replace air filter. 6. Dirty fuel filter. 6. Replace fuel filter. 7. Water in fuel. 7.
TROUBLESHOOTING CHART: See appropriate section in manual unless directed to Sears service center PROBLEM CAUSE CORRECTION Loss of power (cont.) 6. Faulty spark plug. 6. Clean and regap or change spark plug. 7. Dirty fuel filter. 7. Replace fuel filter. 8. Stale or dirty fuel. 8. Empty fuel tank and refill tank with fresh, clean gasoline. 9. Water in fuel. 9. Empty fuel tank and carburetor, refill tank with fresh gasoline and replace fuel filter. 10. Spark plug wire loose. 10.
TROUBLESHOOTING CHART: See appropriate section in manual unless directed to Sears service center PROBLEM CAUSE CORRECTION Mower blades will 1. Obstruction in clutch not rotate mechanism. 2. Worn/damaged mower drive belt. 3. Frozen idler pulley. 4. Frozen blade mandrel. 1. Remove obstruction. 2. Replace mower drive belt. 3. Replace idler pulley. 4. Contact a Sears or other qualified service center. Poor grass discharge 1. Place throttle control in “FAST” position. 2. Travel speed too fast. 2.
1. Fold this page along dotted line indicated above. 2. Hold page before you so that its left edge is vertically parallel to a tree trunk or other upright structure. 3. Sight across the fold in the direction of hill slope you want to measure. 4. Compare the angle of the fold with the slope of the hill. WARNING: To avoid serious injury, operate your tractor up and down the face of slopes, never across the face. Do not mow slopes greater than 15 degrees.
Get it fixed, at your home or ours! Your Home For repair – in your home – of all major brand appliances, lawn and garden equipment, or heating and cooling systems, no matter who made it, no matter who sold it! For the replacement parts, accessories and owner’s manuals that you need to do-it-yourself. For Sears professional installation of home appliances and items like garage door openers and water heaters. 1-800-4-MY-HOME® (1-800-469-4663) www.sears.com Anytime, day or night (U.S.A. and Canada) www.sears.