Operator's Manual 20.0-Volt Lithium-ion Cordless 1/2-in. impact Wrench Model No. 320.66810 Powered by an ENERGY STAR _ _ qualified battery charger for a better environment • Warranty WARNING: the user must this Operator's this product. To reduce the risk of injury, read and understand manual before • Assembly • Operation • Maintenance using Charge • Safety battery before Sears, Roebuck and Co., Hoffman Estates, IL 60179 www.craftsman.com 2341141001 first use U.S.A.
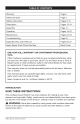
Warranty Page 2 Safety Symbols Page 3 Safety Instructions Pages 5-12 Description Pages 13-14 Assembly Page 14 Operation Pages 15-22 Maintenance Pages 22-23 Troubleshooting Page 24 Exploded Pages 25-27 View and Parts List Sears Repair Parts Phone Number ONE YEAR FULL WARRANTY TOOL Back Cover ON CRAFTSMAN® PROFESSIONAL If this Craftsman professional tool fails to give complete satisfaction within one year from the date of purchase, return it to any Sears store or Parts & Repair Center
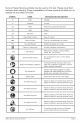
The purpose of safety symbols is to attract your attention to possible dangers. The safety symbols and the explanations with them deserve your careful attention and understanding. The symbol warnings do not, by themselves, eliminate any danger. The instructions and warnings they give are no substitutes for proper accident-prevention measures.
Some of these following symbols may be used on this tool. Please study them and learn their meaning. Proper interpretation of these symbols will allow you to operate the tool better and safer. SYMBOL NAME DESIGNATION/EXPLANATION V Volts Voltage A Amperes Current Hz Hertz Frequency W Watt Power min Minutes Alternating Direct no Class .../min Current Current Rotational Per Minute Read The Operator's Double-insulated at no load construction Alert Manual Do not expose locations.
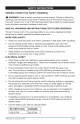
GENERAL POWER TOOL SAFETY WARNINGS WARNING: Read all safety warnings and instructions. Failure to follow the warnings and instructions may result in electric shock, fire and/or serious injury. The term "power tool" in all of the warnings listed below refers to corded power tools or battery-operated (cordless) power tools. SAVE ALL WARNINGS AND INSTRUCTIONS FOR FUTURE REFERENCE. The term "power tool" in the warnings refers to your mains-operated power tool or battery-operated (cordless) power tool.
PERSONAL SAFETY • Stay alert, watch what you a power tool. Do not use a influence of drugs, alcohol operating power tools may are doing and use common sense when operating power tool while you are tired or under the or medication. A moment of inattention while result in serious personal injury. Use personal protective equipment. Always wear eye protection.
POWER TOOL USE AND CARE • Do not force the power tool. Use the correct power tool for your application. The correct power tool will do the job better and safer at the rate for which it was designated. Do not use the power tool if the switch does not turn it ON and OFF. Any power tool that cannot be controlled with the switch is dangerous and must be repaired.
BATTERY • TOOL USE AND CARE Make sure that the switch is in the OFF position before inserting the battery pack. Inserting the battery pack into power tools that have the switch ON invites accidents. Recharge only with the charger specified by the manufacturer. A charger that is suitable for one type of battery pack may create a risk of fire when used with another battery pack. Use power tools only with specifically designated battery other battery packs may create a risk of injury and fire.
• If liquid from the battery gets in your eyes, flush them with clean water for at least 10 minutes, and then seek immediate medical attention. Following this rule will reduce the risk of serious personal injury. SERVICE Have your power tool serviced by a qualified repair person using only identical replacement parts. This will ensure that the safety of the power tool is maintained.
• Do not run the tool while carrying it at your side. A spinning entangled with clothing and injury may result. bit could become Place the tool onto the fastener only when the tool is switched driver tools can slide off the fastener. OFF. Rotating Do not use this tool as a drill. Tools equipped with shut-off clutches are not designed for drilling applications. The output drive can shut off automatically and without warning. Be careful when driving long screws.
Do not allow gasoline, oils, petroleum-based products, etc. to come in contact with plastic parts. These materials contain chemicals that can damage, weaken, or destroy plastic. An extension cord should not be used unless absolutely necessary. Use of an improper extension cord could result in a risk of fire and electric shock. If an extension cord must be used, make sure that: The pins on plug of extension those of the plug on charger.
,_ CAUTION: batteries. To reduce the risk of injury, charge only lithium-ion Other types of batteries may burst, causing personal WARNING: When using electric appliances, always be followed, including the following. basic precautions a) To reduce the risk of injury, close supervision is used near children. is necessary b) Only use attachments recommended rechargeable injury or damage. should when an appliance or sold by manufacturer. c) Do not use outdoors.
KNOW YOUR iMPACT WRENCH (Fig.l) Fig. 1 1/2" Square Drive Direction-ofRotation Selector (Forward/Lock-off/ Reverse) Variable-speed Trigger Switch LED Worklight Battery Pack Power Bar Battery-Pack Button Release PRODUCT SPECIFICATION Motor 20 Volt DC Switch VSR (Variable Speed Reversible) No Load Speed 0-1900 RPM Impacts 0-2100 BPM per minute Torque Wrench 300 ft-lbs Weight (with battery) 7.
WARNING: The safe use of this product requires an understanding of the information on the tool and in this operator's manual, as well as knowledge of the project you are attempting. Before use of this product, familiarize yourself with all operating features and safety rules. VARIABLE SPEED The variable speed trigger switch delivers speed with decreased trigger pressure.
POWER BAR This Lithium-Ion battery pack is equipped with a POWER BAR, which is used to display the battery pack's remaining run time. Press the POWER BAR button to display the LED lights. The LED lights will remain lit for approximately 4 seconds. NOTE: The POWER BAR can be used whether removed from tool.
SmartChip TM BATTERY PROTECTION SmartChip TM intuitive circuitry protects the battery pack from extreme temperature, over-discharge and over-charge. To protect the battery from damage and prolong its life, the battery pack's SmartChip TM circuitry will turn off the battery pack if it becomes overloaded or if the temperature becomes too high during use. This may happen in extremely high torque, binding and stalling situations.
• Due to Lithium-Ion's fade-free properties, the only time it is necessary to charge the Lithium-Ion battery pack is when the pack has reached the end of its charge. To signal the end of charge, power to the tool will drop quickly. Charge the battery pack as needed. HOW TO CHARGE THE BATTERY PACK NOTE: This Lithium-Ion battery pack is shipped the first time, fully charge the battery pack. partially charged.
CHARGING A HOT BATTERY PACK If the battery pack is above normal temperature range, the red LED will illuminate and the green LED will be off. When the battery pack cools down to approximately 104°F (40°C), the charger will automatically begin charging. CHARGING A COLD BATTERY PACK If the battery pack is below the normal temperature range, the red LED will illuminate and the green LED will be off.
TO ATTACH (Fig. 5} BATTERY PACK 1. Lock the trigger switch on the impact Wrench by placing the direction of rotation (forward/reverse/ center lock) selector in the center position. 2. Align the raised rib on the battery pack with the grooves on the bottom of the Wrench, and then attach the battery pack to the Wrench. Fig. 5 _i NOTE: Make sure that the latch on the battery pack snaps into place and the battery pack is secured to the tool before beginning operation. TO DETACH BATTERY PACK (Fig.
DIRECTION-OF-ROTATION LOCK) (Fig. 6) SELECTOR (FORWARD/REVERSE/CENTER The direction of bit rotation is reversible and is controlled by a selector located above the trigger switch. With the Impact Wrench held in normal operating position: 1. Position forward the direction-of-rotation rotation. 2. Position the direction-of-rotation reverse rotation. 3. Setting the switch in the OFF (center lock) position possibility of accidental starting when not in use.
iNSTALLiNG 1. AND REMOVING SOCKET Lock the trigger switch by placing the direction-ofrotation selector in the OFF (Fig.8) Fig. 8 (center) position. 2. To install a 1/2" socket (sold separately), simply push it completely onto the output drive. To remove, pull it off the output drive. ,_ WARNING: DO not use Output Drive regular socket-wrench type Socket sockets; use only those sockets designed for impact wrenches.
TIGHTENING TORQUE The tightening torque depends on the duration of the impacting/tightening action. The highest tightening torque is achieved after approx. 3 to 5 seconds impacting/tightening action. The torque build-up depends on the following of factors: • The hardness of the material in the bolts/nuts. • The type of washer (disk washer, spring washer, seal). The hardness of the material (s) to be joined by the fastener. The lubricants (if any) at the surface of the junction.
BATTERI ES: The battery pack for this tool is equipped with Lithium-ion rechargeable batteries. The duration of use from each charge will depend on the type of work performed. The batteries for this tool have been designed to provide maximum trouble-free life. Like all batteries, they will eventually wear out. Do not disassemble the battery pack or attempt to replace the batteries. Handling of the batteries, especially when wearing rings and jewelry, could result in a serious burn.
PROBLEM CAUSE SOLUTION The Impact Wrench does not work Battery is depleted Charge the battery Bits can not be installed Does not use the proper adapter Use suitable Motor overheating Be sure cooling vents are free from dust and Clean, clear vents.
20.0 VOLT LITHIUM=ION 320. 66810 CORDLESS 1/2=iN. iMPACT WRENCH MODEL NO. The Model Number will be found on the Nameplate attached to Impact Wrench. Always mention the Model Number when ordering parts for this tool. \ \ / 66810 ManuaLRevised_09 0407 Page 25
20.0 VOLT LITHIUM=ION 320. 66810 CORDLESS 1/2=iN. iMPACT WRENCH MODEL NO. The Model Number will be found on the Nameplate attached to Impact Wrench. Always mention the Model Number when ordering parts for this tool.
66810 25 5610024000 Tapping Screw 1 26 5610106000 i Tapping Screw 8 27 5610228000 I Tapping Screw 4 28 5620049000 Screw 2 29 5650014000 Plain Washer 2 30 5650015000 Spring Washer 2 31 5650272000 Washer 1 32 5650273000 Washer 1 33 5650275000 Washer 1 34 5650276000 Washer 1 35 5650296000 Washer 1 36 5670239000 Pin 3 37 5690170000 Rubber Ring 1 38 5690171000 Rubber Ring 1 39 5690172000 Rubber Ring 1 40 5690188000 Rubber Ring 1 41 5700018000
Your Home For expert troubleshooting and home solutions advice: manage home www.managemyhome.