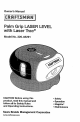
Owner's Manual °! Palm Grip LASER with Laser Trac ® Model No. 320.48291 CAUTION! Before using this product, read this manual and • Safety follow all its Safety Rules and Operating Instructions. ° Magstlc ® ° Maintenance Sears Brands Management www, craftsman.
Warranty Page 2 Safety instruction Page 3 Description Page 4 Operation Instructions Page 6 Applications Page 11 Maintenance Page 14 Troubleshooting Page 15 Parts List Page 15 ONE YEAR FUt.L WARRANTY ON CRAFTSMAN®PRODUCT If this Craftsman product fails due to a defect in material or workmanship within one year from the date of purchase, RETURN IT TO THE NEAREST SEARS STORE OR OTHER CRAFTSMAN OUTLET IN THE UNITED STATES FOR FREE REPLACEMENT.
WARNING BE SURE to read and understand all instruction in this manual before using this Laser Level. Failure to follow all instructions may result in hazardous radiation exposure, electric shock, and/or bodily injury. CAUTION The use of optical instrument with this product wilt increase eye hazard, Use of controls or adjustments or performance of procedures other than those specified herein, may result in hazardous laser radiation exposure. IMPORTANT: The following labels are on your unit.
11o DO NOT leave this tool on unattended_ !2. When using the Magstic adhesive material for mounting the tool to a smooth surface, ALWAYS make sure to place the "tool-side" of the adhesive to the tool first and then position the tool on the wall in the desired location. The Magstic material is intended for temporary hands-free use° Do not leave the tool mounted to the wall using Magstic for extended periods of timer The tool may fall from the wall resulting in damage to the toolo 13.
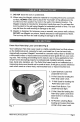
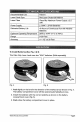
NEWI Magstic Non-Marring Adhesive Strips. (see Fig. 2) Magstic is an innovative technology that is washable and reusable.. To use, remove the "RED" tab (Toot Side) and apply the Magstic adhesive strip to the underside of the tool's base, Remove the "GREEN" tab (Wall Side) and press the tool firmly against the surface in the desired location° After leveling, carefully remove the tool and base from the surface. Replace the green plastic tab on the wall side of the Magstic for storage.
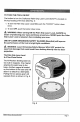
Recommended Use Indoors Laser Diode Type Red Laser Diode 635-665nm Laser Class Class Ilia, Maximum Power Output _ 2,.5 mW Power Supply 2 "AAA" 1,5_Volt Batteries Estimated Battery Life 40 Hours of Continuous Run with Alkaline Batteries Optimum Ope;ating Temperature 30°F to 104°F (-1°C to 40°€) ......... Range 0--30 Feet Accuracy +/- 1/2" at 30 Feet To Install Batteries (See Fig. 4 & 5) This Palm Grip Laser Level uses two "AAA" batteries° (Sold separately) Fig. 4 Fig..
3"0 TURN THE TOOL ON/OFF The button to turn the Craftsman Palm Grip Laser Level ON/OFF is located on the top housing of the tool, (See Fig° 1) 1o To turn the Palm Grip Laser Level ON, push the "ON/OFF" button down once. 2,, To turn OFF, push the button down once. WARNING When turning ON the Palm Grip Laser Level, ALWAYS be aware of protecting your eyes and those around you. NEVER point the Palm Grip Laser Level at anyone's face including your own.
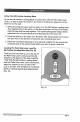
The All-Position Leveling Base (See Fig. 7) "Your Palm Grip Laser Level comes with a spherical base which aliows the level to be finely adjusted to the desired angie when using the base on a surface that is not level or plumb, I i I I 1 I l g II il II II g U U U 8 I Fig. 7 NOTE: To use the level on two adjacent surfaces it must be plumb (vertical) on the surface to which it is mounted. Fig.
Using The All-Position Leveling Base To use the All-Position Leveling Base in conjunction with the Patm Grip Laser Level, it is best to place the level on the base for preliminary alignment of the laser line on the wail. 1. Without turning the Laser Level on, place it on the Al_-Position Leveling Base..
Using The Level With A Tripod (Not Included) Because the Palm Grip Laser Level is a "forward" projection device, it can be placed on any reasonably level flat surface to draw a plumb vertical line, When used in conjunction with any standard tripod (1/4-20 UNC threaded fitting) versatility is further enhanced (See Fig° 1!). Mounting The Level To A Tripod (See Fig. 12) 1. Attach the All-Position Leveling Base to the tripod using the standard 1/4-20 UNC threaded fitting included with the tripod. (See Fig° 11).
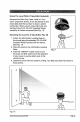
Referencing And Leveling Across Two Adjacent Surfaces The Palm Grip Laser Level can be used to align a single object or objects on two adjacent walls,, The All-Position Leveling Base has a magnetic bottom that will attach to virtually any steel surface° The laser has a broad range of apptications, such as aligning tile on the wall, lining up kitchen and bath cabinets, hanging wallpaper, aligning junction boxes and laying walt or floor tile,, The Palm Grip Laser Level's laser fan beam is also useful when w
Working With Obstructions And User Interference As discussed, the Palm Grip Laser Level is a forward projection device. The nature of the laser light as it is projected from the level is that of a plane rather than a line_This laser fan beam covers the entire line area from end point to end point (Fig 14)_As such the line is not completely blocked by obstructions or user interference° Fig 14 Note in Fig.
Using The Palm Grip Laser Level As A Hand-Held Reference Device (See Fig. 16) With the Laser Level body in the palm of your hand, turn it "ON" being careful not to point it in the direction of anyone's eyes including your own° Note that it projects a horizontal or vertical line "forward" in front of your position..
This Palm Grip Laser Level has been designed to be a low-maintenance tool However, in order to maintain its performance, you must always follow these simple directions° 1, ALWAYS handle the tool with care, Treat it as an optical device, such as a camera or binoculars,, 2o AVOID exposing the tool to shock, continuous cold temperature. vibration or extreme hot or 3, ALWAYS store the tool indoors., When not in use, ALWAYS store the tool in its protective case. 4.
The Laser line projection is weak Batteries are weak Replace with new batteries The Laser line is hard to see The tool is too far from the target Move the too! closer to the target The Laser Fineis not projected Power button is not "ON'* Check to make sure the power button is in the "ON" position The Laser line projected is not level Magstic adhesive is not adhering to surface Magstic adhesive is not adhering to the tool Polarity of the Reinstallthe batteries according to batteries is incorrect
?!:_j:_j:::!:=_i:i_ji _¸ Your Home For expert troubleshooting and home solutions manage advice: home L:i::::!_ www.