Operator's Manual 12-in. 4.0 Amp Weedwacker ® Electric Trimmer Model No. 172.74536 Z_CAUTION: Read, understand and follow all Safety Rules and Operating Instructions in this Manual before using this product. WARRANTY SAFETY ASSEMBLY OPERATION MAINTENANCE PARTS LIST ESPAI_OL Sears, Roebuck and Co., Hoffman Estates, IL 60179 U.S.A. Visit our Craftsman ® website: www.sears.
Warranty ....................................................... Safety Symbols ........ . ..................................... Safety Instructions .......................................... Unpacking ..................................................... Description .................................................... Assembly and Adjustments ............................. Operation ........................................................... Maintenance ......................................................
The purpose of safety symbols is to attract your attention to possible dangers. The safety symbols, and the explanations with them, deserve your careful attention and understanding. The symbol warnings DO NOT by themselves eliminate any danger. The instructions and warnings they give are no substitutes for proper accident prevention measures.
handle and efficient tool; if used improperly or without the due precautions could become aIf dangerous tool. this For electric pleasanttrimmer and safe I it_.WARNING: correctly used, is awork, quick,ALWAYS easy to strictly comply with the safety rules that are contained in this manual. manual before using this electric trimmer.
PERSONAL SAFETY cont. 4. DRESS properly. Long sleeves and long pants are advised. Wear eye protection. Trimmer can pick up objects like rocks and send them flying at fast speeds. Secure long hair above shoulder length. DO NOT wear loose clothing or jewelry. Keep your hair, clothing, and gloves away from moving parts. Loose clothing or long hair can be caught in moving parts. 5. DO NOT overreach. Keep proper footing and balance at all times.
ELECTRICALSAFETY i when installing I_WARNING: or removing plug Do not permit the fingers from the outlet, to touch the terminals 1. Double insulated tools are equipped with a polarized plug (one blade is wider than the other). This plug will fit in a polarized outlet only one way. If the plug does not fit fully in the outlet, reverse the plug. If it still does not fit, contact a qualified electrician to install a polarized outlet. Do not change or alter the plug in any way. 2.
EXTENSION CORDS Use a proper extension cord. ONLY use cords listed by Underwriters Laboratories (UL). Other extension cords can cause a drop in line voltage, resulting in a loss of power and overheating of tool. For this tool an AWG (American Wire Gauge) size of a least 14-gauge is recommended for an extension cord of 25- ft. or less in length. Use 12-gauge for an extension cord of 50-ft. Extension cords 100-ft. or longer are not recommended.
SERVICESAFETY I. If any part of this trimmer is missing or should break, bend, any way; or should any electrical component fail to perform SHUT OFF the power switch and remove the trimmer plug from source and have the missing, damaged or failed parts replaced resuming operation. or failin properly: the power BEFORE 2. Tool service should be performed at a Sears Parts and Repair Center. Service or maintenance performed by unqualified personnel could result in a risk of injury. 3.
SAFETY RULES FOR ELECTRIC TRIMMERS cont, 13. ALWAYS store the trimmer indoors when not in use. It should be stored in a dry place, high up or locked in a place that is out of the reach of children. 14. WHEN LENGTHENING NEW CUTTING LINE, be careful of the line cutter on the guard. Cutter is sharp and can cause injury (see page 12, Fig. 4). 15. ALWAYS use only the accessories provided by or sold by Sears. Use of any other accessories may create a hazardous situation. 16.
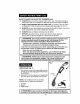
Handle Rotation Button KNOWYOURTRIMMER/EDGER(Fig. 2) Handle Auxiliary X Cord Retention Hook Your trimmer/edger has a precision built electric motor and it should only be connected to a 120-volt, 60 HzAC ONLY power supply (normal household current). The trimmer should always be used with a GFCI (Ground Fault Circuit Interrupter) outlet. Trigger Switch Handle Pigtail Power Cord DO NOT operate this trimmer on direct current (DC).
KNOW YOUR TRIMMER/EDGER This Trimmer/Edger cont. (Fig. 2) has the following features: 1. 4.0 Amp, 8000 RPM (no-load speed) motor. Provides power for trimming and edging in medium duty applications. 2. 180 ° Rotating Handle with Comfort Grip allows you to use the trimmer as an edger. The comfort grip provides increased operator comfort with reduced vibration. 3. Adjustable 4. Adjustable Trimmer Head.
I NOTE: THE GUARD MUST BE ATTACHED to the trimmer head before use. I INSTALLING THE GUARD and EDGE GUIDE (Figs. 4, 4a and 4b) trimmer from the power outlet BEFORE installing parts or cleaning the I trimmer WARNING: To avoid injury, ALWAYS turn off and disconnect the or making any adjustments. 1. Turn the trimmer over to provide 2. Remove the four screws access to trimmer head. from the base of the motor housing (see Fig. 4). 3.
ADJUSTING (Fig. 5) THE AUXILIARY HANDLE 1. The auxiliary handle comes on the shaft of the trimmer. Before operating the trimmer, make sure the auxiliary handle is tightly locked into position. 2. To adjust handle, pick a comfortable height and tighten. 3. To tighten, turn the auxiliary handle knob clockwise to lock the handle in position. Auxlnary handle knob Auxiliary handle Z_WARNING: To avoid injury, adjust the auxiliary handle for maximum control and balance.
ADJUSTING THE CUTTING ANGLE (Figs. 7 and 7a) t trimmer from the power outlet BEFORE installing or changing the I Z_WARNING:To avoid injury, ALWAYS turn off and disconnect the trimmer line or making any adjustments. I I Your trimmer has a 4-position tilting head that easily adjusts to the right working angle for optimum operator control and comfort. To adjust the trimmer head angle: 1. Press the black trimmer head adjustment button on the motor housing, 2.
REMOVING THE SPOOL (Fig. 8) z_ WARNING:To avoid injury, ALWAYS turn off and disconnect the trimmer from the power outlet BEFORE installing or changing the trimmer spool or making any adjustments. 1. Unplug the power cord and turn the trimmer over to access the cutting line. 2. To remove the spool housing retainer, press in on the two tabs located across from each other on the retainer. Lift up, remove and set to one side. 3. Remove Fig. 8 Spool Spool housing retainer spool from spool housing. 4.
REFILLING THE SPOOL (Fig. 10) If you do not purchase a new pre-wound spool, you may purchase .065-inch double-wound monofilament cutting line, (Craftsman Cutting Line 71-85822) to refill the spool that was provided with your trimmer. Cutting line is available at Sears stores or other Craftsman outlets. Fig. 10 Spool Section 1. Remove the spool from the trimmer head (see steps 1through 3 in "Removingthe Spool"). 2. Cut a length of cutting line to approximately 25 feet (7.6 m) long and fold it in half.
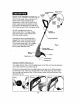
Turning Trimmer "ON" Fig. 11 1. Plug the trimmer's pigtail power cord into extension cord (see Fig. 11). 2. Squeeze trimmer. trigger Trigger Switch Handle Han_lle Rotation Button switch to start 3. The trimmer will stay "ON" as long as the trigger switch is squeezed. Turning Trimmer "OFF" 1. Release the trigger switch to turn trimmer "OFF". 2. Allow at least 5 seconds for the cutting spool (line) to stop rotating.
EXTENDING THE CUTTING LINE (Fig. 14 and 15) During operation, cutting lines shorten due to normal wear. For greater convenience and efficiency, your trimmer has been equipped with a bump feed head that allows you to simply bump the trimmer head to extend the cutting lines while the trimmer is operating. 1. While the trimmer is on and spinning, gently bump the spool housing on a firm surface (hard ground or sidewalk). This should release additional cutting line from the spool. 2.
OPERATING TIPS , Before each use make sure the protective guard is tightly installed. Tighten the guard screws, but DO NOT over tighten. 2. Be sure to check the auxiliary handle before each use, to make sure it is firmly tightened. 3. Before trimming, inspect the area for string, wire, branches, rocks, toys, or other objects that could be entangled in or thrown by the cutting line. 4.
z_WARNING:To avoid injury, ALWAYS turn off and disconnect the trimmer from the power outlet BEFORE installing line, cleaning the trimmer or making any adjustments, I GENERAL MAINTENANCE Keep your trimmer clean and in good repair for maximum long-lasting performance; Before each use, inspect the switch and cord for damage. Check for damaged, missing, or worn parts.
CUTTINGLINE Replace the cutting line ONLY with nylon monofilament double-wound .065 line (Craftsman Cutting Line 71-85822). When winding your own spool, ALWAYS wind the line in the same direction as the arrow on the spool. SPOOL Replace spool with a new pre-wound spool (Craftsman Spool 71-85967).
WEEDWACKER ELECTRIC TRIMMER - MODEL NUMBER 172.74536 The Model Number will be found on the Nameplate. Always mention the Model Number in all correspondence regarding your tool, lo PartNo.
J / J
NOTES 24
Manual del operador Recortadora el ctrica Weedwacker de 4.0 Amp, 12 pulgadas Modelo No. 172.74536 z_PRECAUCION: Lea, comprenda y siga todas las Normas de Seguridad e Instrucciones de Funcionamiento de este manual antes de utilizar este producto. GARANTiA SEGURIDAD ENSAMBLAJE FUNCIONAMIENTO MANTENIMIENTO LISTA DE PIEZAS Sears, Roebuck and Co., Hoffman Estates, IL 60179 U.S.A. Visite nuestro sitio Web de Craftsman®: www.sears.
Garant[a ...................................................... Sfmbolos de seguridad ................................... Instrucciones de seguridad .............................. Desembalaje ................................................ Descripci6n ................. ;................................. Ensamblaje y ajustes ..................................... Funcionamiento ............................................. Mantenimiento ....................................................... Accesorios .....
La finalidad de los simbolos de seguridad es atraer su atenciSn a los posibles peligros. Los simbolos de seguridad y sus explicaciones merecen su detallada atenci6n y comprensi6n. Las advertencias de los simbolos por si mismas NO eliminan el peligro. Las instrucciones y advertencias que brindan no sustituyen las medidas adecuadas de prevenci6n de accidentes.
Ji KADVERTENCIA: Si esta recortadora el6ctrica se usa correctamente, se trata de una herramienta r_ipida,eficiente y de f6cil manejo. Si no se la usa de manera correcta o si no se siguen las precauciones indicadas, podria volverse una herramienta peligrosa. Para un trabajo seguro y agradable, SIEMPRE cumpla estrictamente con las normas de seguridad que se establecen en este manual.
SEGURIDADPERSONALcont. 4. ViSTASE adecuadamente, Se recomiendan mangas largas y pantalones largos. Use protecci6n ocular. La recortadora puede arrastrar objetos como piedras y hacerlos volar a velocidades r&pidas. Aseg_rese de que el cabello largo este arriba de la altura de los hombros. NO use ropas sueltas ni joyas. Mantenga su cabello, ropa y guantes alejados de las piezas en movimiento. La ropa suelta o el cabello largo puede quedar atrapado en las piezas en movimiento. 5. NO intente hacer demasiado.
SEGURIDADELF:CTRICA A ADVERTENCIA: No permita que los dedos hagan contacto con las terminales del enchufe mientras instala o quite el enchufe del tomacorriente, 1. Las herramientas con aislamiento doble est_n equipadas con un enchufe polarizado (una hoja es rods amplia que la otra).
CORDONES DE EXTENSION Utilice un cord6n de extensibn adecuado. Utilice SOLAMENTE los cordones autorizados per UnderwritersLaboratories(UL). Cualquier otrocable de extensi6n puede ocasionaruna caida en la tensi6nde linea resultando en p_rdida de potencia y recalentamiento de la herramienta.
SEGURIDADDELSERVICIO 1. Si alguna pieza de esta recortadora faltara, se rompiera, doblara, o tuviera una falla, o si algQn componente eldctrico no funcionara correctamente: DESCONECTE el interruptorde energia el_ctrica, quite el enchufe del generador y cambie las piezas faltantes, dafiadas o con fallas ANTES de reanudar el funcionamiento. 2. Los servicios de ajuste y reparaciones de las herramientas se deben realizar en un Centre de Reparaci6n y Piezas Sears.
NORMAS DE SEGURIDAD PARA LAS RECORTADORAS ELECTRICAS cont. 13. SIEMPRE guarde la recortadora bajo techo cuando no la usa. Se debe guardar en un lugar seco, en Io alto y asegurada de modo tal que est6 fuera del alcance de los niflos. 14. CUANDO ALARGA LA LINEA DE CORTE, tenga cuidado con la cortadora de Ifnea situada en el dispositivo protector. La cortadora es filosa y puede causar lesiones (ver pAgina 36, Fig. 4). 15.
Gatlllo del lnterruptor eot6n de rotaci6n de mango Mango auxl]lar FAMILIAR[CESE CON SU RECORTADORA/BORDEADORA (Fig. 2) Su recortadora de bordes cuenta con un motor el6ctrico a precisi6n y se debe conectar a una fuente de alimentaci6n de 120 voltios, 60Hz, CA SOLAMENTE (la corriente normal del hogar). La recortadora siempre se debe usar con un tomacorriente protegido con GFCI. NO haga funcionar esta herramienta con corriente continua (CC).
FAMILIARICESE CON SU RECORTADORA / BORDEADORA (Fig. 2) Esta recortadora de bordes tiene las siguientes caracteristioas: 1. Motor de 4.0 Amp, 8000 RPM (velocidad sin carga). Brinda potencia para recortar y bordear en aplicaciones de resistencia mediana. 2. El mango giratorio de 180 ° con empuSadora recortadora como bordeadora. La empu5adura de trabajo c6moda con vibraci6n reducida. 3.
I I recortadora NOTA: El DISPOSITIVO PROTECTOR antes de su uso. SE DEBE ANADIR al cabezal de la I I INSTALACION DEL DISPOSITIVO PROTECTOR y GUIA DE BORDE (Figs. 4, 4a y 4b) _ADVERTENCIA: Para evitar cualquier lesi6n, SIEMPRE apague y desconecte la recortadora del tomacorriente ANTES de Instalar piezas, de Ilmpiar la recortadora o de reallzar ajustes. 1. Volte6 la recortadora para acceder I I al cabezal de la recortadora. 2. Retire los cuatro tornillos de la base de la carcasa del motor (ver Fig.
AJUSTE DEL MANGO AUXILIAR (Fig. 5) 1. El mango auxiliar viene en el eje de la recortadora. Antes de usar la recortadora, aseg_rese de que el mango auxiliar est_ ajustado firmemente. 2. Para ajustar el mango, escoja una altura que le queda c6moda y apriete. 3. Para apretar, gire la peritla del mango auxiliar en el sentido contrario alas agujas del reloj para ajustar el mango en su posici6n correcta.
AJUSTE DEL ANGULO DE CORTE (Figs. 7 y 7a) z_ADVERTENCIA: Para evitar cualquier lesibn, SIEMPRE apague y desconecte la recortadora del tomacorriente ANTES de instalar o cambiar piezas o de realizar ajustes. Su recortadora tiene un cabezal inclinable en 4 posiciones que se ajusta f&cilmente al &ngulo de trabajo adecuado para un control de funcionamiento y confort 5ptimos. Para ajustar el #,ngulo del cabezal de la recortadora: 1.
EXTRACCI(_N DE LA BOBINA (Fig. 8) /h ADVERTENCIA: Para evitar cualquier lesibn, SIEMPRE apague y desconecte la recortadora del tomacorriente ANTES de instalar o cambiar piezas o de realizar ajustes. 1. Desenchufe el cord6n el6ctrico y volte_ la recortadora para acceder a la linea de corte. 2. Para quitar el are de tope de la carcasa de bebina, presione las dos lengeetas situadas una frente a la otra en el are de tope. Lev&ntelo, retirelo y ap_rtelo hacia un costado. I Fig.
RELLENODE LA BOBINA(Fig. 10) Si no compra una nueva bobina devanada, puede adquirir una linea de corte de monofilamento de dos arrollamientos de 0.065 pulgadas, (Linea de corte Craftsman 71-85822) para rellenar la bobina que se proporcion6 con su recortadora. La linea de corte est,, disponible en las Tiendas Sears u otros centros de venta Craftsman. Fig. 10 Bobina Secclbn inferior 1. Retire la bobina del cabezal de la recortadora (ver pasos 1 a 3 en "Extracci6n de la bobina"). 2.
Encendido de la recortadora Fig. 11 1. Enchufe el cord6n el_ctrico en espiral en el cord6n de extensi6n (ver Fig. 11). Mango de gatUlo del interruptor Bot6n de rotaci6n de mango 2. Apriete el gatillo del interruptor para hacer funcionar la recortadora. 3. La recortadora permanecera, en posici6n "ON" siempre y cuando el gatillo del interruptor este siendo apretado. Apagado de la recortadora 1. Suelte el gatillo del interruptor para apagar la recortadora. 2.
EXTENSION DE LA LINEA DE CORTE (Fig. 14 y 15) Durante el funcionamiento, las lineas de corte so acodan per el use normal. Para una mayor conveniencia y eficiencia, su recortadora ha sido equipada con un cabezal de alimentaci6n por golpes que le permite simplemente golpear e[ eabezal de la recortadora para extender Las [[neas de corte mientras usa la recortadora. 1.
CONSEJOS PRACTICOS PARA UN BUEN FUNCIONAMIENTO 1. Antes de cada uso, asegt_rese de que el dispositivo protector este instalado firmemente. Ajuste los tornillos del dispositivo protector, pero NO los ajuste excesivamente. 2. Aseg_rese comprobar de inspeccionar el mango auxiliar antes de cada uso, para que est,. ajustado firmemente. 3.
i desconecte la recortadora ] _ADVERTENCIA: de limpiar la recortadoraParao MANTENIMIENTO del tomacorriente ANTES de instalar la linea, evitar cualquier lesi6n, SIEMPRE apague y de realizar ajustes. I I GENERAL Mantenga [a recortadora limpia yen buen funcionamiento para un rendimiento 6ptimo y de larga duraci6n. Antes de cada uso, inspeccione el interruptor y el cord6n para detectar la presencia de algL_n daSo. Asegt_rese de que no hayan piezas daSadas, faltantes ni gastadas.
L[NEA DE CORTE Reemplace la linea de corte SOLAMENTE con una linea de dos arrollamientos de monofilamento de nylon de 0.065 pulgadas (Linea de corte Craftsman 71-85822). AI devanar ]a bobina, StEMPRE devane la linea en la misma direcci6n que la flecha que aparece en la bobina. BOBINA Reemplace la bobina con una nueva bobina devanada La linea de corte y bobinas est&n disponibles de venta Craftsman. (Bobina Craftsman 71-85967).
RECORTADORA ELECTRICA WEEDWACKER - MODELO NUMERO 172.74536 El numero de modelo se encuentra en la place de informaci6n. Siempre mencione el nQmerode modelo en cualquier correspondencia que se refiera a su herramienta. Plaza No. 4_ O_ Descripcibn Cantidad Pieza No.
\ \ 108- --2O
Your Home For repair-in your home-of all major brand appliances, lawn and garden equipment, or heating and cooling system, no matter who made it, no matter who sold it! For the replacement parts, accessories and owner's manuals that you need to do-it-yourself• For Sears professional ............... installation of home appliances and items like garage door openers and water heaters ............... 1 800 4 MY HOME ® ............................ .........